
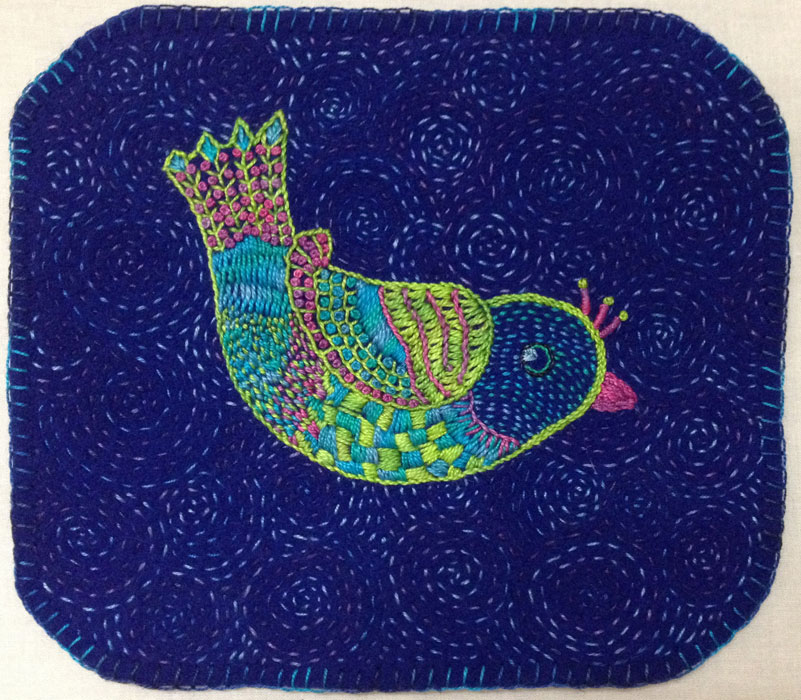
Embroidered Bird #2 by Laura Wasilowski
In 13 steps make a free-stitched bird like this. Woolly Bird is hand embroidered on wool using techniques from my book Joyful Stitching: Transform Fabric with Improvisational Embroidery. You can use any colors you like. We are winging it!
Supplies Needed:
- A 7″ or 8″ square of wool
- Size 8 threads in these colorways: White (or light value color) and light green, light blue, pink.
- Size 12 threads in these colorways: Black, white, and light purple.
- Print out this PDF of the Woolly Bird Pattern or draw your own bird shape.
- Tracing paper
- Straight pins
- Black fine point marker
- Sizes 3 or 4 and size 5 hand embroidery needles
 Step #1
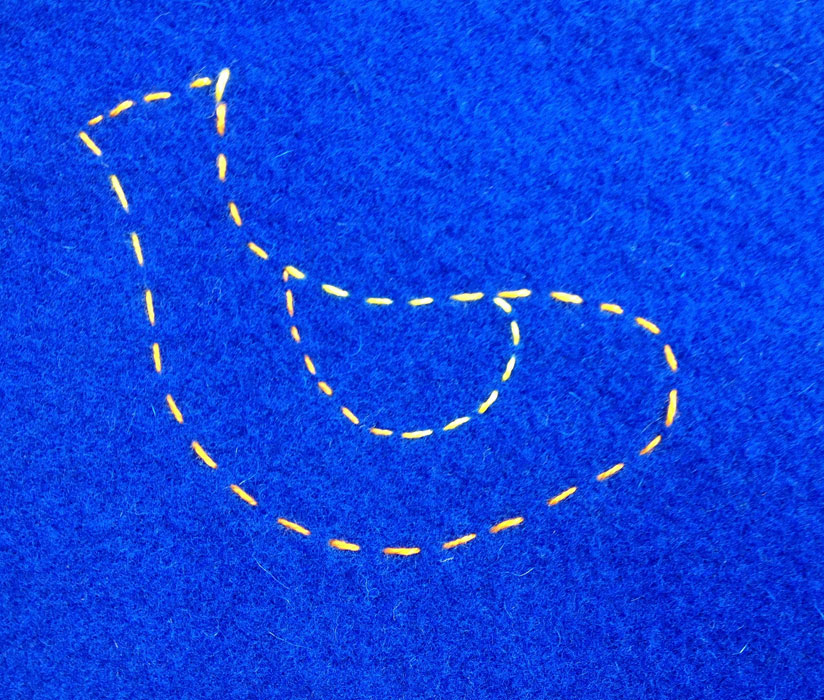
- Follow the instructions on the print out of the Woolly Bird Pattern and stitch an outline of the bird shape on the wool using a Running Stitch. (If you’re drawing your own bird, think of a bird shape as a quarter moon shape with one tip of the moon rounded for the head and the other tip squared off for the tail.)
- Use a thread color that contrasts with the background fabric and in a color you won’t be using to outline the bird.
- Stitch with a size 3 or 4 embroidery needle.
- If you don’t like the shape you’ve stitched, rip out the stitches and start again.
 Step #2
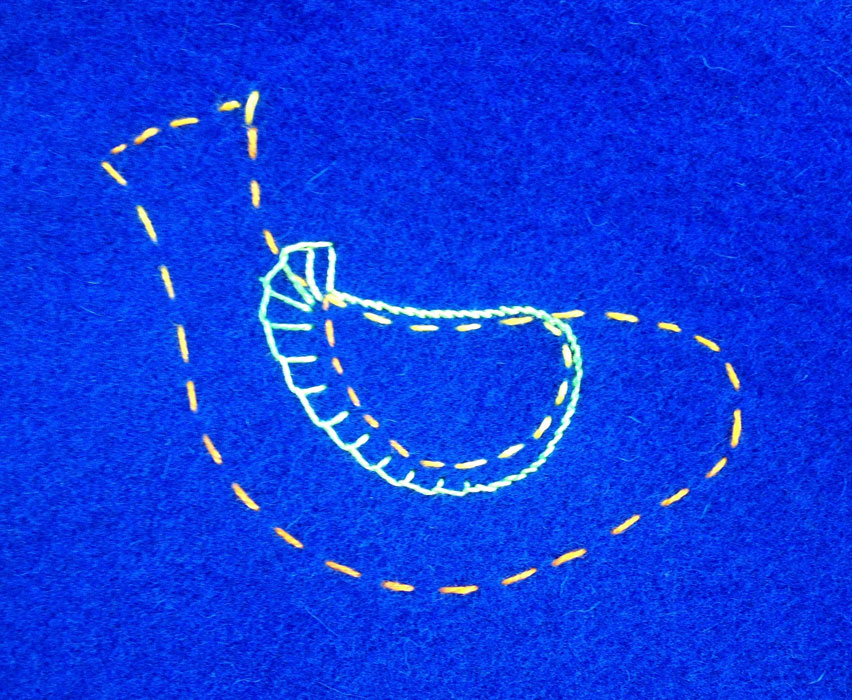
- Use a Size 8 pearl cotton and size 3 or 4 embroidery needle.
- Stitch an Outline Stitch around the top and front of the wing following the lines of the Running Stitch.
- Stitch the wing tip feathers with a Blanket Stitch. Vary the width of the Blanket Stitch on the wing tip so the feathers appear to get longer at the tip.
 Step #3
- Use a Size 8 pearl cotton and size 3 or 4 embroidery needle.
- Stitch an Outline Stitch around the head and body of the bird following the lines of the Running Stitch.
- Stitch a few long Blanket Stitches on the end of the tail for tail feathers.
- Remove the Running Stitches to reveal the neatly outlined shape of the bird.
 Step #4
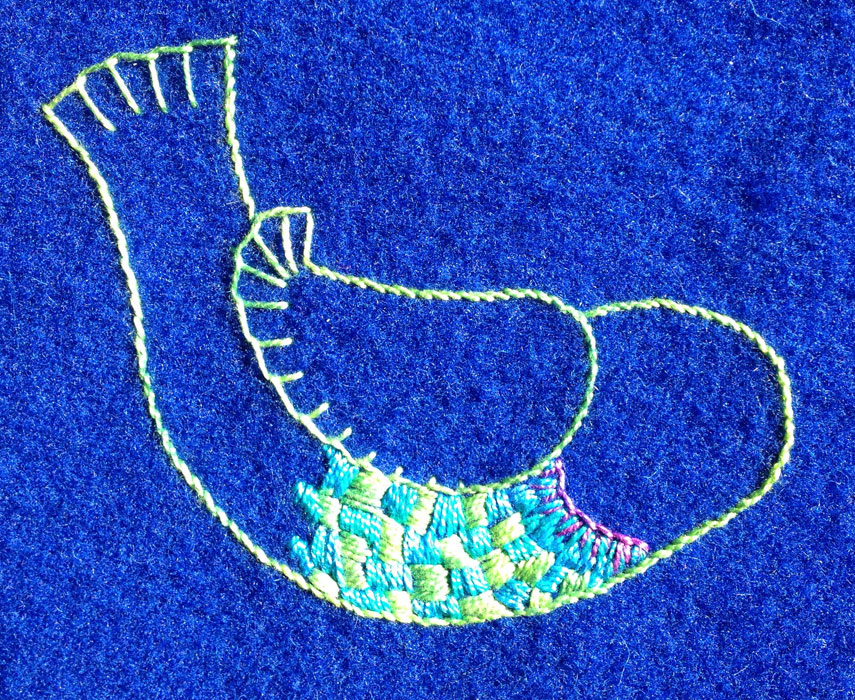
- Use Size 8 pearl cotton threads in different colorways and size 3 or 4 embroidery needles to make the neck ring.
- Stitch a Blanket Stitch to make the arc of the neck.
- Stitch a few Straight Stitches in a different thread color between the tines of the Blanket Stitch.
 Step #5
- Select two different Size 8 pearl cotton thread colors and use a size 3 or 4 embroidery needle to make the belly of the bird.
- Stitch a row of Satin Stitches down the lower edge of the neck ring to fill it in.
- Stitch Satin Stitches that measure about ¼” long from the neck to a midway point on the lower wing.
- Alternate the thread colors and lay the Satin Stitches perpendicular to the opposite color to fill in the bird belly.
- This bird has 7 vertical rows of Satin Stitches Your bird belly size may vary.
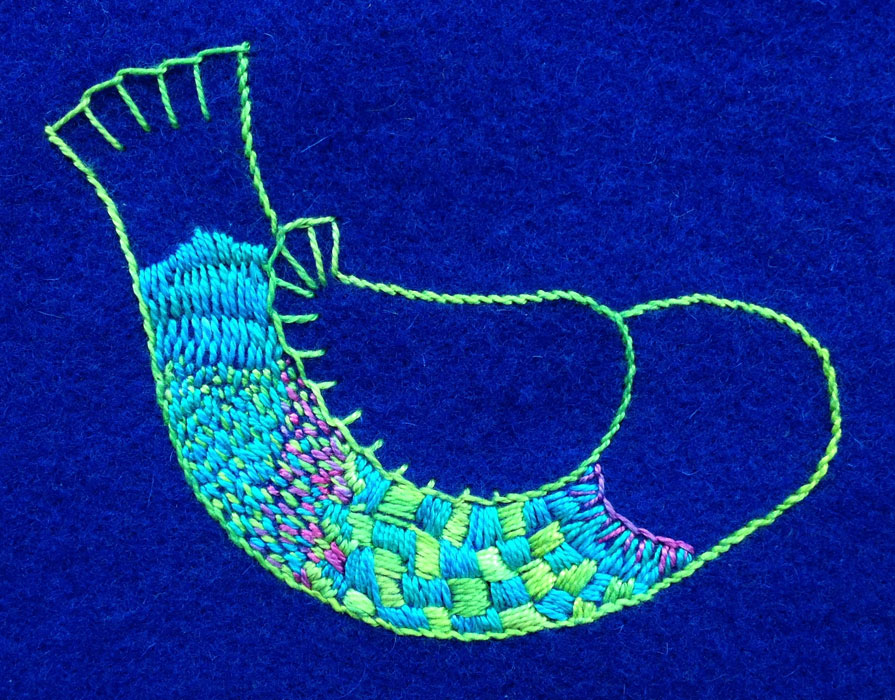 Step #6
- Use Size 8 pearl cotton threads in different colorways and size 3 or 4 embroidery needles.
- Stitch Straight Stitches in parallel lines from the belly up to the tail area of the bird.
- Mix the thread colors for more interest.
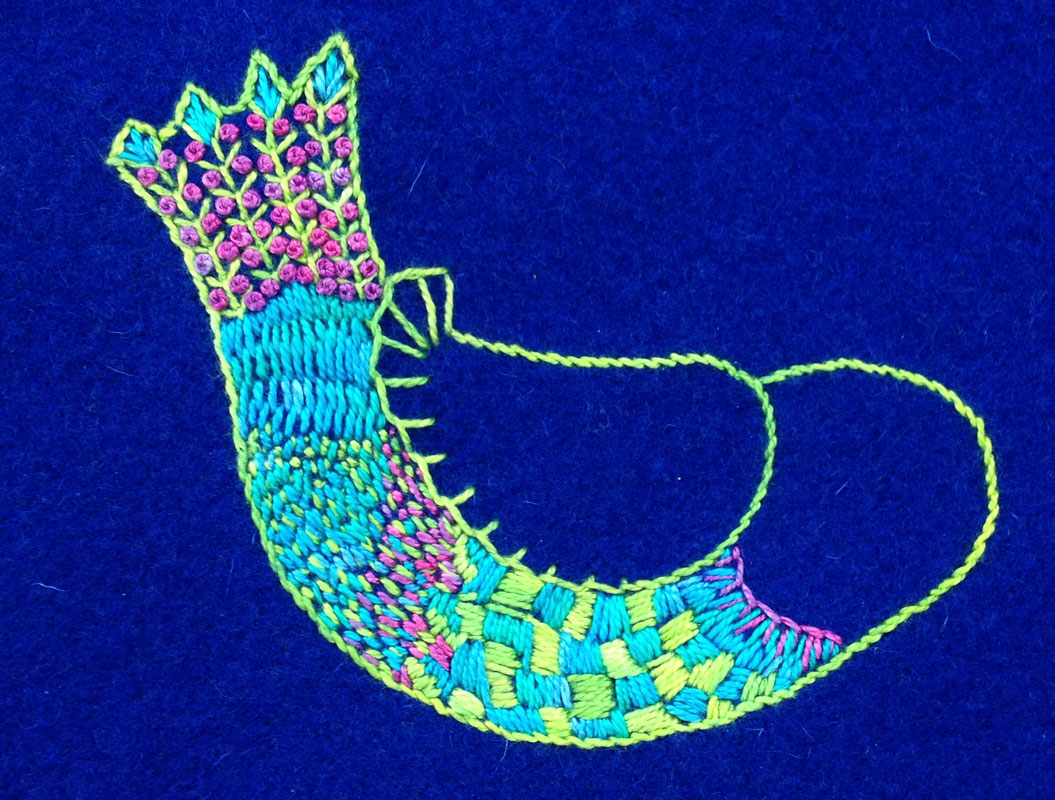
Step #7
- Use Size 8 pearl cotton threads in different colorways and size 3 or 4 embroidery needles.
- Stitch 4 rows of Fern Stitches from the tip of the tail feathers back to the Straight Stitches on the bird’s body.
- Add French Knots between the spars of the Fern Stitch.
- Fill in the tail points with Straight Stitches.
Step #8
- Use a Size 8 pearl cotton thread and size 3 or 4 embroidery needle.
- Stitch four rows of the Lazy Daisy Stitch to make the wing cap.
- Stitch three rows of the Blanket Stitch to add more feathers to the wing tips. Place the Blanket Stitches so they touch the previous rows and make little boxes.
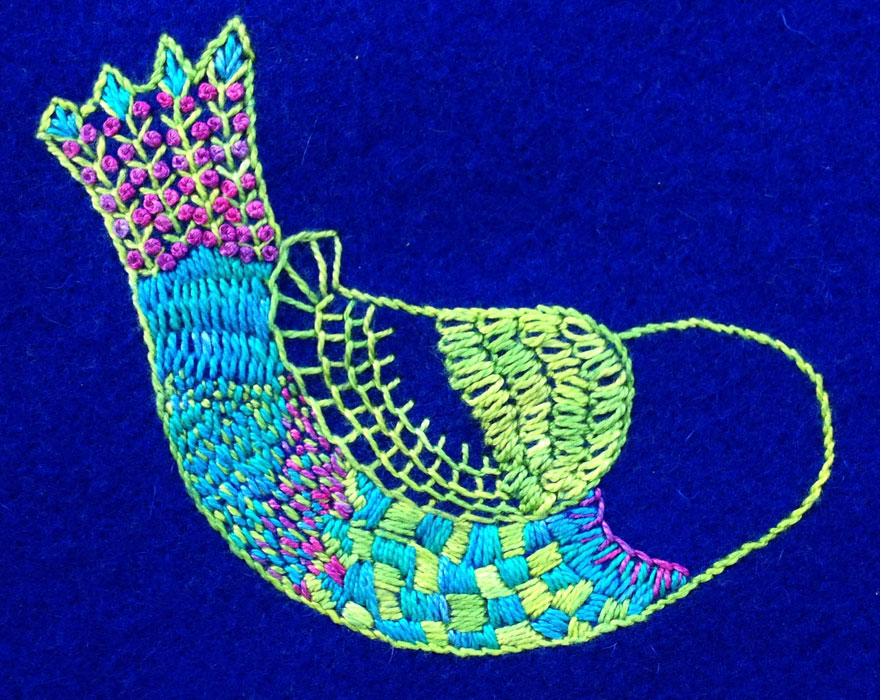
Step #9
- Use Size 8 pearl cotton threads in different colorways and size 3 or 4 embroidery needles.
- Stitch the Outline Stitch between the rows of Lazy Daisy Stitches on the wing cap.
- Fill in the Blanket Stitches on the wing tips with French Knots.
- Stitch Satin Stitches between the wing cap and wing tip.
- Stitch a ½” diameter circle for the bird’s outer eye (black thread is recommended) with a size 12 thread using the Outline Stitch.
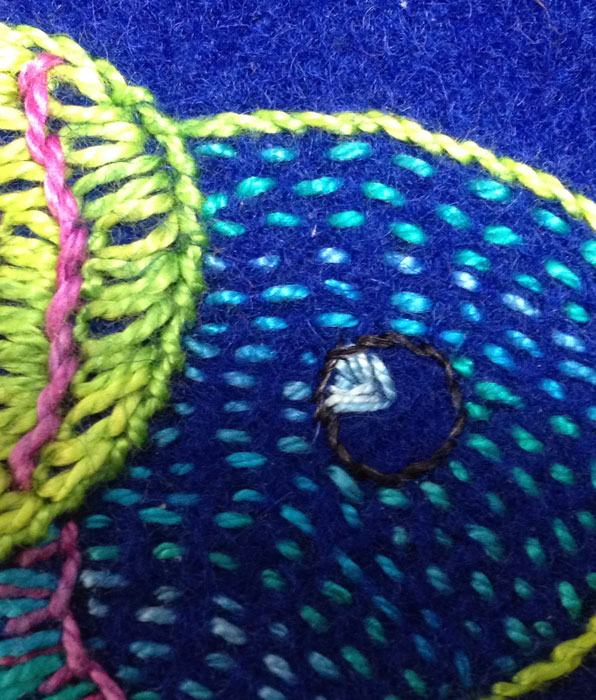
Step #10
- Use Size 8 pearl cotton threads in different colorways and size 3 or 4 embroidery needles.
- Use a white or light colored size 12 thread to make a triangle with closely packed Satin Stitches for the highlight in the bird’s eye.
- Fill in the eye with Satin Stitches using a darker thread unless the wool color you are using is dark like this example.
- Stitch Running Stitches across the head to fill in the bird’s head.
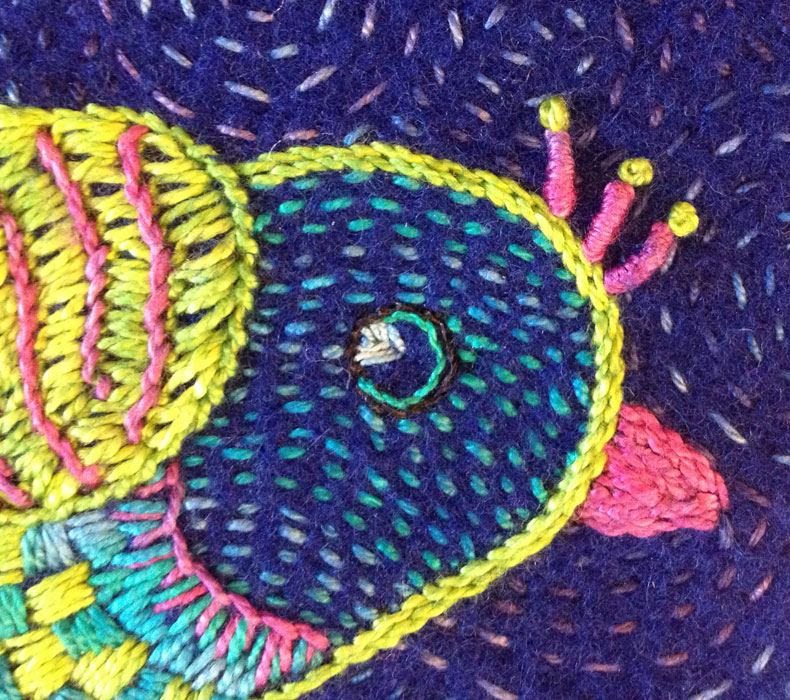
Step #11
- Use Size 8 pearl cotton threads in different colorways and size 3 or 4 embroidery needles.
- Stitch another row of Outline Stitches inside the bird’s eye and around the outside edge of the bird’s head to make them stand out if necessary.
- Stitch Outline Stitches in tight rows to make a triangle for the beak.
- Stitch three Bullion Knots with French Knots at the tip across the bird’s head to make the crest.
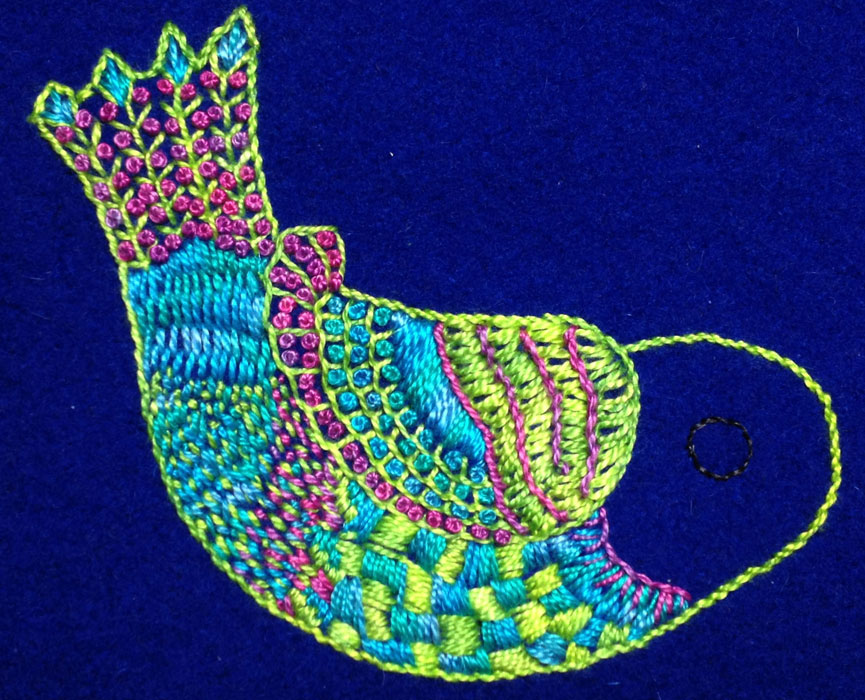
Step #12
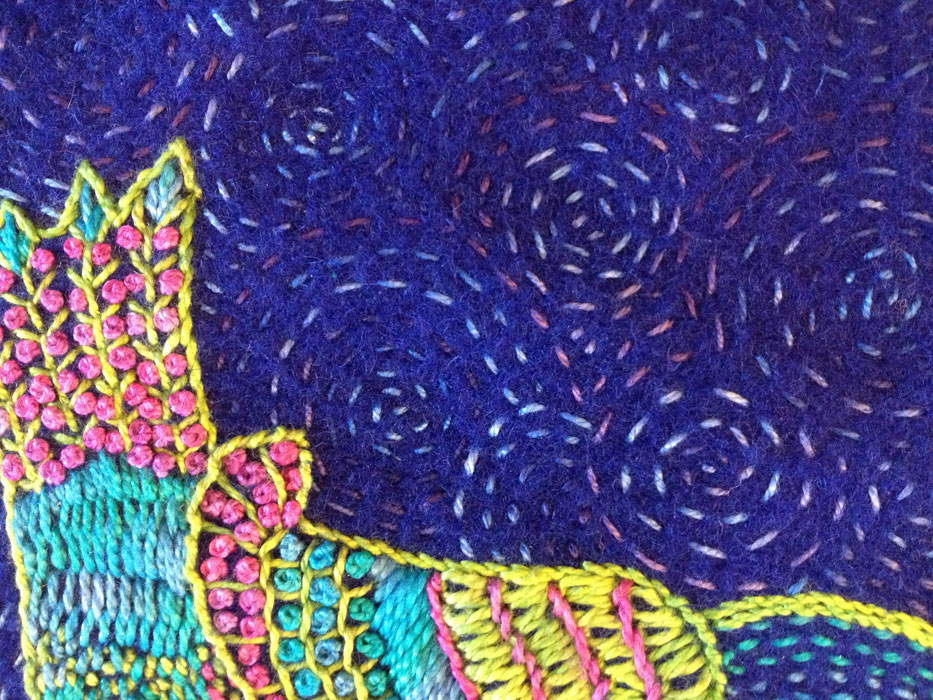
- Use a Size 12 pearl cotton thread and size 5 embroidery needle.
- Stitch the background fabric with swirls of the Running Stitch for a Starry Night kind of look. (Thank you Vincent Van Gogh!)
Embroidered Bird #2 by Laura Wasilowski
Step #13
- Use a Size 8 pearl cotton thread and size 3 or 4 embroidery needle.
- Stitch the Blanket Stitches around the edges of the wool.
- Enjoy your new Woolly Bird!