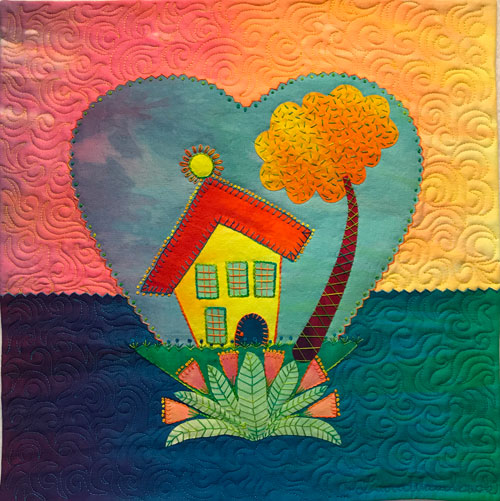
Home, Sweet Home by Laura Wasilowski
Ah, how good to be in my Home, Sweet Home! Now that the closets are free of long lost socks and enough dust bunnies to start a rabbit farm, it’s time to start another stitch-along project.
Won’t you join me?
We’re making this sweet little fused quilt called Home, Sweet Home. It measures about 12″ x 12.5″. We start by learning how to fuse the fabrics for the design, then move on to constructing the quilt top, adding hand embroidery, and finishing it with a pillowcase binding.
(Note that directions are first given on the Artfabrik blog and then added to the Home, Sweet Home Tutorial page as we go.)
Step #1

My version of Home Sweet Home is made with hand-dyed fabrics but you can use any cotton fabric you like as your canvas. (See a Note about Fabric Choices below.) Click here for a Home Sweet Home Stitch Kit. The stitch kit includes pre-fused fabrics for the quilt top only and pearl cotton threads for hand embroidery.
Or assemble the following items:
- 8″ x 13″ light yellow to pink for top background
- 6″ x 13″ blue/green to purple for bottom background
- 8″ x 10″ light blue to light purple for sky
- 4″ x 4″ yellow for house and house dot
- 4″ x 5″ red orange for roof
- 1″ x 5″ light blue for windows
- 1″ x 1″ blue for door
- 3″ x 7″ green for grass
- 4″ x 5″ light green for leaves
- 4″ x 4″ orange for tree top
- 5″ x 5″ purple for tree trunk
- 13″ x 13″ backing fabric
- 2 yards of fusible web (Wonder Under #805 recommended)
- 13″ x 13″ batting (Hobbs Heirloom Premium 80/20 Batting or wool batting recommended)
- Size 12 pearl cotton embroidery thread
- Size 4 or 5 hand embroidery needle
A Note about Fabric Choices Fabrics with no finish like 100% cotton hand-dyed and batik fabrics work best for raw edge fusing because the color goes through the fabric. (Fused elements from printed fabrics with a white back will show a white edge when cut.) Fabrics with a higher thread count fray less when cut. Wash your fabric to remove any starch or sizing before fusing and do not use fabric softener.
Other items needed:
- Black Sharpie Fine Point marker or lead pencil
- 1 yard parchment or baking paper (optional)
- Rotary cutter, mat, and ruler
- Decorative pinking rotary cutter blade or pinking shears (optional but helpful)
- Machine quilting thread
- Click here to download and print out the Home Sweet Home pattern as a Word document. Or click here to download and print out the Home Sweet Home pattern as a PDF.
Stay tuned for your first set of directions. Meanwhile, what do you do with your odd socks?