
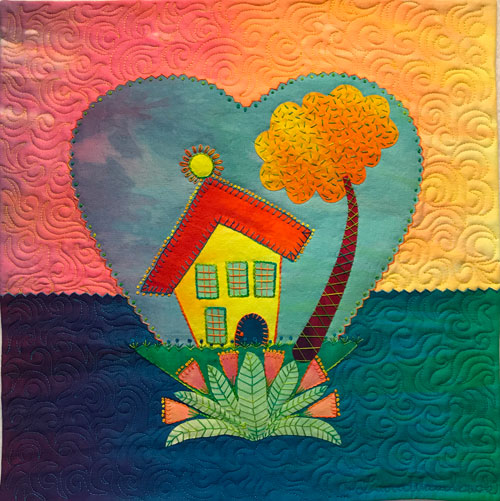
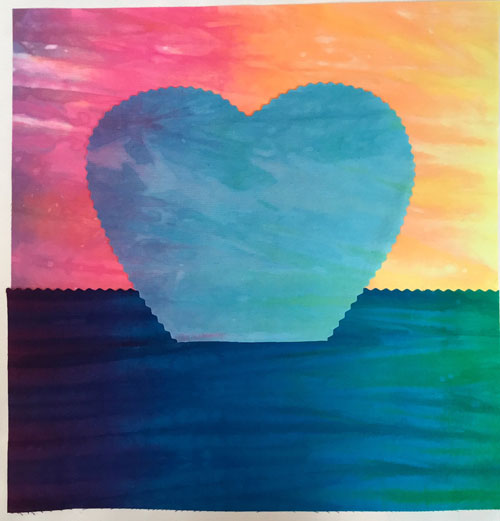
Home Sweet Home is a fused art quilt measuring about 12″ x 12.5″. It is hand embroidered and machine quilted. Thank you for joining me!
Step #1

Assemble the following items:
- 8″ x 13″ light yellow to pink for top background
- 6″ x 13″ blue/green to purple for bottom background
- 8″ x 10″ light blue to light purple for sky
- 4″ x 4″ yellow for house and house dot
- 4″ x 5″ red-orange for roof
- 1″ x 5″ light blue for windows
- 1″ x 1″ blue for door
- 3″ x 7″ green for grass
- 4″ x 5″ light green for leaves
- 4″ x 4″ orange for treetop
- 5″ x 5″ purple for tree trunk
- 13″ x 13″ backing fabric
- 2 yards of fusible web (Pellon Wonder Under paper backed #805, Soft Fuse, or Misty Fuse used with parchment paper are recommended)
- 13″ x 13″ batting (Hobbs Heirloom Premium 80/20 Batting or wool batting recommended)
- Size 12 pearl cotton embroidery thread
- Size 4 or 5 hand embroidery needle
A Note about Fabric Choices Fabrics with no finish like 100% cotton hand-dyed and batik fabrics work best for raw edge fusing because the color goes through the fabric. (Fused elements from printed fabrics with a white back will show a white edge when cut.) Fabrics with a higher thread count fray less when cut. Wash your fabric to remove any starch or sizing before fusing and do not use fabric softener.
Other items needed:
- Black Sharpie Fine Point marker or lead pencil
- 1 yard parchment or baking paper (optional)
- Rotary cutter, mat, and ruler
- Decorative pinking rotary cutter blade or pinking shears (optional but helpful)
- Machine quilting thread
- Click here to download and print out the Home Sweet Home pattern as a Word document. Or click here to download and print out the Home Sweet Home pattern as a PDF.
Step #2 Fusing the Fabric
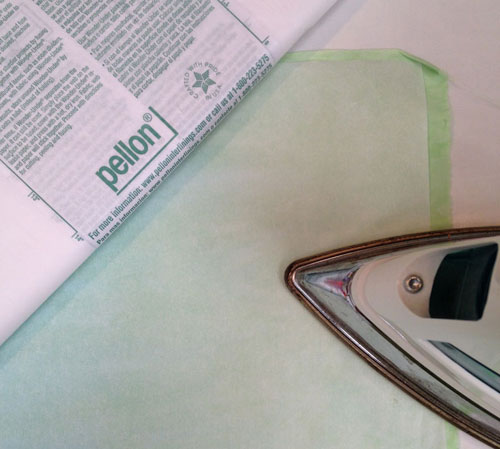
- Cut the fusible web slightly smaller than the fabrics for the quilt top. Do not cut fusible web for the backing fabric. Suggested fusible webs are: Pellon Wonder Under paper backed #805, Soft Fuse, or Misty Fuse (used with parchment paper). Please note that some other brands of fusible web are tacky and will be difficult to hand embroider.
- Place the fabric on the ironing surface then put the rough side or glue side of the paper on top. (If using Misty Fuse, place the web on the fabric and cover the web with parchment paper.)
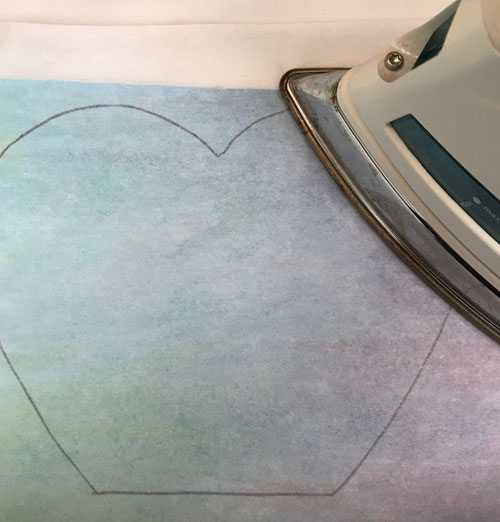
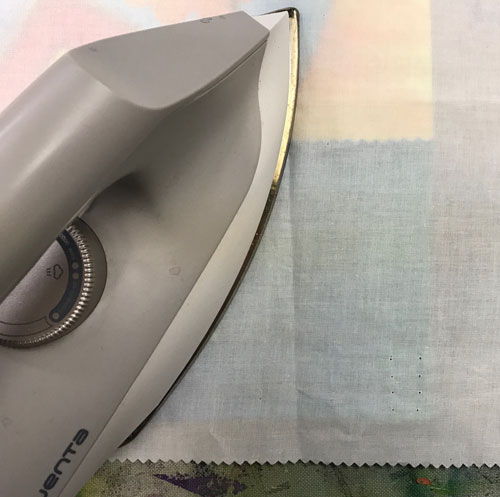
- Transfer the fusible web to the fabric using a hot (cotton setting), dry iron.
- Glide the iron across the paper from edge to edge for about 5 seconds in each spot. Go to the edge and beyond!
- Note that fabric that bubbles or ripples when fused will flatten out when the paper is peeled off.
- If the web separates from the paper, place the web on the fabric with release paper on top and fuse.
Step #3 Silicone Release Paper
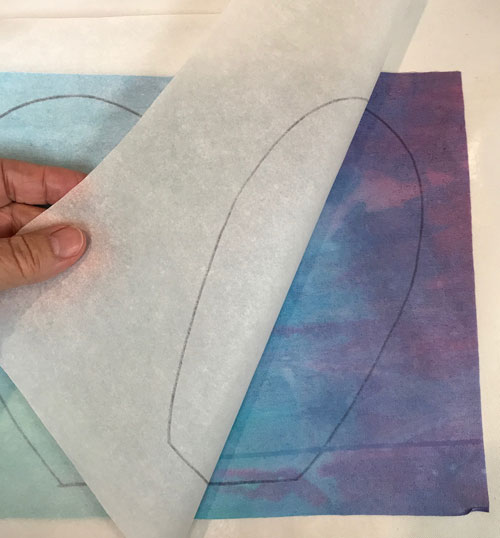
- Let the fabric and web cool 5- 20 minutes before removing the paper. The fused fabric should feel dry, not tacky.
- Before removing the paper, separate the fabric from the paper at one corner. Then trim the non-fused fabric off by following the paper’s edge. Peel the paper off without ripping it. Save the paper.
- The paper you’ve just removed is called silicone release paper. It has a silicone coating and can be used to 1. assemble fused collages and compositions, 2. build design elements as a unit, 3. store fused fabric scraps, 4. place on top of compositions to protect them from dirty irons and, 5. transfer shapes to fused fabrics.
- Parchment (or baking) paper is similar to release paper and can be used in place of release paper. Test the paper first by ironing a piece of fused fabric to it. The fabric should easily release or come off the paper.
- Either side of silicone release paper or most parchment papers are usable for fusing. Please note, however, that on some versions of fusible web only the “shiny” side of the paper is usable as release paper.
- Both parchment paper and release paper can be used for assembling quilt tops, fused collages, storing fused scraps, protecting the ironing board, and pattern transfer.
- Peel the paper off the fused fabric before cutting shapes. Paper dulls scissors and cutting blades. Also fabric edges may fray if paper is peeled off a cut shape.
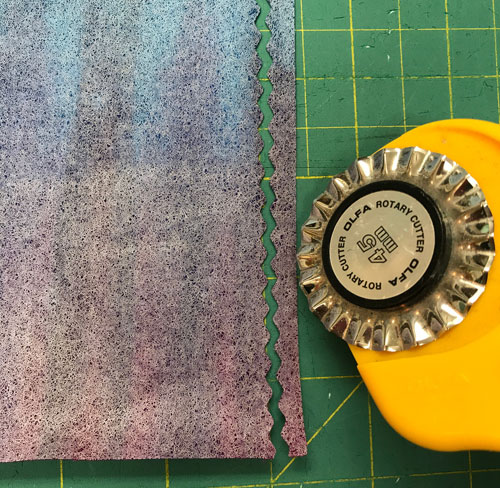
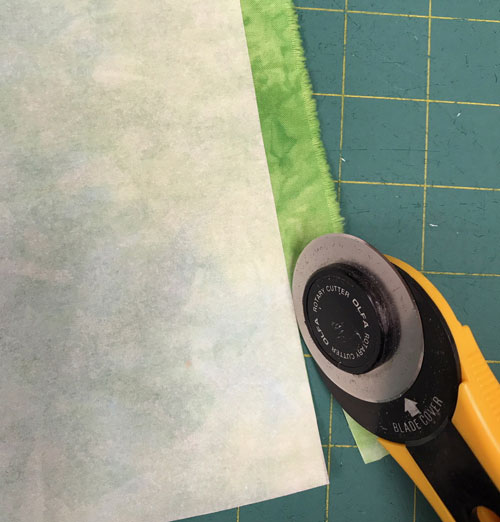
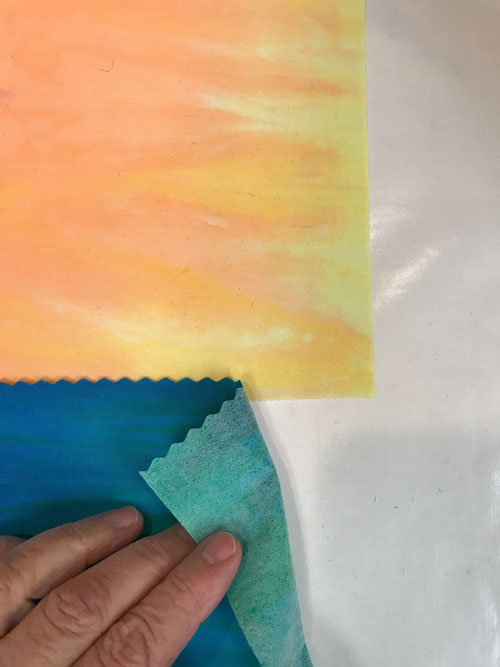
- Trim 1/4″ from the long edge of the bottom background fabric.
- Use a pinking blade in your rotary cutter or pinking shears. (See: How to Load Decorative Blades onto Your Rotary Cutter.)
- If you don’t have a decorative cutter, just make sure the edge is trimmed neatly without any fraying of the fabric.
- Place parchment paper or silicone release paper on the ironing board. The paper should measure about 13″ x 13″ or larger. You can overlap sheets of paper to make the 13″ square. It’s important to have the paper underneath the fabrics before fusing or the fabric will fuse or glue to your ironing board.
- You can also use a Teflon ironing sheet as seen in this photo.
- Place the top background fabric horizontally on the paper.
- Overlap the pinked edge of the bottom background fabric 1/4″ onto the bottom edge of the top background fabric.
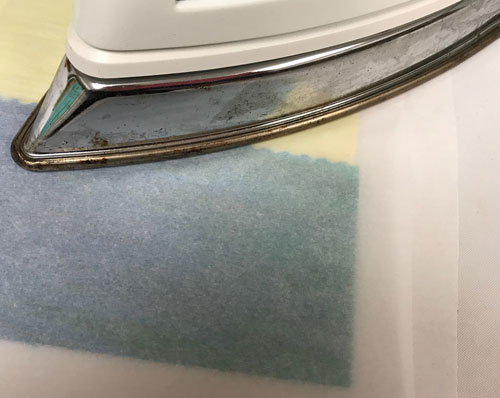
- Cover the fabrics with another piece of silicone release paper and fuse-tack into place with a hot dry iron. Cover the fabric to keep it clean. Irons are filthy things.
- This is important: Remember, fusible web is a heat-activated glue. Too much heat applied repeatedly for too long burns the glue into the fabric. Over-fusing changes the fabric color, makes the fabric stiff, makes it difficult to stitch, and the fabric will no longer adhere to other fabrics.
- Fuse-tacking or exposing the glue to only 5 seconds of heat at a time is best. Once the composition is complete you will steam set the fabric to batting for 10 seconds bonding everything into place.
- Click here to download and print out the Home Sweet Home pattern as a Word document. Or click here to download and print out the Home Sweet Home pattern as a PDF.
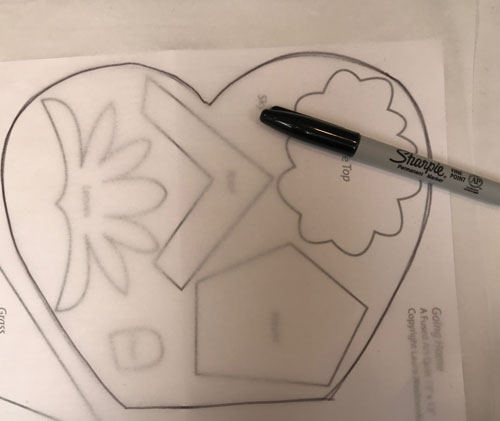
- Place silicone release paper or parchment paper on the sky pattern.
- Trace the pattern shape with a black Sharpie marker or a lead pencil.
- Do not write or add numbers inside the shape or the writing will transfer too.
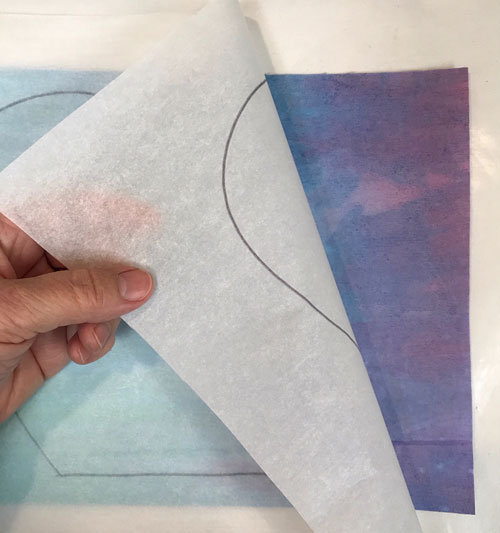
- Place the marker or drawn side of the release paper onto the glue or fused side of the fabric.
- Iron the paper in place for 5 seconds with a hot iron.
- After the fabric cools, remove the paper from the fabric.
- The ink from the tracing will transfer to the glue. The fabric shape will also face the same direction as the pattern shape was drawn. No need to flip the shape.
- It’s a miracle!

- Cut out the shape just inside the black line with a pinking blade or pinking shears.
Step #7
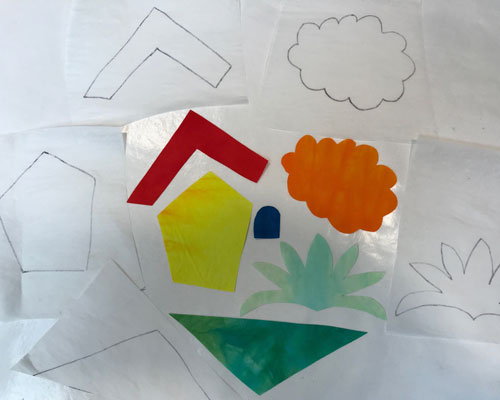
- Repeat the steps above to transfer the house, roof, door, grass, leaves, and treetop pattern shapes to their respective fabrics.
Step #8
- Center the sky onto the background fabrics about 2″ down from the top edge.

- Cover the sky with parchment paper or silicone release paper and fuse-tack into place.
- Remember fuse-tacking is exposing the fusible web to a short amount of heat, 5 seconds, from the iron (set at the cotton setting).
Step #9

- Place the house on the lower edge of the sky about 1″ in from the left edge.
- Place the roof on the top of the house and overlap the house shape about 1/8″.
- Place the door on the bottom edge of the house about 1/4″ in from the right edge.
- Cover the sky and house with paper and fuse-tack into place.
Step #10

- Trim 1/4″ from the long edge of the grass fabric using a pinking blade or pinking shears.
- Center the grass shape with the pinked side up about 1/4″ over the lower edge of the sky.
- Free cut 4 windows measuring about 1/2″ x 3/4″. Place the windows vertically on the house.
- Free cut a dot measuring about 1/2″ across. Place the dot on the peak of the house.
- Cover the house and grass with paper and fuse-tack into place.
Step #11

- Place the treetop onto the sky. Cover with paper and fuse-tack into place.
- Clean your iron if necessary. For this next step, you can not use paper to cover the fabric. See: How to Clean an Iron
- Cut the tree trunk fabric on the bias to form 2 triangles. (Note: a bias cut fabric is cut at a 45-degree angle from the grain of the fabric or from corner to corner on a square piece of fabric to form 2 triangles.)
- Cut 1 strip measuring about 1/8″ wide and tapering to 1/ 2″ wide by 5″ long from the long or bias side of one of the triangles. Snip the 1/ 2″ wide end of the tree trunk into a curve.
- Fuse the tree trunk from the treetop to the grass by curving the trunk with one hand while fusing with the other.
Step #12

- Center the leaves on the lower point of the grass.
- Cut 6 triangles measuring about 1/2″ across by 1″ long to make the flowers.
- Place the flowers between the leaves. Cover the leaves and flowers with paper and fuse-tack into place.
Step #13
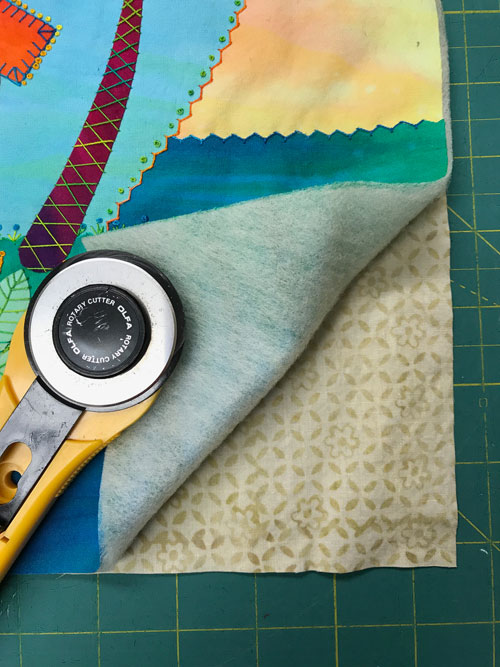
- Remove the quilt top from the paper. Place the glue side of the composition on to the non-scrim side of the batting. It is important the glue does not touch the scrim or you’ll get a rippley quilt. See How to Determine the Scrim Side of Batting.
- Cover the quilt and batting with a dry pressing cloth. Iron the quilt to the batting using a steam iron. Set the steam iron to the cotton setting and steam the top for 10 seconds in each spot to set the glue. Wiggle the iron so you don’t get the shape of the iron on the quilt top.
Step #14
- Add hand embroidery stitches through just the batting and quilt top layers Do not put the backing on the quilt yet.
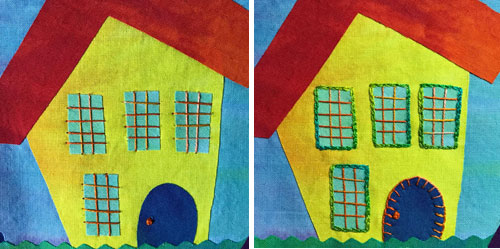
- Stitch straight stitches vertically and horizontally across each window to make the window panes. Use a size 12 thread (like Oranges) and a size 5 or 7 embroidery needle.
- Stitch a French Knot on the door to make the doorknob and stitch Blanket Stitches around the door using the same thread color as the windows.
- Stitch Chain Stitches around each window to outline them. Stitch right next to the window shape on the house fabric. Use a size 12 thread (like Lettuce).
Step #15
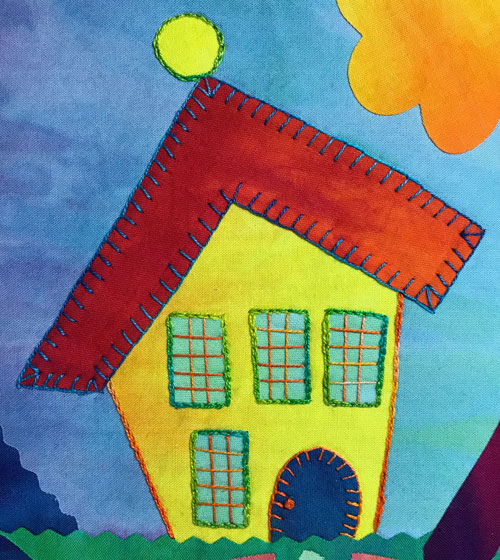
- Stitch Chain Stitches on each side edge of the house to outline the house. Use a size 12 thread (like Oranges).
- Stitch Blanket Stitches around the edge of the roof shape. Use a size 12 thread (like Degas Blue).
- Stitch Chain Stitches around the house dot to outline it. Use a size 12 thread (like Lettuce).
Step #16
- Stitch French Knots around the outside edges of the roof. Use a size 12 thread (like Butter) and a size 5 or 7 embroidery needle.
- Stitch Lazy Daisy Stitches around the dot on the house. Use a size 12 thread (like Oranges).
- Stitch a straight stitch inside each loop of the Lazy Daisies. Use a size 12 thread (like Lettuce).
Step #17
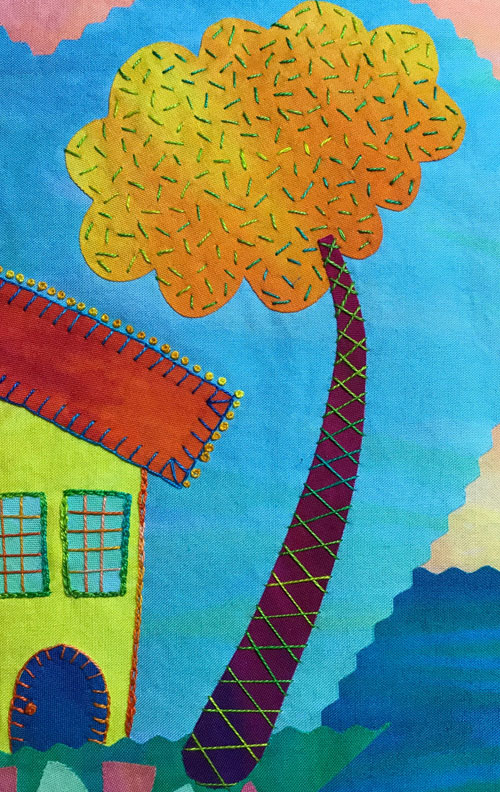
- Stitch Herringbone Stitches down the tree trunk from top to bottom. Use a size 12 thread (like Lettuce).
- Stitch Scattered Seed Stitches on the treetop using that same thread.
Step #18
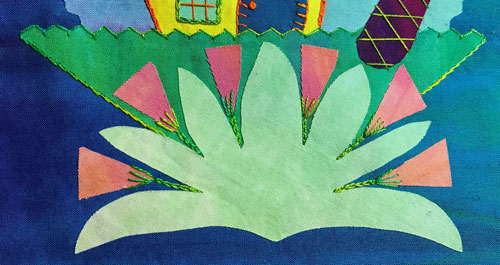
- Stitch Fly Stitches across the pinked edge of the grass and Stem Stitches down each side of the grass. Use a size 12 thread (like Lettuce).
- Stitch 3 straight stitches vertically at the base of each flower and stitch Chain Stitches from the base of the flowers to the leaves to make stems. Use that same color of thread.
Step #19
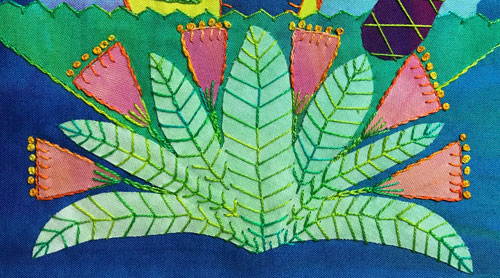
- Stitch Stem Stitches down each edge of each flower and stitch Blanket Stitches across the top of the flowers. Use a size 12 thread (like Butter).
- Stitch French Knots across the top of each flower using that same color of thread.
- Stitch Fern Stitches down each leaf from the tip to the base. Use a size 12 thread (like Lettuce).
Step #20
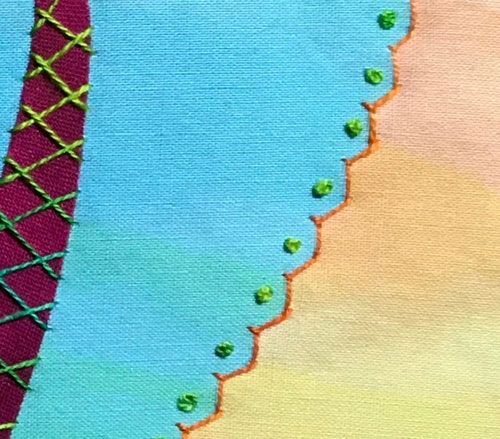
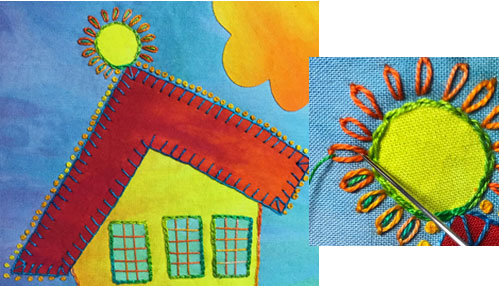
- Stitch Fly Stitches around the pinked edge of the sky. Use a size 12 thread (like Oranges).
- Stitch French Knots inside each pinked shape. Use a size 12 thread (like Lettuce).
Step #21
- Trim the quilt top square.
- Use one of the binding methods on the Tutorial Page. Or refer to the Pillowcase Binding directions and begin with Step #4.
Step #22
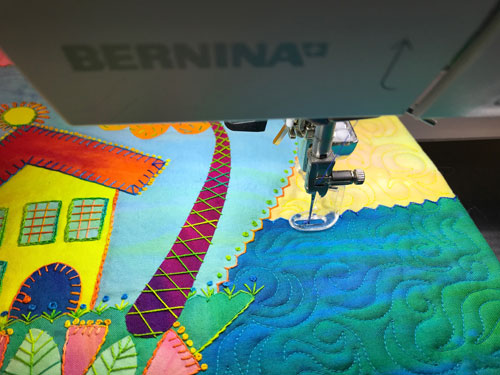
- Machine quilt the quilt using a titanium or chrome coated embroidery needle and free-motion stitching. (Please note that this step is optional. It is not necessary to machine quilt the piece.)
- To add free-motion stitching, drop the feed dogs on the machine and guide the needle around all the organic shapes in the design while moving the quilt.
- Add a hanging sleeve across the top part of the quilt if desired.
Congratulations! You did it! Please send me a photo of your artwork. I’d love to see it. Send to: laura at artfabrik.com