Simple Stitches that Surprise: Lazy Daisy

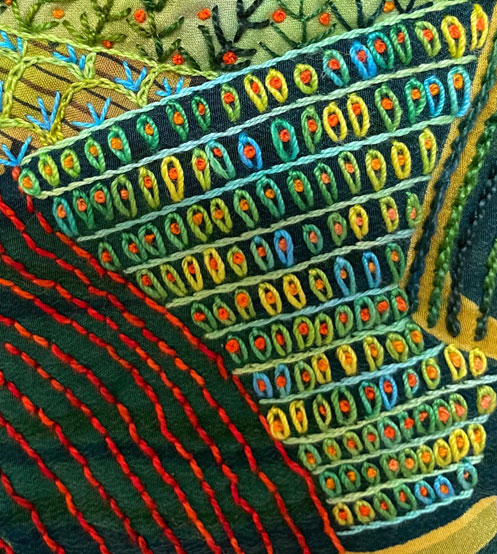
The Lazy Daisy stitch is often used to create flowers but it has the potential to create pattern on the surface of fabric too. Here you see rows of the Lazy Daisy separated by lines of the Stem Stitch. I’m using a size 12 Lettuce thread. Lettuce is a fresh green, turquoise, and chartreuse variegated thread.

If you make the loop of the Lazy Daisy stitch wide enough you can fill it in with a French Knot. This builds even more pattern on the fabric surface. These knots are made with a size 12 Oranges thread that offers high contrast with the dark green background fabric and fresh greens in the Lazy Daisy stitches. Isn’t this a beautiful pattern created with the Lazy Daisy stitch?

A Note about Fusible Web

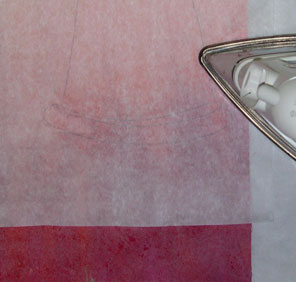
The fusible web I’m using for all the silk fabrics in this design is Misty Fuse. Misty Fuse fusible web is a very lightweight mesh of glue. When you apply it to shear fabrics the glue does not penetrate the silk and appear on the other side of the fabric like the heavier fusible webs used on cotton fabrics.

Misty Fuse does not come with paper. So you must use silicone release paper or parchment paper to transfer it to fabrics. (Please test parchment paper before using.) An added advantage to using Misty Fuse is that it is easy to stitch through. I recommend it highly.

Protect Your Mat from Decorative Blades

Are you using decorative blades in your rotary cutters? Decorative blades make wonderful embellished edges for your fused art quilts. They come in wave, scallop, and, my favorite, the delightful pinking blade

But beware! Decorative blades can damage your cutting mats. Here you see a cutting mat on the right that has been scored by decorative blades. See how the decorative blades have gouged into the mat?

When you cut with a decorative blade you have to push a little harder to cut cleanly into the fabric. This means the blade will etch into the mat and mess up your grid lines.

Save the grid! Flip that mat over and cut your fabric on the wrong side of the mat. You’ll save your mat and you can use a pinking blade to create fun fabric edges like these.

Check out how I’ve used the pinking blade to create this decorative fused binding here.

What Foot to Use for Collage Stitching

Welcome to my studio! I make fused art quilts with free-motion machine quilting. Every inch of the colorful fabrics used in my designs is covered with fusible web. And, as a precaution, I fuse more fabric than necessary to construct a new design.

This means I have lots of cut-aways or left over fused fabrics. I save these fabrics. Once fusible web is on a fabric, you can use it today or years from now. These oddly shaped fabrics also give me a palette of pre-fused colors to improvise with and often trigger new quilt ideas.

When I’m in a tidy-up mood, I like to build collages from my fused fabric scraps and use them in “color chip” quilts. Art quilts made with these chips have a lot of movement and cheerful color. But there is a trick to the free-motion stitching on this type of collage quilt made with many small snips of fabric. 

Here’s how I prepare my Bernina 750QE sewing machine for free-motion quilting on a collage quilt. (You may have to adapt the instructions to your machine.)

  • Drop the feed dogs on your machine.
  • Insert a straight stitch needle plate
  • Use a size 40 thread in the bobbin and top in your choice of color.
  • Use a chrome coated embroidery needle (best for fused fabrics). Size 14/90 recommended.
  • Use a closed quilting foot.

Why use this type of quilting foot? This foot has a wide, clear sole so you can see where you’re stitching. But most importantly, it is a closed foot. There are lots of raw edges on the fused collage you are stitching. These fabric edges can catch on the prongs of an open presser foot.

But with the closed quilting foot, the foot glides across the fabric surface and keeps those fabric edges flat as you stitch. Free-motion stitching with the closed quilting foot is slick and easy.