
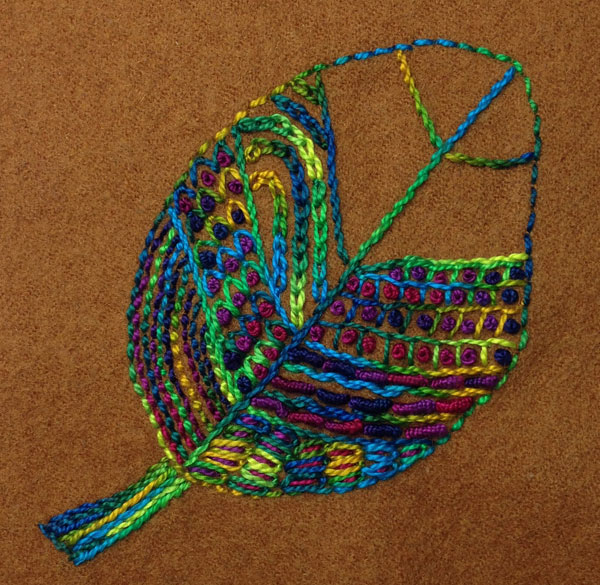
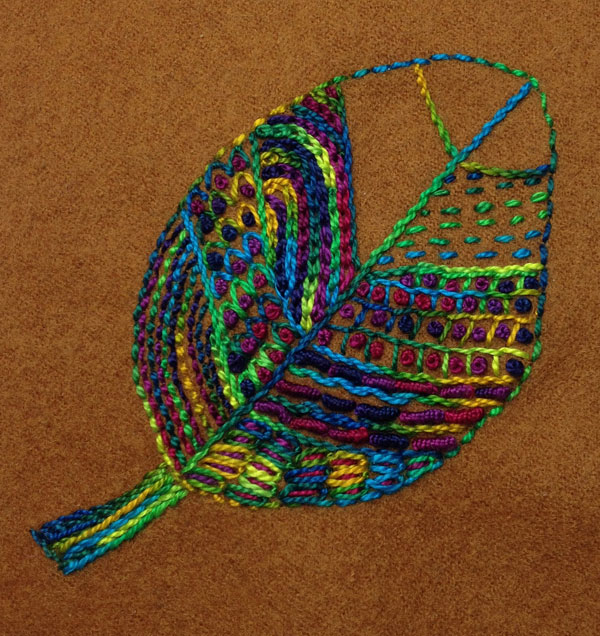
 Welcome to our Leaf on Wool Stitch Along!
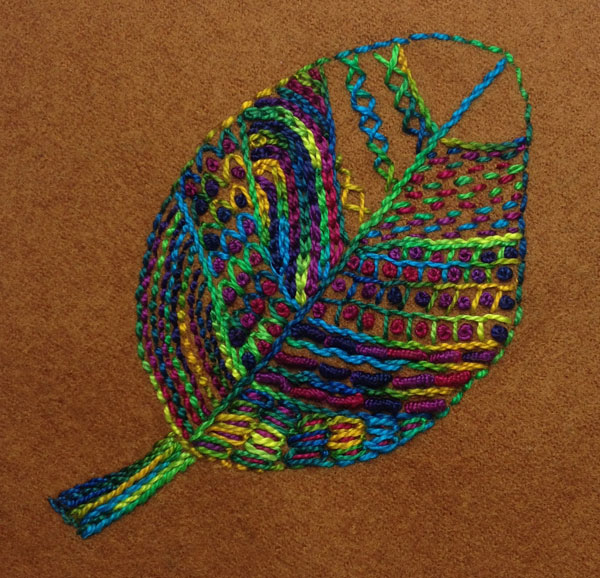
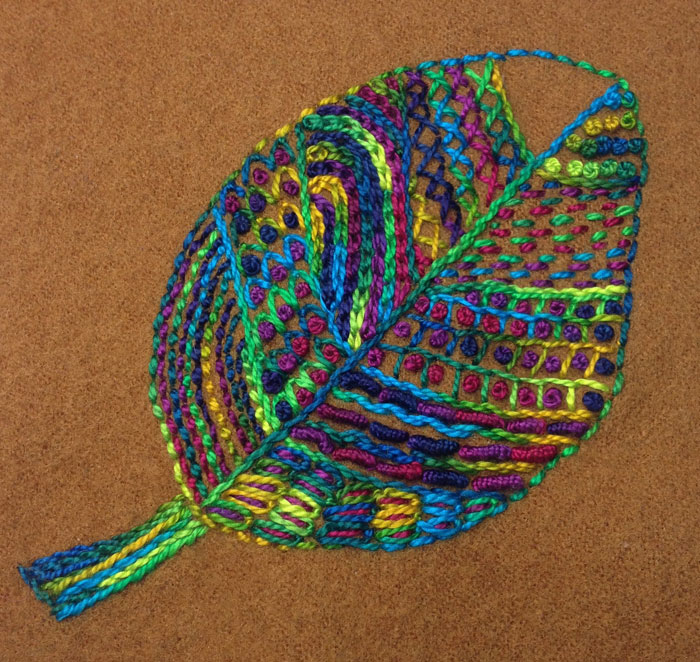
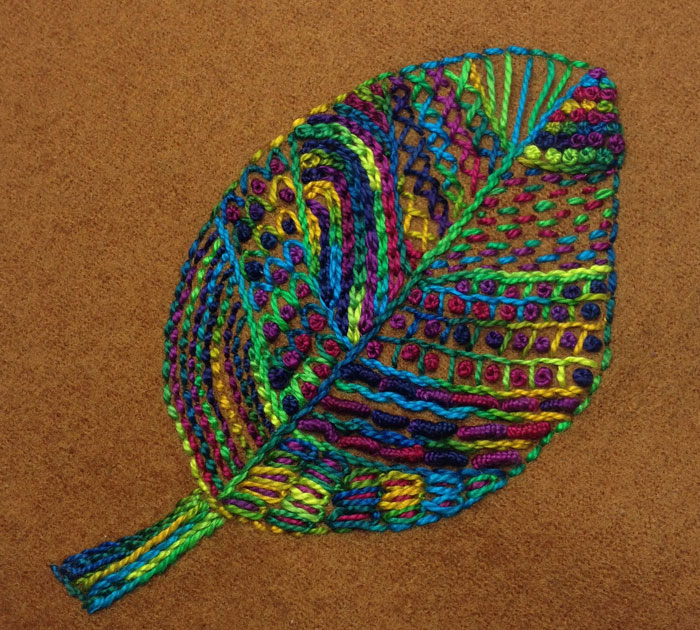
Leaf on Wool is an exploration of stitch combinations using only 2 variegated threads. This version is hand embroidered on wool using techniques from my book Joyful Stitching: Transform Fabric with Improvisational Embroidery. (You can also work on cotton, commercial felt, or silk.)
The written and illustrated directions for Leaf on Wool, are also found in Free-Form Hand Embroidery on Wool along with 4 other projects stitched on wool.

Dismantle an old wool garment and felt it.
Step 1: Felting the Wool
For this Stitch Along you’ll need a 5” or 6″ square of base fabric like 100% wool. (You can certainly work on cotton, commercial felt, or silk but I like the ease of stitching on wool.) Also, pure wool is ideal for felting. Felted wool has body and is easy to grip and stitch. You don’t need an embroidery hoop for stitching and knots are concealed on the back. So grab any old 100% wool garment or fabric (knit or woven) and give it a good felting.
Here’s how to felt the wool:
- Place the fabric in the washing machine with really hot water.
- Set the machine to the fastest agitation setting.
- Wash the wool with a little bit of detergent and a cold water rinse.
- Throw it in the dryer or air dry the fabric.
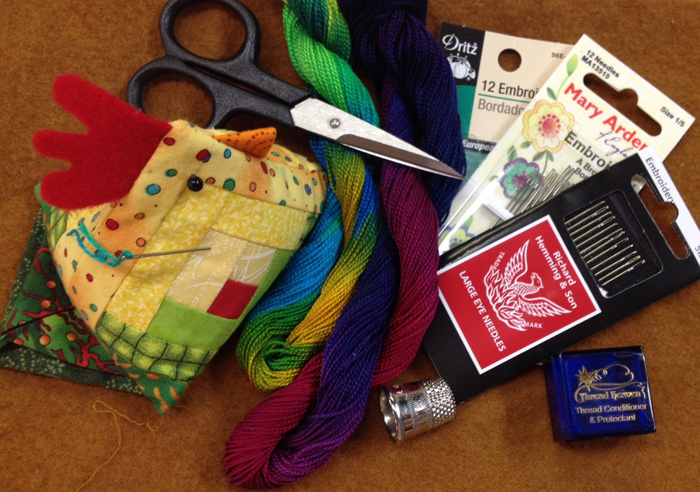
Gather your tools, fabric, and threads.
Step 2: Tools and Materials
- Felted wool for the design measuring about 5” x 5” or 6″ x 6″
- Felted wool or felt measuring about 6″ x 6″ for a frame (optional)
- Felted wool or felt for outer frame (see Step 15 for size) (optional)
- Printed pattern for the Leaf on Wool. Click here for a PDF of the pattern to download and print.
- 2 colors of Size 8 pearl cotton threads (suggested are Lime Frappe and Wisteria)
- Size 8 pearl cotton thread in white for outlining the shapes
- Size 3 or 4 embroidery needles for the size 8 thread
- A thread conditioner like Thread Magic (recommended but not necessary)
- Small, sharp scissors
- A thimble
- And a chicken pincushion with attitude (also recommended but not necessary)
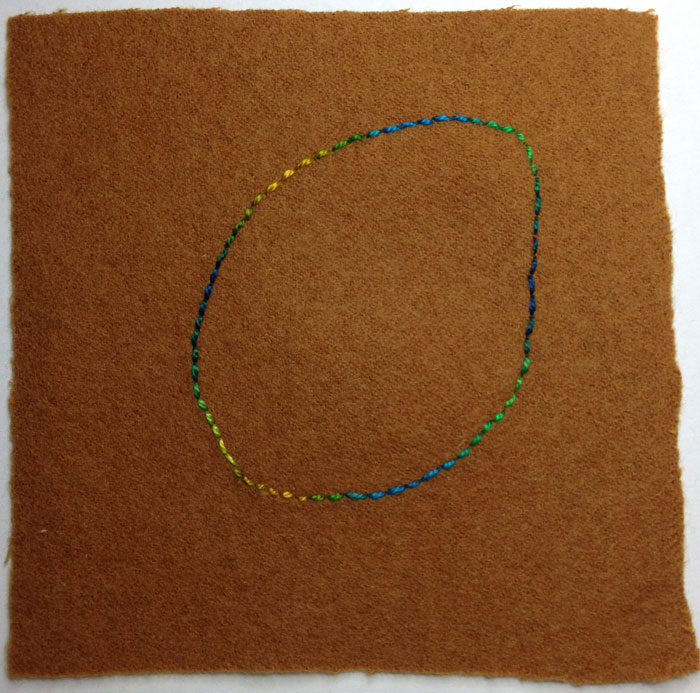
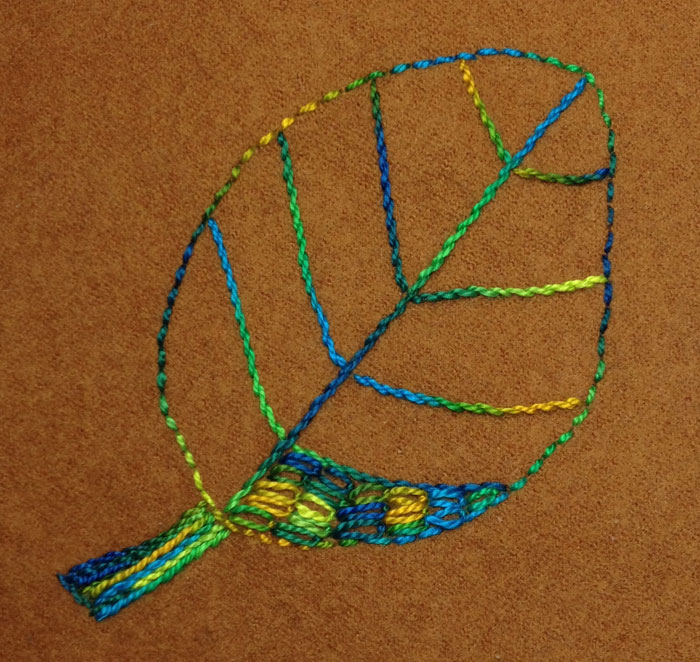
Make an outline of the leaf shape on the wool.
Step 3: Outlining the Shape
- Download and print out the Pattern PDF.
- Follow the directions given on the pattern for transferring the Leaf on Wool shape to the fabric using the white thread.
- After removing the tracing paper, stitch the Back Stitch to outline the shape following the Running Stitches.
- Remove the Running Stitches.
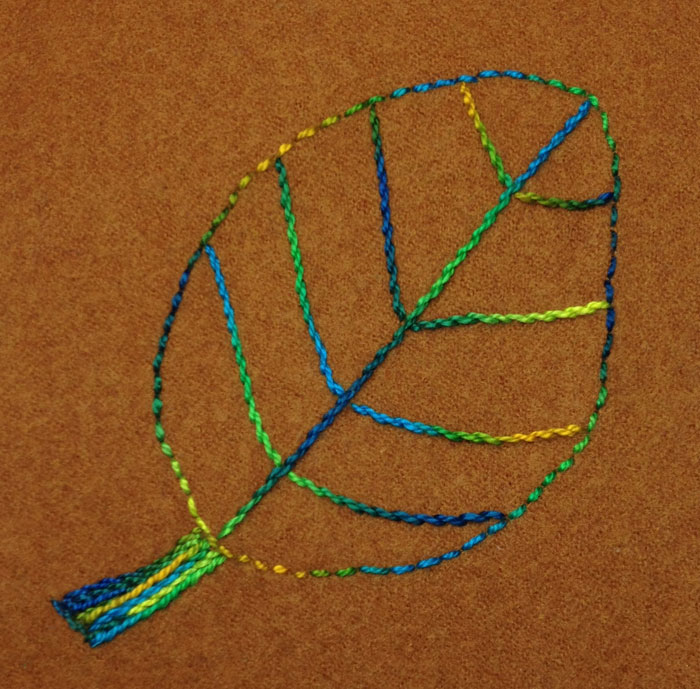
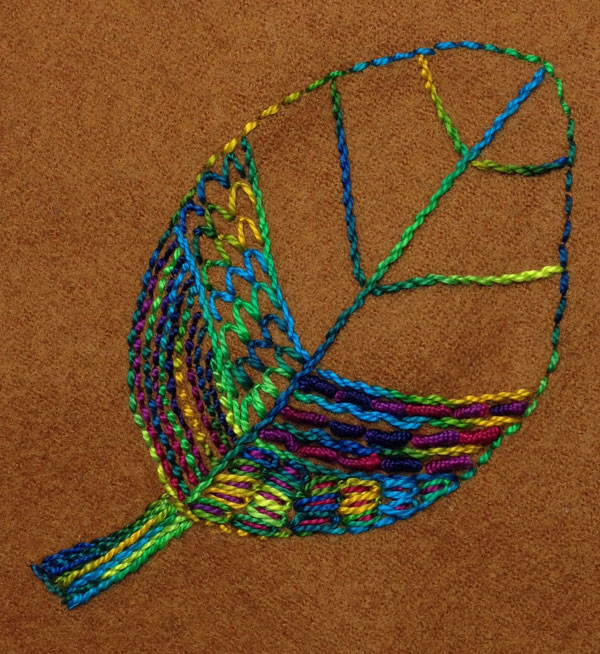
Use the Stem Stitch to divide the leaf shape.
Step 4: Make Compartments Inside the Shape
- Stitch down the center of the leaf to the base using a Stem Stitch.
- Stitch 4 lines of Stem Stitches at an angle on either side of the center line to form the veins.
- Stitch 6 rows of Stem Stitches right next to each other at the base of the leaf to form a stem measuring about 1” long.
- Stitch one row of Stem Stitches across the base of the stem to even it out.
- Breath.
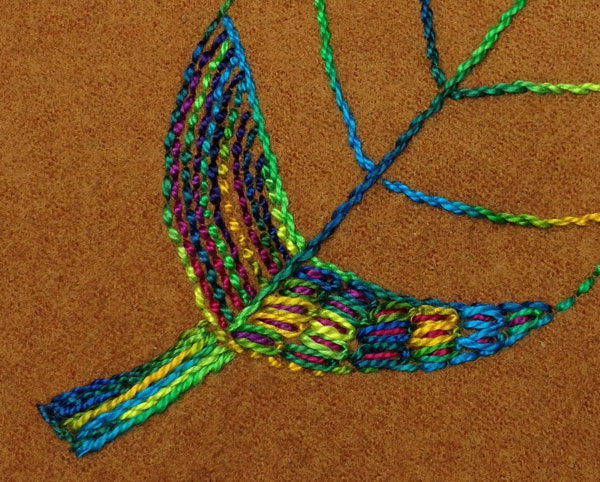
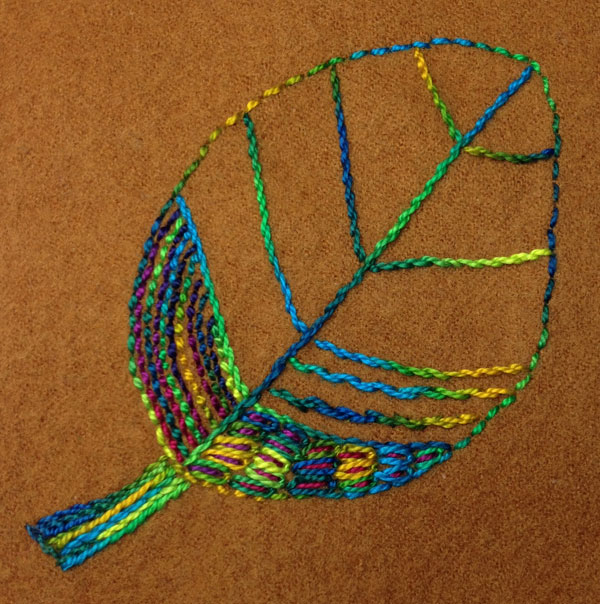
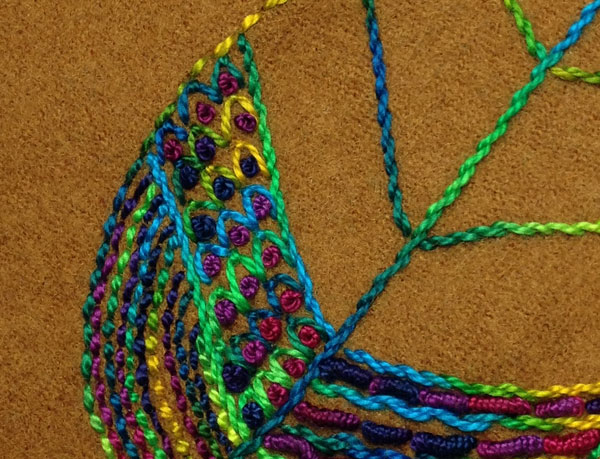
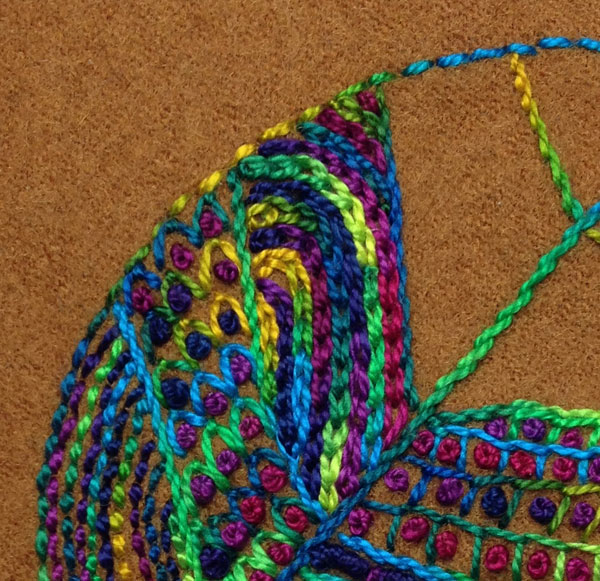
Add Lazy Daisy Stitches inside the first compartment.
Step 5: Add Lazy Daisy Stitches
- Use the same color of size 8 thread used to outline the leaf shape and a size 3 – 4 embroidery needle.
- Stitch the Lazy Daisy Stitches in rows across the bottom right compartment. Point the stitches toward the outside edge of the leaf.
- Note the wonderful color changes that occur with a variegated thread.
- Fill in each open loop of the Lazy Daisy with a Straight Stitch.
- Use the second color you’ve chosen for the embroidery.
- Rejoice in those little peaks of color inside the loop of the Lazy Daisy.
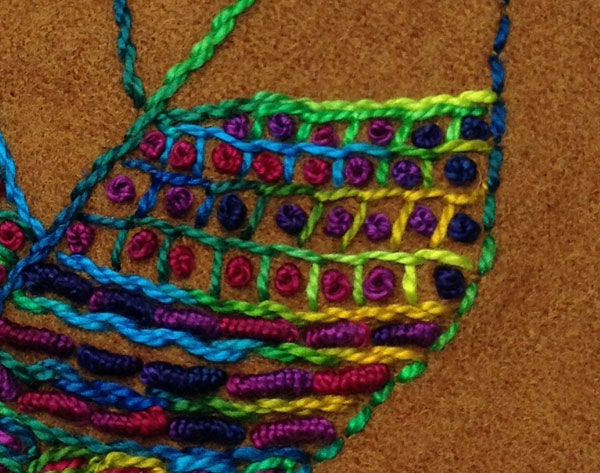
Step 6: Add the Back Stitch

Stitch Back Stitch in the next compartment.
- Use the same color of size 8 thread used in the outline and a size 3 – 4 embroidery needle.
- Start stitching the Back Stitch inside the compartment about 1/8” away from the outside curve. Follow that curve up the leaf edge.
- Stitch 3 – 4 more rows of Back Stitches about 1/8” apart following the previous curve.
- (Please ignore that line of red thread on the left in the image above. I got carried away and forgot to take the photo of just the green stitches.)
- Use that same Back Stitch and fill in the spaces between the rows.
- Use our second color of thread.
- Enjoy this orderly pattern of dashes on the fabric and go reorganize your closet.
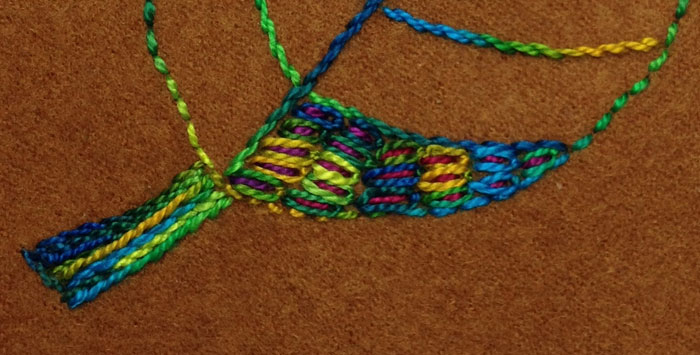
Stitch the Cable Stitch in the next compartment.
Step 7: Cable Stitch and Bullion Knot
- Use the same color of size 8 thread used in the outline and a size 3 – 4 embroidery needle.
- Run 2 rows of the Cable Stitch parallel to the arc of the leaf veins.
- Stitch the rows about 1/8” to 1/4” apart inside the compartment.
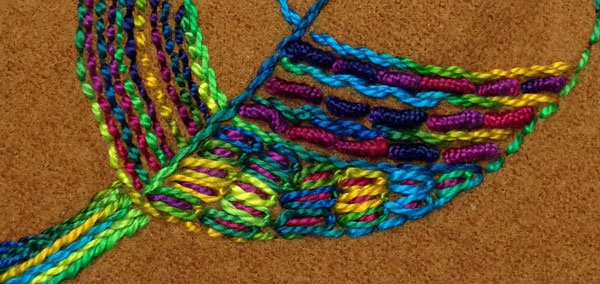
- Use your second color of size 8 pearl cotton thread.
- Fill in the area between the Cable Stitched rows with Bullion Knots. Run the stitches parallel to the rows.
- Remove the needle from your hand and give yourself a high five for making the Bullion Knots.
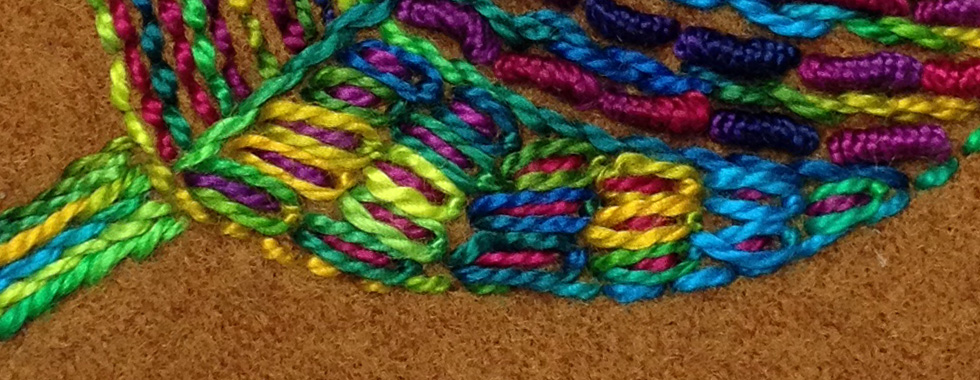
Stitch Fly Stitches across the next compartment of the leaf.
Step 8: Fly Stitch and French Knots
- Use the same color of size 8 thread used in the outline and a size 3 – 4 embroidery needle.
- Stitch 6 – 7 rows of Fly Stitches across the compartment.
- Point the stitches toward the outside edge of the leaf.
- Use your second color of size 8 pearl cotton thread.
- Add French Knots inside the V shape of each Fly Stitch.
- Enjoy the color contrast and pattern the threads make.
Stitch rows of the Blanket Stitches across the next compartment in the leaf.
Step 9: Blanket Stitch and French Knots
- Use the same color of size 8 thread used in the outline and a size 3 – 4 embroidery needle.
- Stitch 4 parallel rows of the Blanket Stitch inside the next compartment.
- In the bottom row, the “teeth” of the Blanket Stitch touch the Straight Stitches that make the lower vein line. This forms the first set of boxes.
- In the next 2 rows, the teeth touch the top edge of the previous row to form boxes.
- In the top row, the top edge of the Blanket Stitch is placed right next to the top vein.
- Use your second color of size 8 pearl cotton thread.
- Add French Knots inside the boxes formed by the Blanket Stitches.
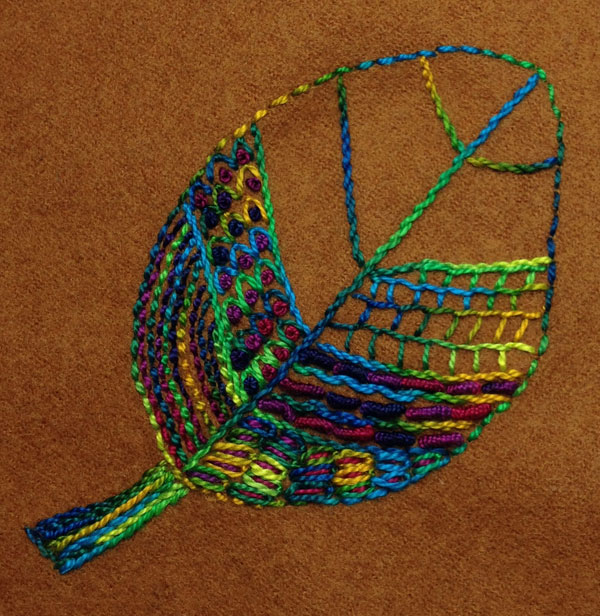
Stitch rows of the Chain Stitch in the next compartment of the leaf.
Step 10: Chain Stitch
- Use the same color of size 8 thread used in the outline and a size 3 – 4 embroidery needle.
- Stitch parallel rows of the Chain Stitch inside the next compartment.
- Leave space between the rows and stitch the rows with an arc shape.
- Use your second color of size 8 pearl cotton thread.
- Stitch the Chain Stitch between the first rows of Chain Stitches to fill in the space.
Step 11: Running Stitch
- Use the same color of size 8 thread used in the outline and a size 3 – 4 embroidery needle.
- Stitch parallel rows of the Running Stitch inside the next compartment.
- Use your second color of size 8 pearl cotton thread.
- Add more rows of the Running Stitch between the previous Stitches.
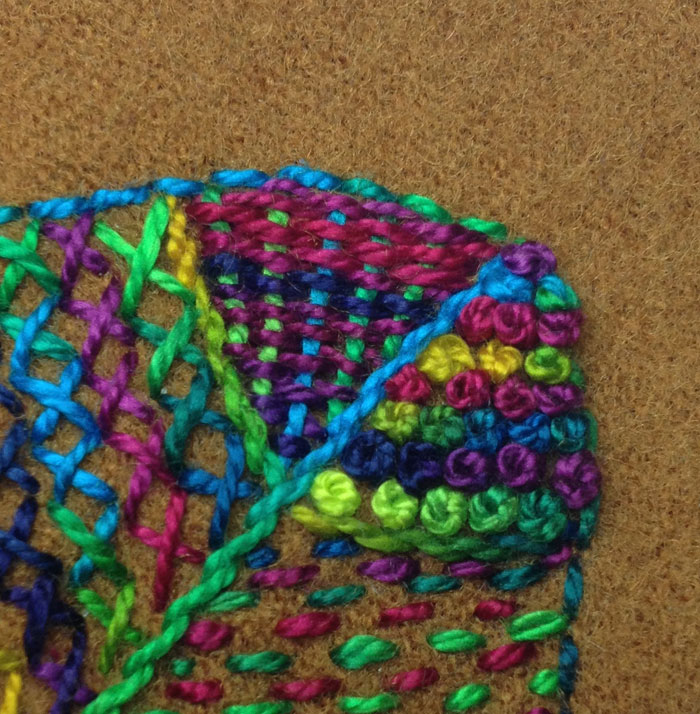
Step 12: Cross Stitch
- Use the same color of size 8 thread used in the outline and a size 3 – 4 embroidery needle.
- Stitch parallel rows of the Cross Stitch inside the next compartment.
- Leave space between rows for the next set of Cross Stitches to be stitched in another thread colorway.
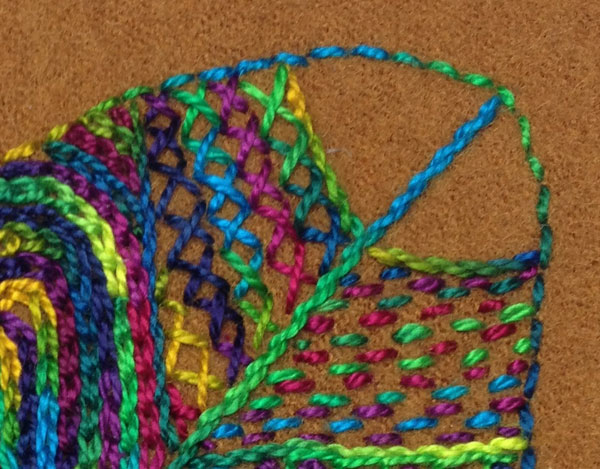
- Use your second color of size 8 pearl cotton thread.
- Add more rows of the Cross Stitches between the previous stitches.
Step 13: French Knots
- Use the same color of size 8 thread used in the outline and a size 3 – 4 embroidery needle.
- Stitch rows of French Knots inside the next compartment.
- Leave space between rows for the next set of French Knots to be stitched in another thread colorway.
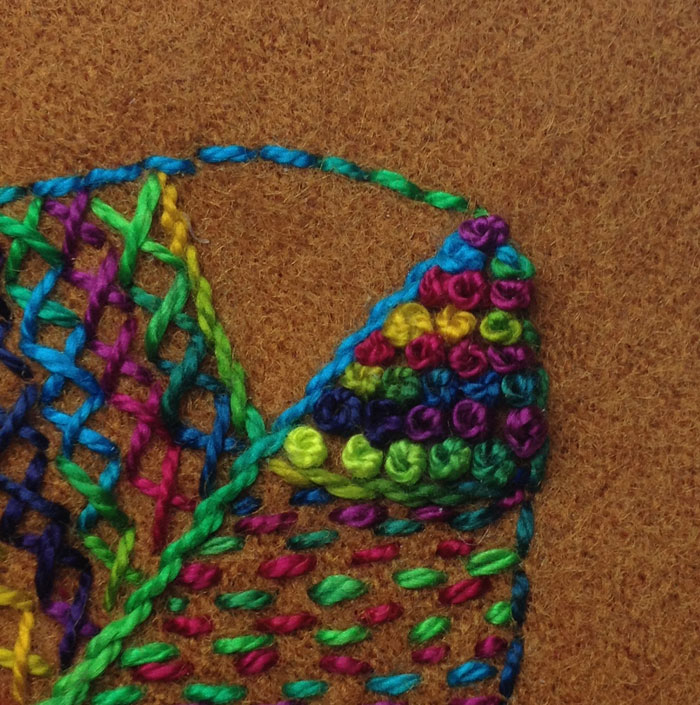
- Use your second color of size 8 pearl cotton thread.
- Add more French Knots between the previous stitches.
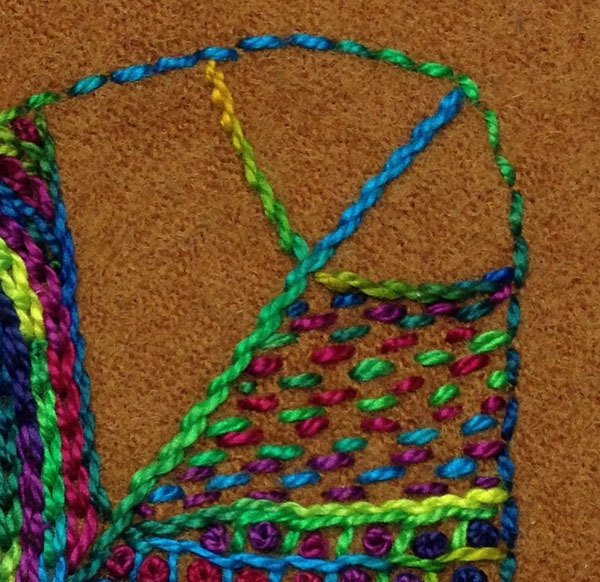
Step 14: Needle Weaving
- Use the same color of size 8 thread used in the outline and a size 3 – 4 embroidery needle.
- Stitch parallel Straight Stitches (the warp) for the first part of the Needle Weaving inside the next compartment.
- Space these warp stitches about 1/16” apart across the space.
- Use your second color of size 8 pearl cotton thread.
- Weave the thread across the warp stitches using the directions for Needle Weaving.
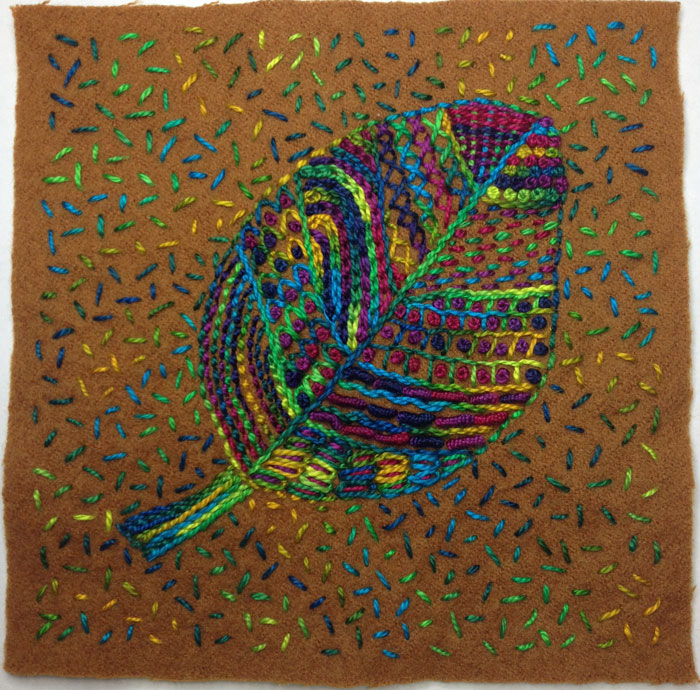 Step 14: Scattered Seed Stitch
- Use the same color of size 8 thread used in the outline and a size 3 – 4 embroidery needle.
- Stitch Scattered Seed Stitches around the leaf. Stitch within 1/4″ of the edges of the fabric.
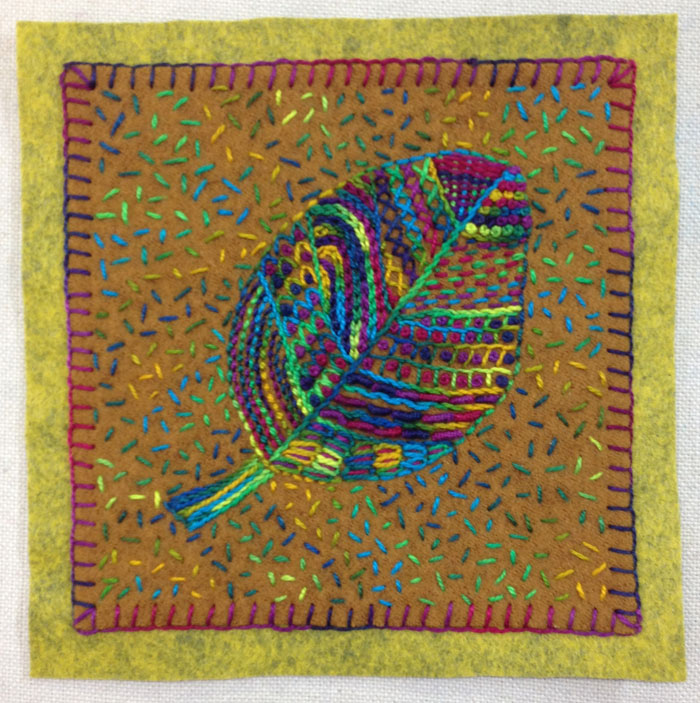 Step 15: Finishing the Wool Stitch Along
- Trim the wool to remove any frayed edges.
- Place it onto a piece of felt. (Commercial felt from your local fabric shop is fine.)
- Stitch it to the felt around the edges with the Blanket Stitch.
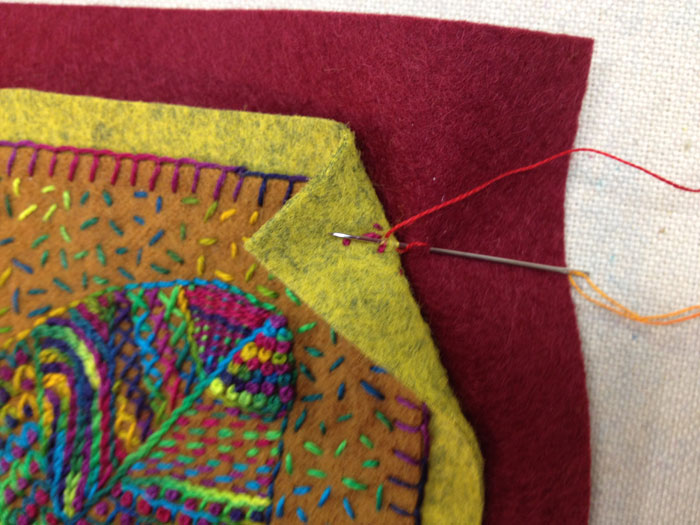
- Add another frame around the piece with another piece of felt in a color that enhances the design. Cut this felt larger than the first piece of felt. (The size depends on if you have a mat or frame size in mind.)
- Stitch the artwork onto the larger piece of felt at each corner concealing the stitches.

- Cut a piece of mat board the size of the felt or the size of your frame if you are displaying it in a frame. (A shadow box frame is recommended.)
- Use double stick tape and tape the piece into place on the mat board. Or stitch it to the mat.