
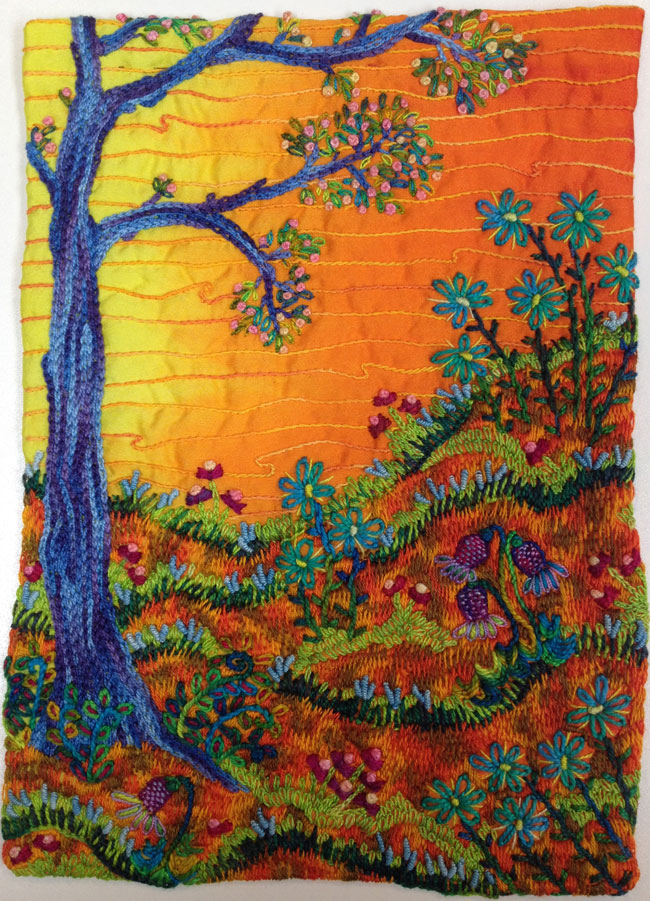
 Welcome to the Silk Stitch Along to make our Embroidered Garden!
The goal of the Stitch Along is to:
- Make an embroidered garden on silk. You can also use wool, cotton, or felt, but silk is lovely to work with.
- Try new embroidery stitches and stitch combinations.
- Enjoy the challenge of free-form embroidery and improvise as we go.
 Step #1: Gather These Materials and Tools
- Click here to purchase the hand-dyed threads needed. Or use the following items you already have in your stash.
- Silk measuring about 11” x 8 1/2’’ in any weave or color. (A heavier silk such as a 12 or 14 momme sateen or jacquard is recommended.)
- Wool batting (recommended) measuring 9’’ x 6 1/2’’. Wool is easy to stitch. If using a different batting, select one that does not beard when stitched.
- Misty Fuse fusible web: 11” x 8 1/2’’
- Felt for the backing: 8’’ x 5 1/2’’
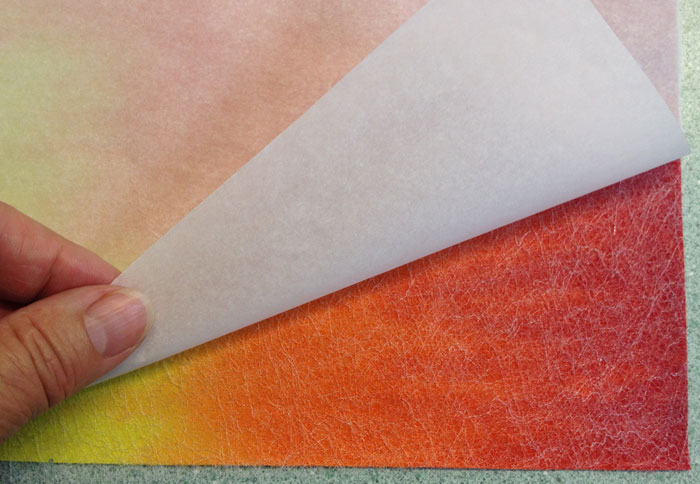
- Parchment paper: 12’’ x 10’’
- Size 12 pearl cotton threads (8) like Artfabrik: Lime Frappe, Lemons, Japanese Iris, Forget Me Not, Pumpkin Patch, Oranges, Sprouts, Wisteria
- Size 8 pearl cotton threads (6) like Artfabrk: Aquamarine, Lime Frappe, Degas Blue, Wisteria, Green Grass, Petunias
- Size 3, 4, and 5 embroidery needles. (Size 7 is optional)
- Thread Magic or other thread conditioner (highly recommended)
- Scissors
- Thimble
- Pincushion
 Step #2: Fusing Silk to Wool Batting
- Cut a lightweight fusible like Misty Fuse the size of the silk fabric. (Misty Fuse is recommended because it is very fine and doesn’t sink into the fabric, changing the color of the silk.)
- Place the fusible web onto the wrong side of the silk. Cover the web with a large piece of parchment paper. Glide a hot iron across the paper to fuse the web to the silk.
- Let the fabric cool, then remove the parchment paper.

- Cut the wool batting to measure 1’’ smaller than the silk on each edge. (This fabric on the edge is wrapped to the back of the embroidery after you are finished stitching.)
- Center the batting onto the fused side of the silk. Flip the fabric and batting over and place them on the parchment paper.
- Fuse the batting to the fabric by gliding the iron across the fabric for about 3 seconds in each spot.
 Step #3: A Few Tips About Thread
- Pearl cotton thread is suggested for your embroidery. It has a sheen or gloss that enhances the glow of silk fabric. The thread has dimension (it doesn’t flatten out), and the high twist helps it hold up for stitching. Use it as a single with the appropriate-sized embroidery needle.
- Fine fabrics, like silk, are best stitched with finer threads such as Sizes 8 or 12 pearl cotton. Size 8 makes bold, dense shapes on the fabric. Size 12 makes delicate, detailed shapes.
- A variety of thread colors enlivens your design. Colors contrasting with the background fabric in hue or value make shapes prominent. Colors analogous to the background fabric blend and create soft texture.
- If your garden reflects nature’s colors, then you’ll need a variety of green threads from light to dark in both thread sizes. There is no need to copy nature, however. Maybe this is a fantasy garden!
- Variegated threads offer changes in color without changing threads. They add texture and spark to the work.
- And here’s the best news: if you don’t like a thread color or size, you can always remove it.
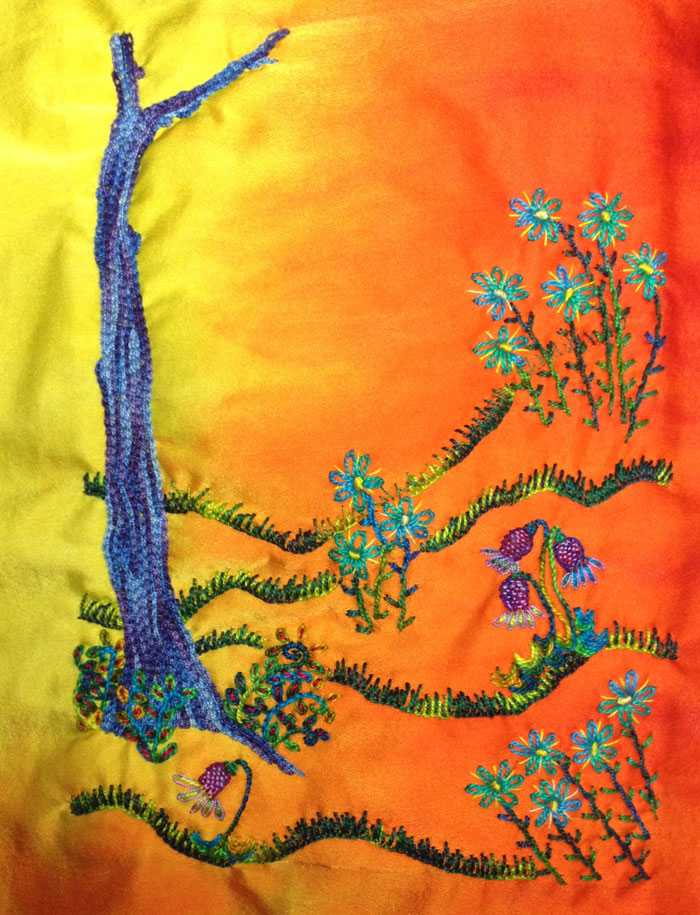
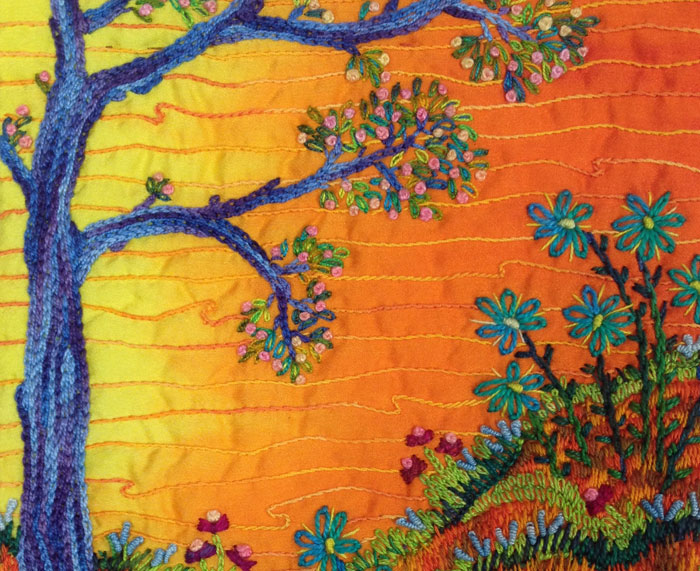
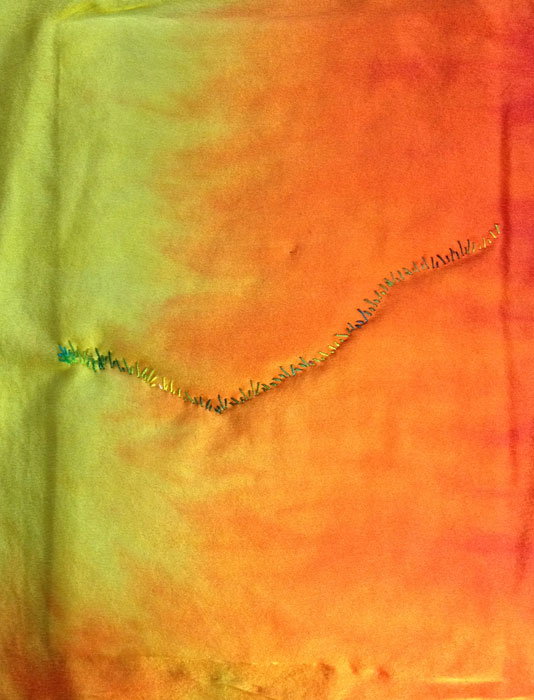 Step #4: The Horizon Line
- Place the background fabric (with the batting attached) vertically or in the portrait orientation.
- Use a size 12 thread (like Lime Frappe) and a Size 5 or 7 embroidery needle.
- Stitch Straight Stitches across the fabric to make an sloping horizon line. The stitches should resemble fine blades of grass.
- This horizon line gives us a starting point for the composition. It may be removed or changed later if necessary.
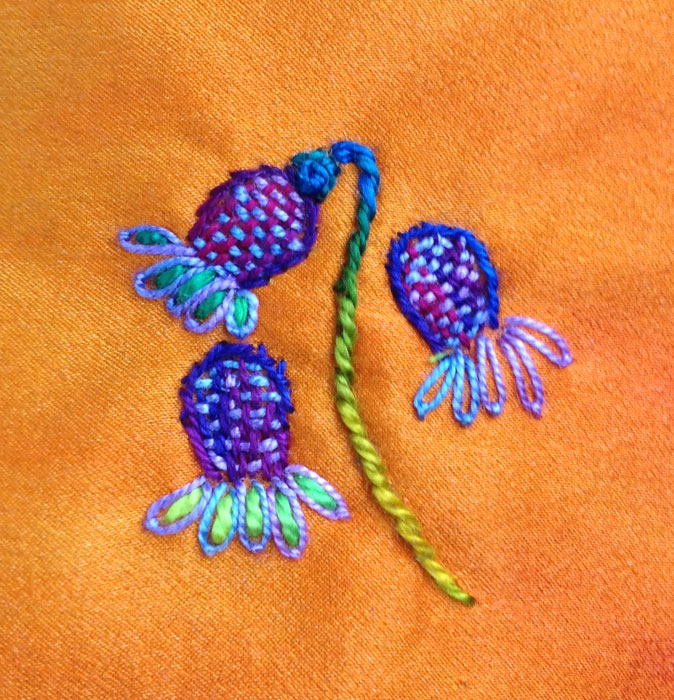
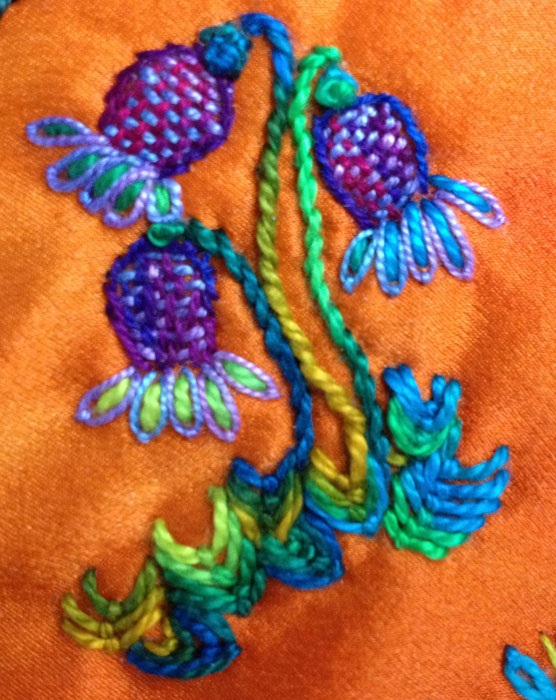
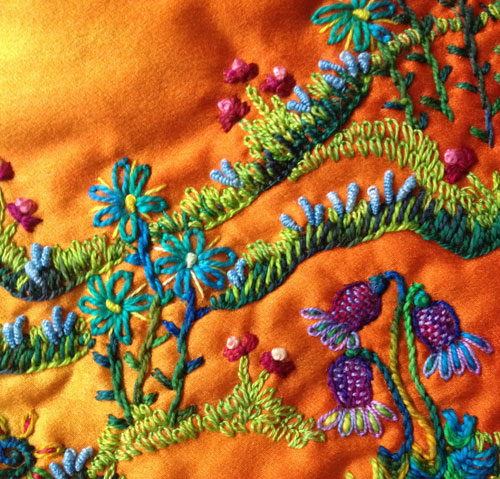
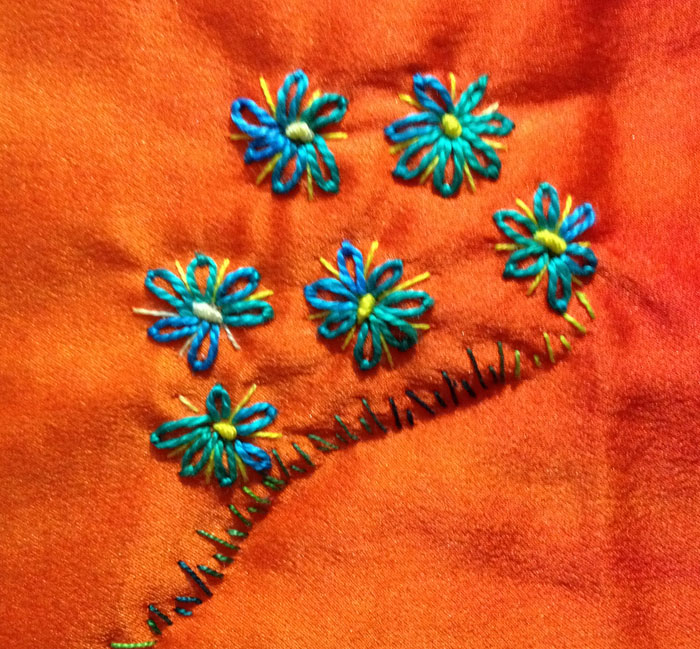 Step #5: Lazy Daisy Flowers
- Use a Size 8 thread (like Aquamarine) and a size 3 or 4 embroidery needle for the flowers.
- Stitch on the right side of the piece reserving the left side for a tree.
- Stitch Lazy Daisy Stitches around a central point to make flower petals.
- Stitch a French Knot or a small Bullion Knot in the center of each set of petals with a Size 12 (like Lemons).
- Add a Straight Stitch between each petal with that same thread.
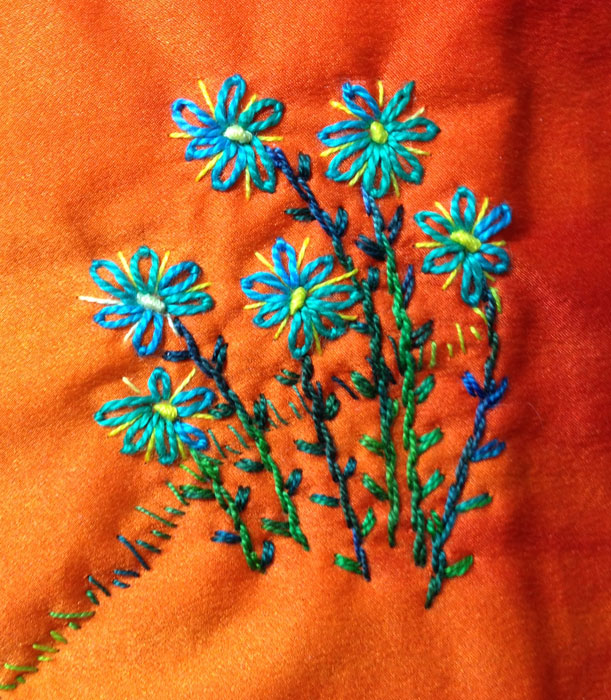
- Use a size 12 thread (like Lime Frappe).
- Stitch from each flower to the ground using the Cable Stitch.
- Add a few Straight Stitches along each stem to make leaves.
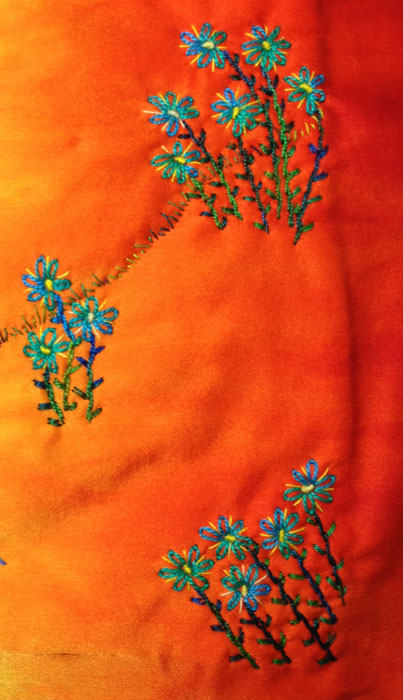
- Make 2 or 3 more groups of the flowers on the right side of the design.
- Vary the heights of the flowers and place them at an angle if you like.
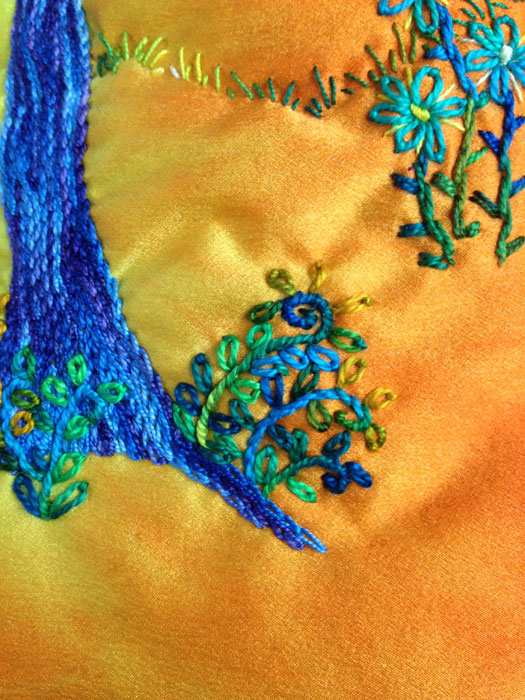
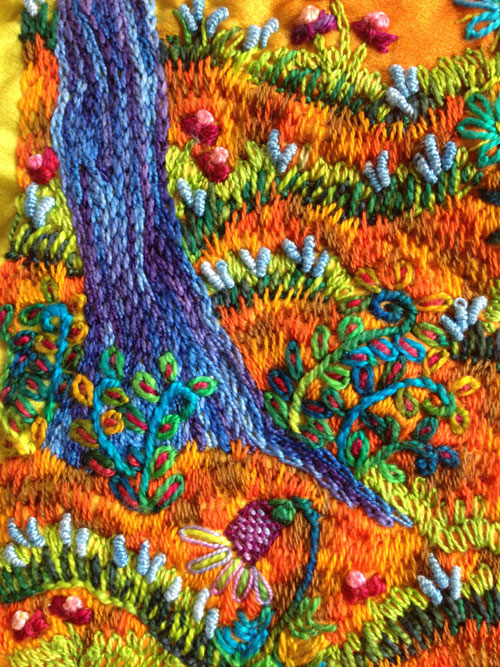
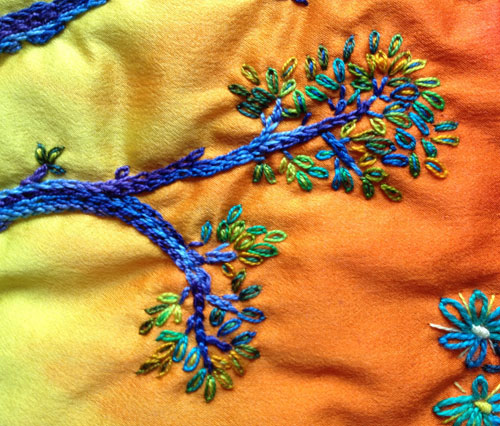
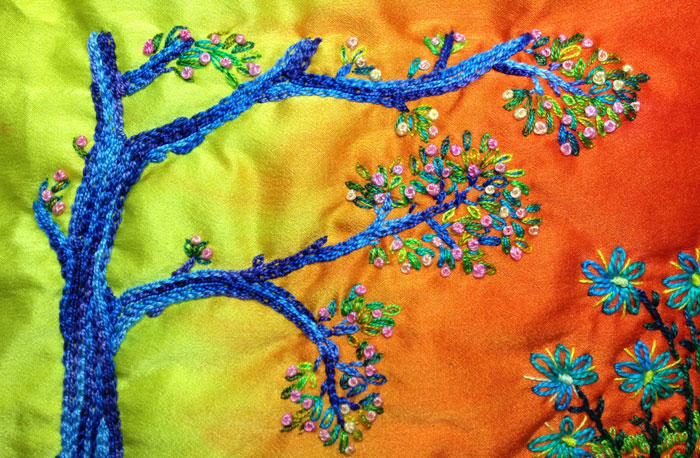
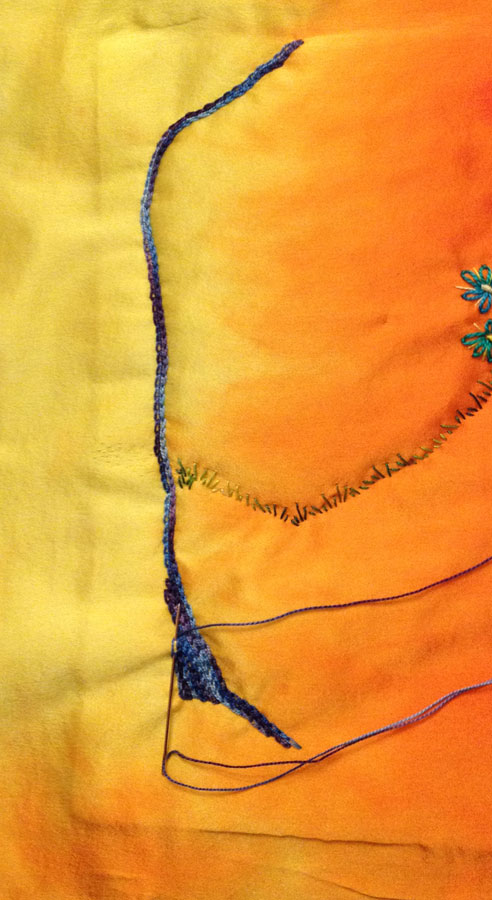 Step #6: Tree Trunk
- Use a Size 8 thread (like Degas Blue).
- Stitch Chain Stitches on the left side of the design. Begin the first row at the top of the design and about 4″ in from the left side to make a tree branch.
- Angle the branch shape down and to the left to about 2″ from the left side of the design.
- Stitch down vertically to within 2″ of the base of the design to make a tree trunk.
- Angle the stitches at the base of the tree trunk to the right for 1 – 2 inches to make a root.
- The line of stitching should wobble slightly to reflect the organic nature of a tree trunk.
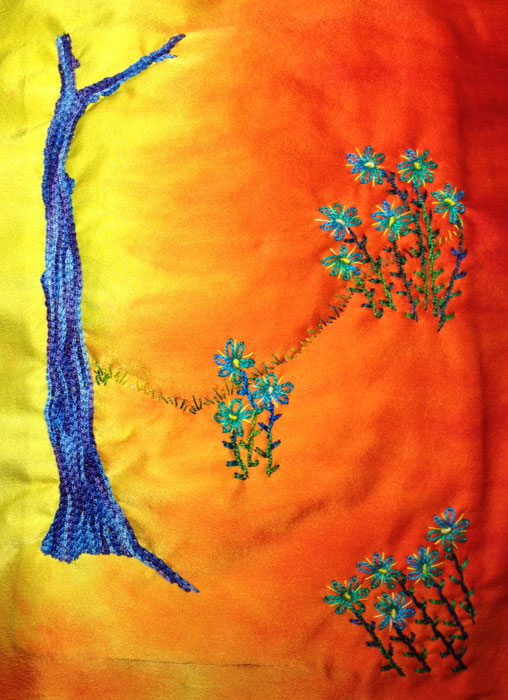
- Continue to add vertical rows of the Chain Stitch next to each other, working from right to left.
- Slowly taper the rows so the tree trunk is wider at the bottom than the top.
- After you complete the large branch on the right, extend the tree trunk off the top edge of the design.
- Add knots and branches if you like. More branches can always be added later.
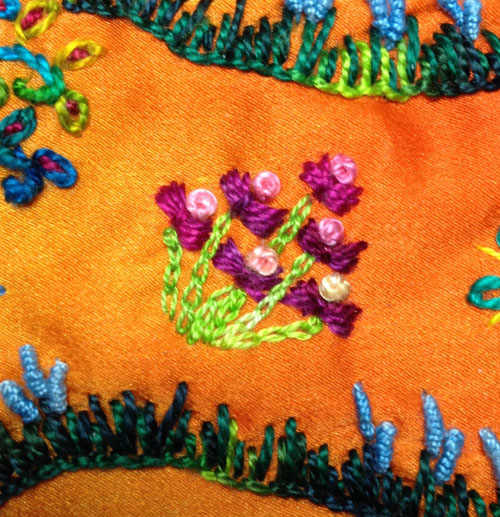
 Step #7: Needle Weaving Flowers
- Use 2 colors of size 12 threads (like Wisteria and Japanese Iris).
- Stitch a U shape with the darker thread using Stem Stitches measuring about 1/2″ across to make the outline of the flower base.
- Using that same thread color, stitch the warp or vertical stitches for the Needle Weaving inside the flower base.
- Use a lighter-colored thread and weave across the warp to fill in the flower base.
- Use that same light colored thread and stitch Lazy Daisy Stitches across the open end of the flower to make petals.
- Make 2 or 3 more flowers.
- Use a size 8 thread (like Lime Frappe) and fill in the Lazy Daisy Stitches with Straight Stitches.
- Use that same thread and place a French Knot at the base of a flower and stitch a Stem Stitch from the French Knot to the ground.
- Repeat this for the other flowers.
- Using the same thread color as the stem to make the base of the plant.
- Stack Fly Stitches on top of each other to form leaves. Place them across the bottom of the stems.
Step #8: Ferns
- Use a size 8 thread (like Lime Frappe).
- Stitch a hook-shaped line about 1 1/2” long using Stem Stitches that begins at the base of the tree trunk and curls at the tip to form the center spine of a fern.
- Using that same thread color, stitch Lazy Daisy Stitches down the length and on either side of the Stem Stitching to make leaves.
- Add more ferns around the base of the tree trunk stitching a few on top of the tree trunk.
- Use a size 8 thread (like Wisteria) in a color contrasting to the color used for the fern leaves.
- Stitch a Straight Stitch inside each opening of the Lazy Daisy Stitch.
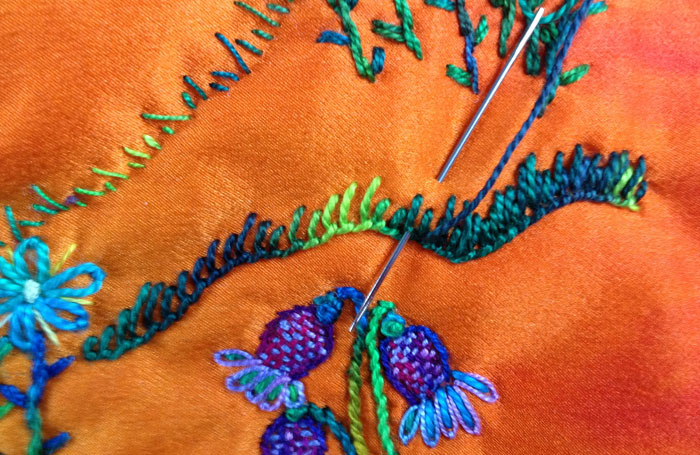
Step #9: Grass
- Use a variegated color of size 8 green thread (like Green Grass).
- Stitch a wobbly line of Blanket Stitches across the silk.
- Vary the length and width of the stitches to make grass.
- Using that same thread color, stitch Straight Stitches between the “teeth” of the Blanket Stitches to make more leaves of grass.
- Add more rows of grass across the piece. Don’t place them inside the bundles of Lazy Daisy flowers.
- Follow the horizon line stitches and add a top row of grass to them.
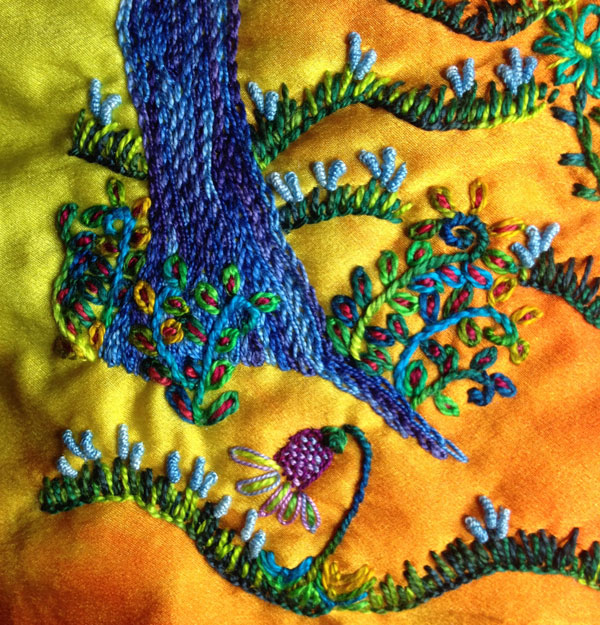 Step #10: Bullion Knot Flowers
- Use a size 12 variegated light blue (like Forget Me Nots).
- Stitch Bullion Knots across the grassy lines made with Blanket Stitches.
- Place the Bullion Knots in groups or individually. Tie off the knots as you make them to secure them in place.
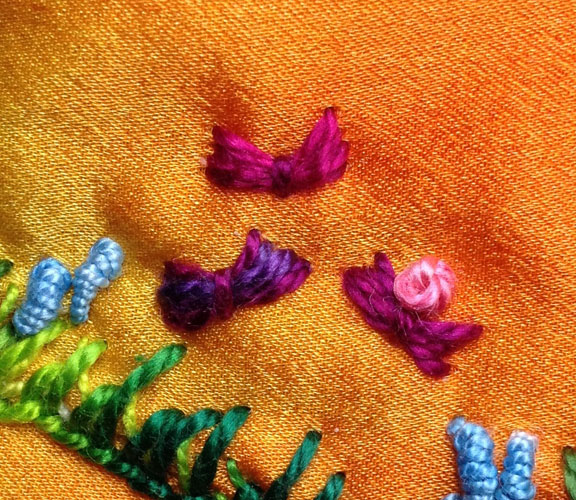 Step #11: Sheaf Stitch Flowers
- Use a Size 8 thread (like Wisteria).
- Stitch the Sheaf Stitch horizontally on the fabric to form a flower.
- Add a French Knot to the top of the Sheaf Stitch using a size 8 thread (like Petunias).
- Use a size 12 thread (like Sprouts).
- Stitch the Chain Stitch from the base of each flower down to the ground to form a plant.
- Place groups or individual Sheaf Stitched flowers around the garden.
Step #12: Lazy Daisy Leaves
- Use a size 12 thread (like Sprouts).
- Stitch rows of Lazy Daisy Stitches across the garden.
- Stack the stitches to make clumps of plants.
- Stitch them around the Sheaf Stitched flowers and on top of the Blanket Stitched grass.
 Step # 13: Long/Short Grass
- Use a size 12 thread (like Pumpkin Patch).
- If using a different colored background, choose a thread color that is analogous in color to the background fabric, so it blends in with the fabric.
- Stitch rows of Long and Short Stitches across the garden filling in the spaces between plants to make grass.
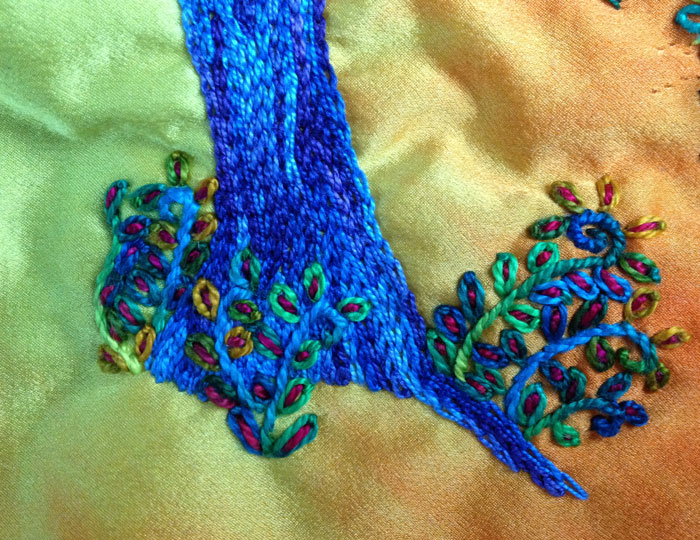
Step # 14: Adding Branches and Leaves
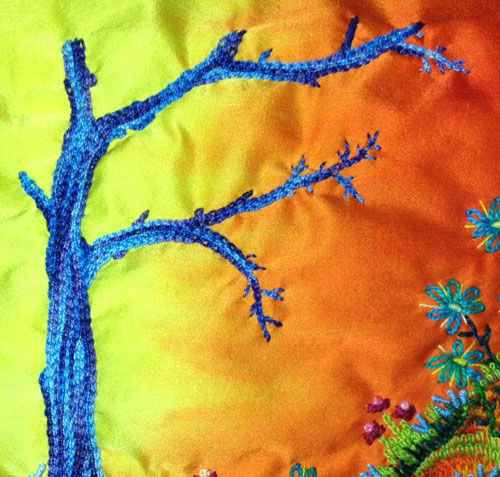
- Use the same size 8 thread used to stitch the tree trunk (like Degas Blue).
- Add adjacent rows of Chain Stitches extending from the tree trunk out to the right and left.
- Add smaller branches off of larger ones with more Chain Stitches or Straight Stitches.
- Use a size 12 variegated green (like Lime Frappe).
- Stitch Lazy Daisy Stitches on the ends of the branches to make leaves.
- Randomly add more Lazy Daisy Stitches around the these stitches to create a canopy of leaves.
- Using that same thread, fill in each Lazy Daisy loop with a Straight Stitch.
Step # 15 : Buds
- Use a size 8 thread (like Petunias).
- Stitch French Knots between the leaves to make flower buds.
Step # 16: Sky
- Use a size 12 thread (like Oranges).
- Stitch Stem Stitches horizontally across the sky to make subtle cloud shapes.
Step # 17: Finishing
- Fold a corner back onto the batting at a 90-degree angle. Fuse the corner into place with a hot iron.
- Repeat this at each corner.

- Fold each side onto the batting, making a sharp corner. Fuse the sides down with a hot iron.
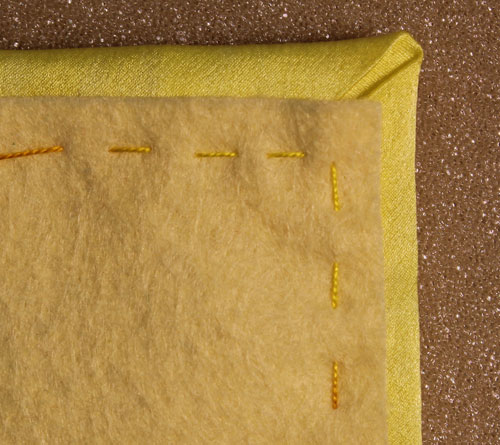
- Cut a piece of felt to measure about 1/4″ smaller on each edge than the size of the piece.
- Stitch the felt to the back of the piece with a Running Stitch.
I hope you enjoyed this Tutorial
Click here to see more free Tutorials.