
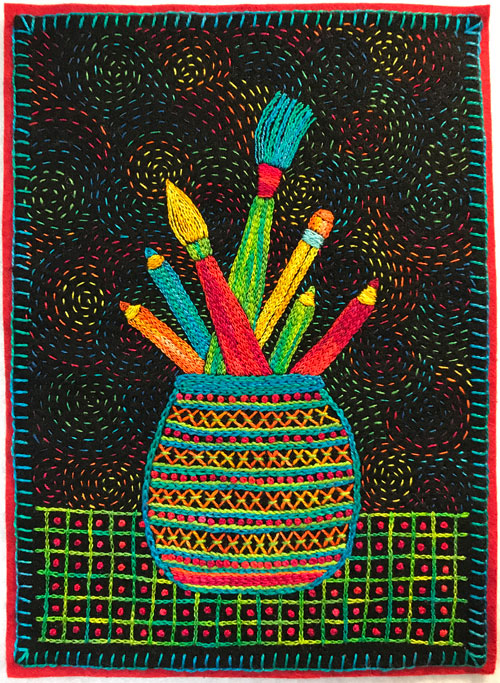
Tools of the Trade by Laura Wasilowski
This version of Tools of the Trade is embroidered on black wool, but you can use any fabric you like as your canvas. Thank you for joining me!
Step #1
Click here for a Tools of the Trade Stitch Kit or assemble the following items:
- Black wool (or other fabric of your choice) measuring 6″ x 9″
- Sewing thread for transferring the pattern shapes (or used the light blue size 12 below)
- Size 8 pearl cotton threads in these variegated colors: turquoise, pea green, orange, and red
- Size 12 pearl cotton threads in these variegated colors: red, medium greens, yellow, turquoise, light blue, orange, rainbow
- Tracing paper for transferring the pattern shapes
- Size 3 and 5 hand embroidery needles
- Red felt (or other color of your choice) for backing measuring 7″ x 9″
- Download and print out this Word document of the Tools of the Trade pattern.
Step #2
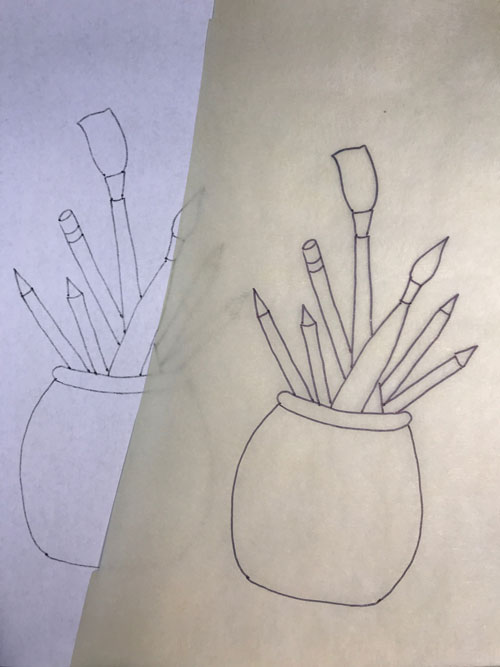
- Complete the directions below. Or follow the directions on the printed Tools of the Trade pattern to transfer the shapes to the fabric.
- Place tracing paper on the drawing and trace it with a black marker.
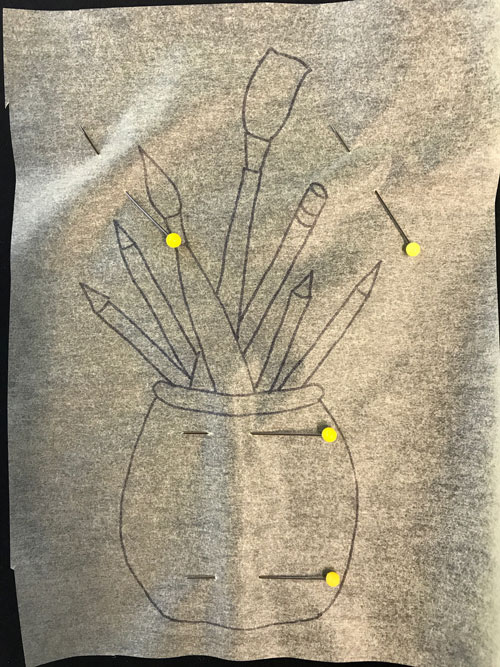
- Place the fabric vertically so it is 6″ across by 9″ high.
- Position the tracing paper about 2″ up from the bottom of the fabric.
- Pin the tracing paper into place.
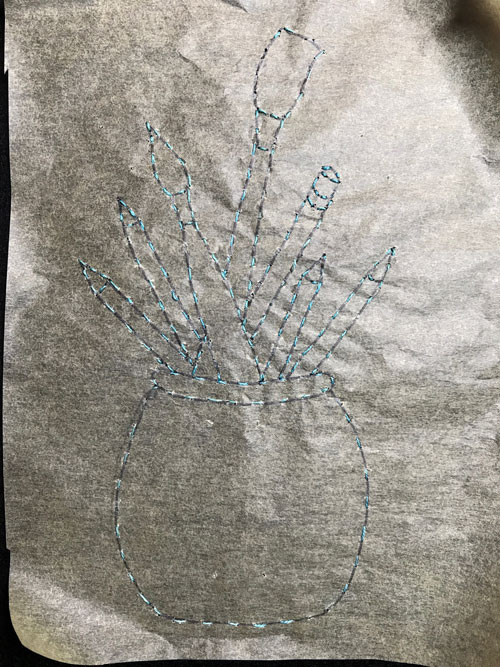
- Follow the black marker lines on the tracing and stitch the outline of the shapes in the design using Running Stitches. Stitch with a sewing thread (40 or 50 weight) or a size 12 pearl cotton in a color contrasting to the background fabric and a sewing needle or size 5 embroidery needle.
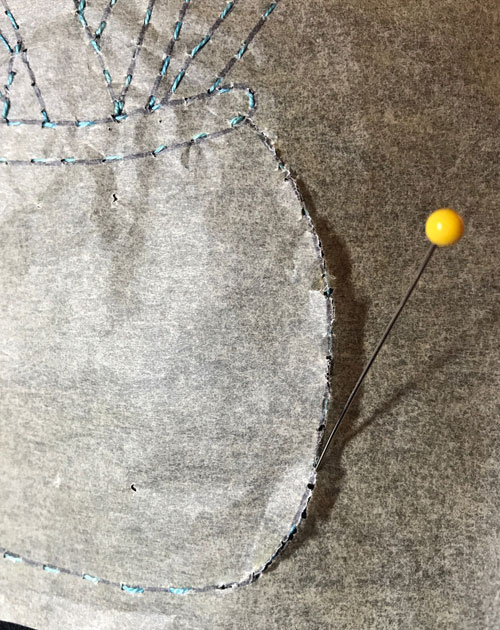
- After stitching the outline, remove the paper using the tip of a pin to score the paper next to the stitches. Gently rip away the paper.
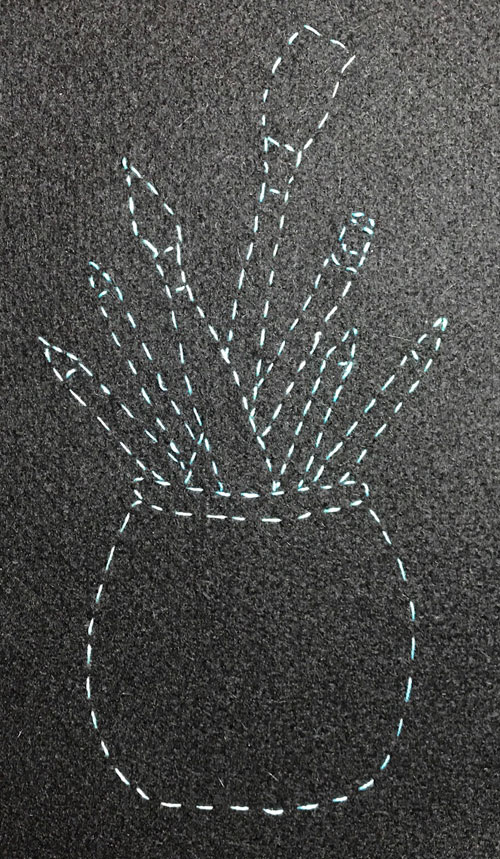
- The Running Stitches define the edges of the design and will be removed after stitching the shapes with permanent stitches.
Step #3
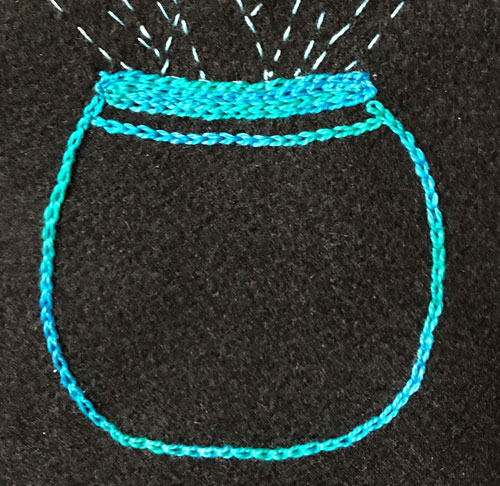
- Stitch Chain Stitches to outline the vase shape following the Running Stitches. Use a size 8 pearl cotton thread and a size 3 embroidery needle.
- Fill in the rim of the vase with horizontal rows of Chain Stitches placed right next to each other. Remove the Running Stitches around the vase shape.
- Stitch one row of Chain Stitches horizontally and about 1/4″ below the rim of the vase.
Step #4
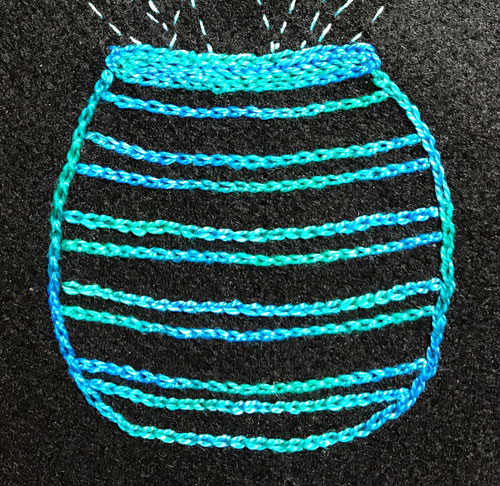
- Stitch 8 more horizontal rows of Chain Stitches across the vase to make stripes.
- Stitch row #2 about 1/2″ below row #1. Stitch row #3 about 1/4″ below row #2.
- Add 3 more sets of rows with this same spacing.
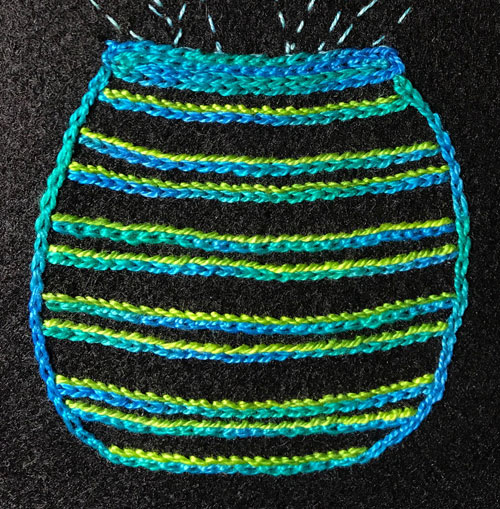
Steps #5
- Stitch Stem Stitches horizontally and on top of the rows of Chain Stitches. Use a size 8 pearl cotton thread and a size 3 embroidery needle.
- Stitch a row of Stem Stitches across the base of the vase.
Step #6
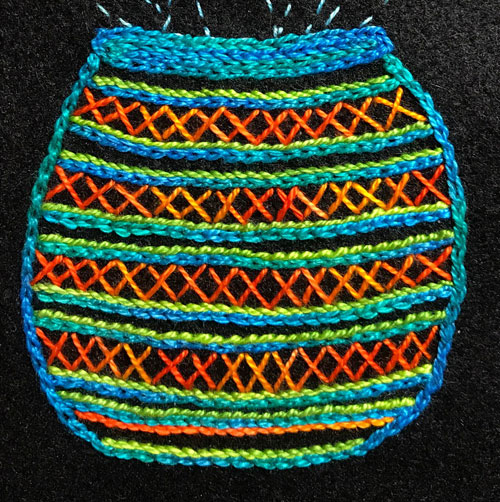
- Stitch Cross Stitches horizontally and between the 4 wider stripes on the upper part of the vase. Use a size 8 pearl cotton thread and a size 3 embroidery needle.
- Stitch 1 row of Stem Stitches horizontally and under the last line of Chain Stitches at the base of vase using that same color of thread.
Step #7

- Stitch French Knots between the narrow stripes on the vase. Use a size 8 pearl cotton thread and a size 3 embroidery needle.
- Stitch rows of Stem Stitches horizontally across the base of the vase to fill it in using that same color of thread.
Step #8

- Stitch a Straight Stitch horizontally and across the center of each Cross Stitch on the vase. Use a size 8 pearl cotton thread and a size 3 embroidery needle.
Step #9
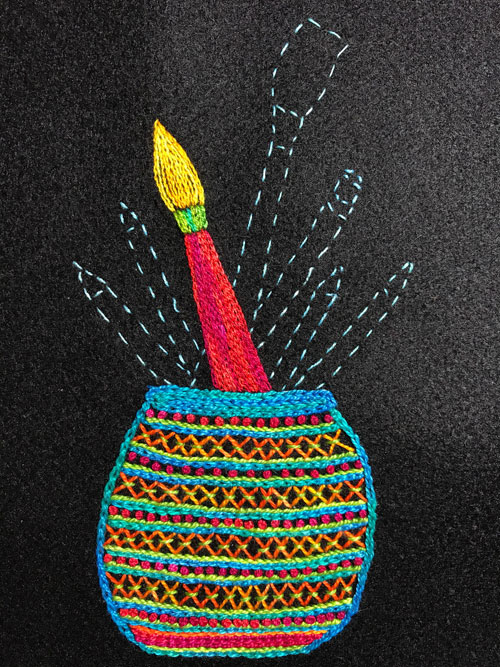
- Stitch Chain Stitches to outline the handle on the first paint brush shape following the Running Stitches. Use a size 12 thread and a size 5 or 7 embroidery needle.
- Fill in the handle shape with vertical rows of Chain Stitches placed right next to each other.
- Stitch vertical rows of Chain Stitches to fill in the ferrule (that green thing) of the paint brush. Use a size 12 thread.
- Stitch Stem Stitches to outline the bristles on the paint brush. Use a size 12 thread.
- Fill in the bristle shape with vertical rows rows of Stem Stitches.
- Remove the Running Stitches around the paint brush shape.
Step #10
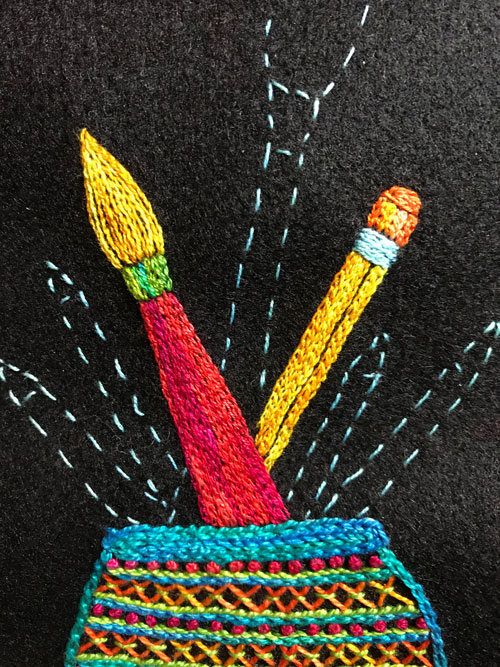
- Stitch Chain Stitches vertically to outline the shaft of the pencil following the Running Stitches. Use a size 12 thread and a size 5 or 7 embroidery needle.
- Stitch rows of Chain Stitches vertically to fill in the pencil shaft. Leave a small gap between 2 rows of the Chain Stitches to make an edge.
- Stitch Stem Stitches horizontally and in rows across the top of the pencil to make the ferrule. Use a size 12 thread (like Forget Me Nots).
- Stitch Chain Stitches vertically to make the bottom part of the eraser. Use a size 12 thread.
- Stitch Stem Stitches to outline the tip of the eraser using that same thread color. Fill in the eraser tip with horizontal rows of Stem Stitches.
- Remove the Running Stitches that outline the pencil shape.
Step #11
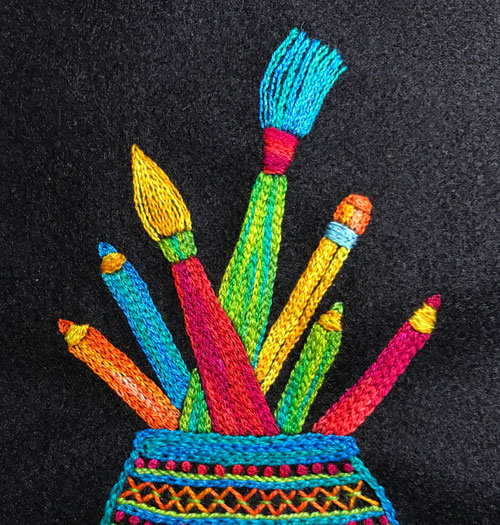
- Stitch Chain Stitches vertically to outline the shaft of the first colored pencil. Use a size 12 thread.
- Stitch rows of Chain Stitches vertically to fill in the pencil shaft.
- Stitch Stem Stitches horizontally and in tapering rows across the top of the pencil shaft to make the wood. Use a size 12 thread.
- Stitch Fly Stitches on the tip of the pencil using the same color as the pencil shaft. Stack the Fly Stitches closely with the tip facing up to create the tip of the pencil.
- Remove the Running Stitches that outline the pencil shape.
- Repeat the above steps to fill in the remaining 3 colored pencils. Use size 12 threads.
- Stitch Chain Stitches to outline the handle on the tall paint brush shape following the Running Stitches. Use a size 12 thread.
- Fill in the handle shape with vertical rows of Chain Stitches placed right next to each other.
- Stitch horizontal rows of Chain Stitches to fill in the ferrule of the paint brush. Use a size 12 thread.
- Fill in the bristle shape with vertical rows rows of Stem Stitches. Use a size 12 thread.
- Remove the Running Stitches around the paint brush shape.
Step #12
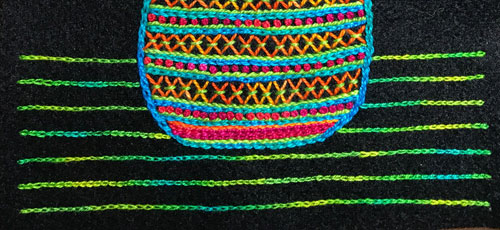
- Stitch 7 rows of Chain Stitches horizontally across the fabric to make the tablecloth. Begin the first row about 2″ up from the bottom edge of the fabric. Use a size 12 thread and a size 5 or 7 hand embroidery needle.
- Stitch each row to within 1/2″ of the edges of the fabric.
- To make a straight line, place a strip of painter’s tape on the fabric from the beginning of the stitch line to where you want the line to end.
- Press the tape firmly into place on the fabric. Stitch the Chain Stitches right next to the tape line.
- Gently remove the tape when the stitching is complete. Use the tape for the next line, spacing it about 1/4″ below the first row of stitches.
- Continue to add rows to make a total of 7 rows of Chain Stitches.
Step #13

- Stitch rows of Chain Stitches vertically across the fabric to make the checkerboard tablecloth. Use the same thread as the horizontal lines.
- Find the center of the design and begin the first row about 1/4″ to the right of the center line. Stitch between the base of the vase and bottom horizontal row to connect them.
- Space the next vertical stitch line 1/2″ to the right of the first vertical row. Continue stitching vertical lines across the tablecloth between the top and bottom horizontal rows. Space them 1/2″ apart to make boxes.
- Repeat the above steps on the left side of the tablecloth, spacing vertical rows 1/2″ apart.
Step # 14
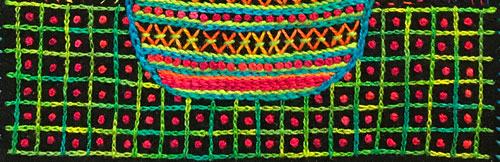
- Stitch French Knots in the center of each box on the tablecloth. Use a size 12 thread,
Step #15
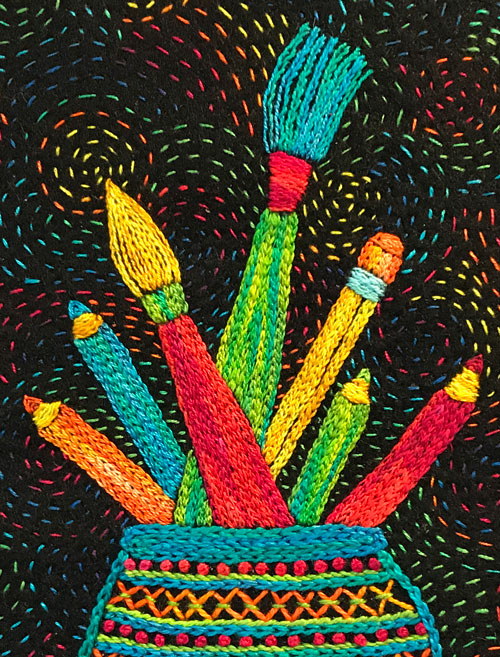
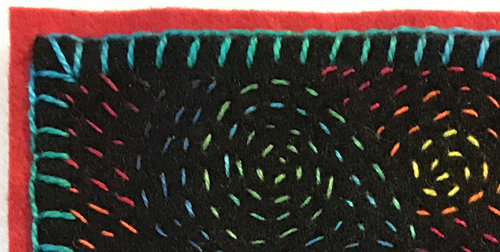
- Stitch Running Stitches across the background fabric in spirals and curves. Use a size 12 thread and a size 5 or 7 hand embroidery needle.
- Stitch to within 1/2″ of the edges of the fabric.
Step #16
- Stitch tack the embroidery to the backing fabric.
- Stitch Blanket Stitches around the edge of the design to secure it to the backing fabric. Use a size 8 thread and a size 3 or 4 hand embroidery needle.
- Trim the backing fabric to within 1/8″ of the design if necessary.
- Remove the tacking stitches.
I hope you enjoyed Tools of the Trade project. Thank you for joining me!