
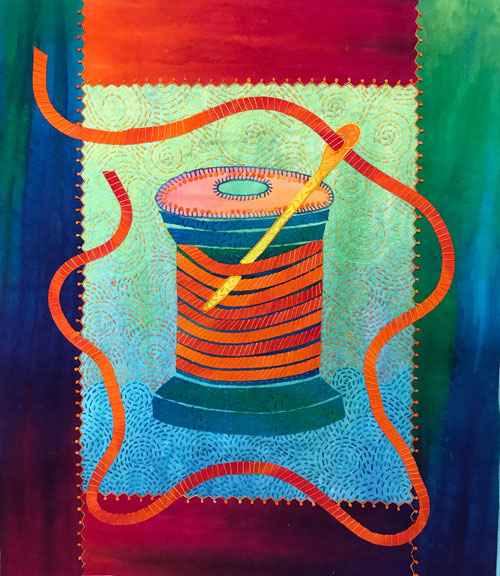
Pretty Spool is a fused art quilt measuring about 11″ x 13″. It is hand embroidered and finished with a pillowcase binding.
This version of Pretty Spool is made with my hand-dyed fabrics but you can use any fabric you like as your canvas (See a Note about Fabric Choices below).
Thank you for joining me!
Step #1

Assemble the following items:
- 8″ x 10″ light blue to green for the background
- 4″ x 4″ blue for spool
- 4″ x 6″ blue/green for spool top edge, top slope, base slope, and base
- 2″ x 5″ light pink/orange for spool top
- 6″ x 6″ red-orange for thread
- 1 1/2″ x 7″ yellow for needle
- 5″ x 8″ red to purple for top and bottom borders
- 5″ x 13″ green to blue to purple for side borders
- 12″ x 13″ backing fabric
- 12″ x 13″ batting (Hobbs Heirloom Premium 80/20 Batting or wool batting recommended)
- 1 yard of fusible web (Pellon Wonder Under paper backed #805, Soft Fuse, or Misty Fuse used with parchment paper are recommended)
- 1 yard of parchment paper (optional but recommended)
- Size 12 pearl cotton embroidery thread
- Size 4 or 5 hand embroidery needle
A Note about Fabric Choices Fabrics with no finish like 100% cotton hand-dyed and batik fabrics work best for raw edge fusing because the color goes through the fabric. (Fused elements from printed fabrics with a white back will show a white edge when cut.) Fabrics with a higher thread count fray less when cut. Wash your fabric to remove any starch or sizing before fusing and do not use fabric softener.
Other items needed:
- Black Sharpie Fine Point marker or lead pencil
- 1 1/2 yard parchment or baking paper (optional but very handy)
- Rotary cutter, mat, and ruler
- Decorative pinking rotary cutter blade or pinking shears (optional but helpful)
- Machine quilting thread (optional)
- Click here to download and print out the Pretty Spool pattern as a Word document. Or click here to download and print out the Pretty Spool pattern as a PDF.
Step #4

- Print out the Pretty Spool pattern by downloading the Pretty Spool pattern as a Word document. Or click here to download and print out the Pretty Spool pattern as a PDF.
- Place the silicone release paper (the paper you’ve just removed from the fabric) or parchment paper on the needle pattern.
- Trace the pattern with the black Sharpie marker or a lead pencil. (Please note that any writing or numbers written on the release paper will also transfer to the fabric.)

- Place the marker or ink side of the release paper onto the glue or fused side of the needle fabric.
- Iron the paper in place for about 4 – 5 seconds with a hot dry iron.

- After the fabric cools, remove the release paper from the fabric.
- The ink from the tracing will transfer to the glue. It’s a miracle!

- Cut out the needle shape just inside the black line with scissors.
- Repeat the steps above to make the other Pretty Spool pattern parts.
Step #5

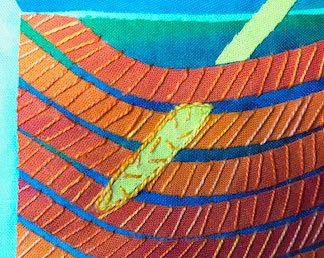
- Cut the thread fabric on the bias (from corner to corner) to form 2 triangles.
- Cut 7 strips measuring a scant 1/4″ wide from the long bias sides of each triangle for a total of 14 bias thread strips.

- Place the spool inside the book of parchment paper. Close the book and fuse-tack into place. Fuse tacking is holding the hot iron in place on the fabric for about 3 seconds.
- Starting at the bottom of the spool body, fuse-tack a thread strip across the spool from side to side. Follow the curve of the bottom edge of the spool as you fuse. Make sure your iron is clean as you will be ironing directly on the fabric.
- Repeat the steps above adding more thread strips to cover the spool body. Space the thread strips about 1/16″ to 1/8″ apart

- After the fabric cools, remove the spool from the parchment paper. Trim the edges to remove the thread strip ends.
Step #6

- Center the background fabric vertically inside the book. Close the book and fuse-tack into place.
- Center the spool about 3″ up from the bottom edge of the background fabric. Close the book and fuse-tack into place.

- Space the remaining spool parts in order about 1/16″ apart above and below the spool. Use the pattern printout or photo as a guide. Close the book and fuse-tack into place.

- Position the needle parts on top of the spool at an angle. Close the book and fuse-tack into place.
Step #7

- Trim 1/4″ from one long side of the top and bottom border fabrics. And trim 1/4″ from the one long side of both side border fabrics using the pinking blade in the rotary cutter or pinking shears.
- Learn how to load the pinking blade on your rotary cutter here: How to Load Decorative Blades onto Rotary Cutter Handles.

- Center and overlap the bottom border strip about 1/4″ onto the bottom edge of the quilt. Close the book and fuse-tack into place.
- Repeat this step, adding the top border strip to the top edge of the quilt.
- Repeat the previous step and add the 2 side borders to the quilt.
Step # 8

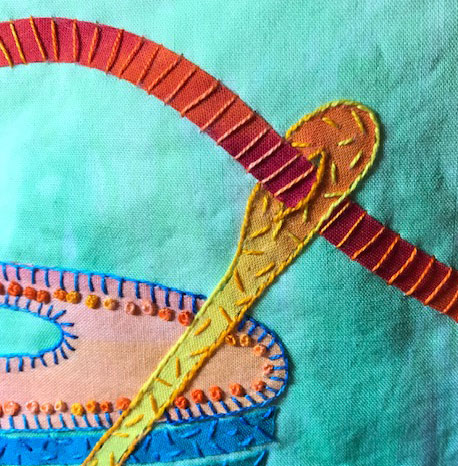
- Place a thread strip entering the eye of the needle.
- Snip the strip to match the angle of the needle opening.
- Fuse-tack the end of the strip in place and continue to fuse and curve the strip up around the top of the spool.
- Make sure your iron is clean as you will be ironing directly on the fabric.

- Place a thread strip on the other side of the eye of the needle.
- Snip to match the angle of the needle fabric.
- Fuse-tack the end of the strip in place and continue to fuse and curve the strip down and around the spool.
- Overlap the strip ends to continue around the design as needed.
Step # 9

- Remove the quilt top from the book.
- Center the non-scrim side of the batting onto the back of the quilt top. (Please note that if the background fabric is applied to the scrim side of the batting and fused into place, the quilt may appear rippled.)
- Place a dry cloth on the quilt top and steam set the top to the batting for about 10 seconds in each spot.
Step #10

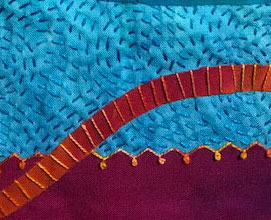
- Stitch straight stitches across the thread on the spool.
- Use a size 12 pearl cotton thread like Oranges and a size 5 hand embroidery needle.
Step #11
- Stitch scattered seed stitches across the lower and upper part of the needle. Use
a size 12 pearl cotton thread like Butter and a size 5 hand embroidery needle. - Stitch stem stitches around the edge of the lower and upper part of the needle.
Step #12
- Stitch scattered seed stitches across all of the spool parts except for the spool top.
- Use a size 12 pearl cotton thread like Degas Blue.
Step #13
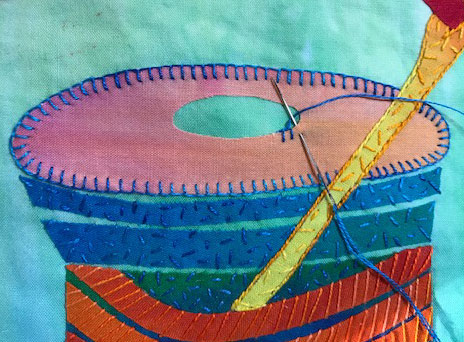
- Stitch blanket stitches around the edges of the spool top.
- Use a size 12 pearl cotton thread like Degas Blue.
Step #14
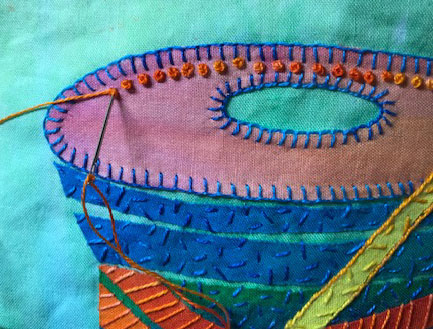
- Stitch French Knots around the outside edges of the spool top next to the blanket stitches.
- Use a size 12 pearl cotton thread like Oranges.
Step #15
- Stitch straight stitches across the thread passing through the needle and surrounding the spool.
- Use a size 12 pearl cotton thread like Oranges.
Step #16

- Stitch running stitches in curves, arcs, and spirals on the background fabric surrounding the spool.
- Use a size 12 pearl cotton in a thread color like Degas Blue for the lower part of the background.
- Use a size 12 pearl cotton in a thread color like Oranges for the center part of the background.
- Use a size 12 pearl cotton in a thread color like Butter for the top part of the background.
Step #17
- Stitch each pinked edge of the border fabrics with a French Fly Stitch or a Fly Stitch.
- Use a size 12 pearl cotton in a thread color like Oranges.
Step #18
- Place the backing fabric on the quilt top and trim the quilt top square.
- Use one of the binding methods on the Tutorial Page. Or refer to the Pillowcase Binding directions and begin with Step #4.
Congratulations on completing your Pretty Spool quilt!
I hope you’ve enjoyed making it. If you’d like to make more artwork, please visit my Tutorial Page for free-form embroidery and fused art quilt projects.