A Free Tutorial

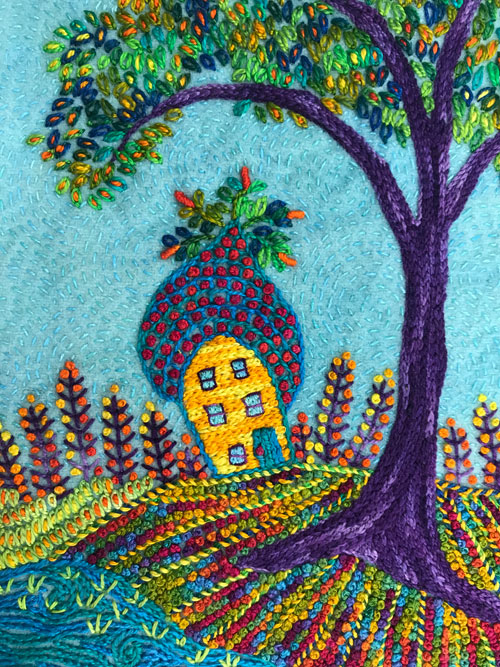
Home in the Country depicts a whimsical house near a spring-fed pond nestled in the rolling hills of the mid-west. It is made with free-form hand embroidery on a single piece of wool fabric and measures about 8 1/2″ x 10 1/2″ when complete.
Step #1- Gather Supplies and Materials
Click here for a Home in the Country Stitch Kit or assemble the following items:
- Light blue medium weight wool measuring 8″ x 10″
- Yellow gold felt measuring 9″ x 11″ for backing
- Sewing thread for transferring the pattern shapes in a color contrasting to the wool
- Size 8 pearl cotton threads: turquoise (Aquamarine), yellow (Butter), red (Red Hots), variegated red violet (Grape Juice), variegated green (Lime Frappe), variegated yellow/orange (Sunrise), green (Peas in a Pod), variegated red/violet/turquoise/green/gold (Asters)
- Size 12 pearl cotton thread: purple (Bordeaux) and light blue (Ocean)
- Size 3 and 5 hand embroidery needles
- Tracing paper for transferring the pattern shapes
- Black fine point marker
- Straight pins
- Download and print out this Word document of the Home in the Country pattern. Or print out this PDF of the Home in the Country pattern.
Step #2- Transferring the Pattern Shapes

- Download and print out this Word document of the Home in the Country pattern. Or print out this PDF of the Home in the Country pattern.
- Complete the directions below. Or follow the directions on the printed Home in the Country pattern to transfer the shapes to the fabric.
- Place tracing paper on the drawing and trace it with a black marker. If you like, copy the dashed lines around the pattern too. It’s not necessary, but they can help you line up the pattern on the fabric.

- Place the fabric vertically so it is 8″ across by 10″ high.
- Position the tracing paper on the wool fabric.
- Pin the tracing paper into place.

- Follow the black marker lines on the tracing and stitch the outline of the shapes in the design using Running Stitches. (Do not stitch the dashed lines around the edge if you have traced them.)
- Stitch with a sewing thread (40 or 50 weight) or a size 12 pearl cotton in a color contrasting to the background fabric and a sewing needle or size 5 embroidery needle.

- After stitching the outline, remove the paper using the tip of a pin to score the paper next to the stitches.
- Gently rip away the paper.
- The Running Stitches define the edges of the design and will be removed after stitching the shapes with permanent stitches.
Step #3- Stitching the House

- Stitch Stem Stitches to outline the house and roof shape following the running stitches.
- Use a size 8 pearl cotton thread (like Aquamarine) and a size 3 hand embroidery needle.
- Remove the running stitches that surround the house shape.

- Stitch Chain Stitches horizontally in close rows across the house shape to fill in the base of the house.
- Use a size 8 pearl cotton thread (like Butter).

- Stitch Blanket Stitches horizontally across the roof shape. Begin at the base of the roof and face the stitches, so the tines of the Blanket Stitches touch the stem stitches that outline the bottom curve of the roof.
- Use a size 8 pearl cotton thread (like Aquamarine).
- Continue to stitch rows of Blanket Stitches up to the tip of the roof making rows of box shapes.

- Stitch a French Knot inside each box made by the blanket stitches on the roof.
- Use a size 8 pearl cotton thread (like Red Hots).

- Stitch Stem Stitches vertically and next to each other on the house to make a door measuring about 3/8” high. Stitch just into the threads that make the house, not into the fabric behind it.
- Use a size 8 pearl cotton thread (like Aquamarine).
- Stitch a French knot on the door to make the doorknob. Use a size 8 pearl cotton thread (like Red Hots).
- Stitch Stem Stitches vertically and next to each other on the house to make 5 windows measuring about 1/4″ high. Use a size 12 thread (like Ocean) and a size 5 hand embroidery needle.
- Stitch Straight Stitches around the outside of each window and across each window to create window panes. Use a size 12 thread (like Bordeaux).
Step #4- Stitching the Tree

- Stitch Stem Stitches to outline the tree trunk shape following the Running Stitches.
- Use a size 8 pearl cotton thread (like Grape Juice) and a size 3 hand embroidery needle.
- Remove the running stitches.

- Stitch Chain Stitches vertically in close rows inside the tree trunk shape to fill it in using that same color of thread.
Step #5- Stitching the Fields

- Stitch Chain Stitches to outline the top of the center field shape following the running stitches.
- Use a size 8 pearl cotton thread (like Lime Frappe) and a size 3 hand embroidery needle.
- Stitch to within 1/4” of the edge of the fabric on the right.

- Stitch lines of Chain Stitches that taper from the top edge of the center field shape down to the running stitches marking the bottom edge of the field using that same thread.
- Stitch to within 1/4” of the edge of the fabric on the right.

- Stitch a row of Long and Short Stitches across the top right side of the center field to make the right field.
- Use a size 8 thread (like Butter).
- Stitch to within 1/4” of the edge of the fabric on the right.

- Continue to add Long and Short Stitches across the right field up to the running stitches that mark the top of the field.
- Use a variegated size 8 thread (like Sunrise).
- Stitch to within 1/4” of the edge of the fabric on the right.
- Remove the running stitches.

- Stitch rows of Lazy Daisy Stitches vertically to fill in the left field.
- Use a size 8 thread (like Peas in a Pod).
- Stitch to within 1/4” of the edge of the fabric on the left.
- Remove the running stitches.
Step #6- Stitching the Water

- Stitch Stem Stitches following the curvy line of running stitches below the fields to make the edge of the water.
- Use a size 12 pearl cotton thread (like Aquamarine) and a size 5 hand embroidery needle.
- Stitch to within 1/4” of the edges of the fabric.
- Remove the running stitches.

- Stitch Stem Stitches in curvy horizontal lines across the fabric to make waves of water using that same thread.
- Stitch spirals of stem stitches to create eddies of water.
- Stitch to within 1/4” of the edges of the fabric.

- Stitch Stem Stitches in curves, spirals, and waves down to within 1/4” of the bottom edge of the fabric to fill in the water shape.
Step #7- Fill in the Center Field

- Whip Stitch a thread around each line of chain stitches that make the furrow lines on the center field.
- Use a size 8 pearl cotton (like Butter) and a size 3 hand embroidery needle.

- Stitch French Knots closely together inside each furrow on the field.
- Use a size 8 pearl cotton thread (like Asters).
- Stitch to within 1/4” of the edges of the fabric.
Step #8- Stitch the Treetop

- Stitch Lazy Daisy Stitches around the tree trunk to form an outline for the treetop. Make soft curves and dips to suggest the outer edge of leaves surrounding the tree trunk.
- Use a size 8 pearl cotton variegated thread (like Lime Frappe) and a size 3 hand embroidery needle.

- Stitch the Lazy Daisy stitches across the interior of the treetop outline.
- Place the stitches closely together and at random angles.

- Fill in the entire treetop shape with Lazy Daisy stitches.
Step #9- Stitch the Sun

- Stitch Blanket Stitches with the points facing out and following the running stitches that mark the sun shape.
- Use a size 8 pearl cotton thread (like Sunrise) and a size 3 hand embroidery needle.
- Stitch to within 1/4″ of the fabric edges
- Remove the running stitches.

- Stitch a row of Blanket Stitches following the curve of the first row of Blanket Stitches, so the tines of the stitches touch the previous row. Use that same thread.
- Continue to add rows of Blanket Stitches with the tines of the Blanket Stitches touching the previous rows of Blanket Stitches to make rows of box shapes.

- Stitch a French Knot inside each box made by the Blanket Stitches on the sun.
- Alternate the thread colors used for each row. Use size 8 pearl cotton threads (like Aquamarine and Sunrise).
Step #10- Stitch the Tree Line and the Rooftop Garden

- Stitch the Fern Stitch vertically from the sky down to the horizon line to make a tree.
- Use a size 8 pearl cotton thread (like Grape Juice) and a size 3 hand embroidery needle.
- Add more trees across the horizon to create a tree line. Stitch to within 1/4″ of the edges of the fabric.

- Stitch Stem Stitches from the rooftop of the house to create stems for the flowers.
- Use a size 8 pearl cotton thread (like Lime Frappe).
- Stitch Lazy Daisy Stitches on either side of each stem. Using that same thread to make leaves.

- Stitch a Bullion Knot from the tip of each stem to make a flower.
- Use a size 8 pearl cotton thread (like Sunrise).
Step #11- Stitch Details on the Field, Tree Line, Water, and Tree Top

- Stitch a Straight Stitch inside each loop of the Lazy Daisy stitches that form the left field.
- Use a size 8 pearl cotton thread (like Sunrise) and a size 3 hand embroidery needle.

- Stitch French Knots inside the branches of the trees on the tree line.
- Use a size 8 pearl cotton thread (like Sunrise).

- Stitch Straight Stitches across the top edge of the water to form grasses.
- Use a size 8 pearl cotton thread (like Peas in a Pod).

- Stitch a Straight Stitch inside each loop of the Lazy Daisy stitches that form the leaves on the tree top.
- Use a size 8 pearl cotton thread (like Sunrise).
Step #12- Stitch the Sky and Edging
- Stitch Running Stitches on the sky fabric in spirals and curves. Use a size 12 thread (like Ocean) and a size 5 hand embroidery needle.
- Stitch to within 1/4” of the fabric edges.

- Center the design on the background fabric and pin it into place.
- Stitch the design to the background using sewing thread and long Running Stitches.

- Stitch Blanket Stitches around the edge of the design attaching it to the backing fabric.
- Use a size 8 pearl cotton thread (like Asters).

- Stitch French Knots inside each tine of the Blanket Stitches.
- Use a size 8 pearl cotton thread (like Asters).
Hurray! You’ve finished your Home in the Country project. Thank you for joining me. If you’d like to see more free stitch-alongs please visit our Tutorials Page.