Pretty Spool: Border and Beginning to Stitch

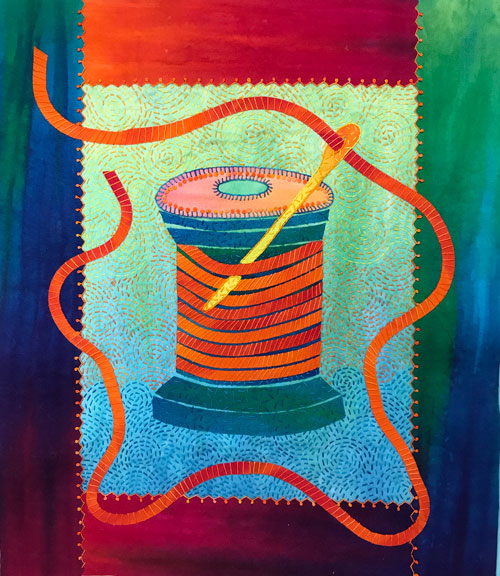
When we last left our Pretty Spool, you had just fused the needle shapes into place. Yippee! Now the center of the design is complete.

Next, we are adding borders and steam setting the quilt top to the batting.

Once it is steam set, the quilt top is ready for hand embroidery. This quilt has very simple stitching cause, let’s face it, I need simple right now.

Please note: Directions are first given here on the blog, then added to the Pretty Spool Tutorial page as we go.

Step #7

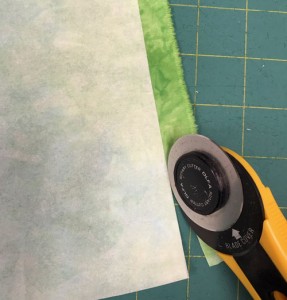
  • Trim 1/4″ from one long side of the top and bottom border fabrics. And trim 1/4″ from the one long side of both side border fabrics using the pinking blade in the rotary cutter or pinking shears.
  • Learn how to load the pinking blade on your rotary cutter here: How to Load Decorative Blades onto Rotary Cutter Handles.
  • Center and overlap the bottom border strip about 1/4″ onto the bottom edge of the quilt. Close the book and fuse-tack into place.
  • Repeat this step, adding the top border strip to the top edge of the quilt.
  • Repeat the previous step and add the 2 side borders to the quilt.


Step # 8

  • Place a thread strip entering the eye of the needle.
  • Snip the strip to match the angle of the needle opening.
  • Fuse-tack the end of the strip in place and continue to fuse and curve the strip up around the top of the spool.
  • Make sure your iron is clean as you will be ironing directly on the fabric.

  • Place a thread strip on the other side of the eye of the needle.
  • Snip to match the angle of the needle fabric.
  • Fuse-tack the end of the strip in place and continue to fuse and curve the strip down and around the spool.
  • Overlap the strip ends to continue around the design as needed.

Step # 9

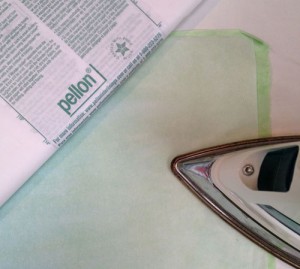
  • Remove the quilt top from the book.
  • Center the non-scrim side of the batting onto the back of the quilt top. (Please note that if the background fabric is applied to the scrim side of the batting and fused into place, the quilt may appear rippled.)
  • Place a dry cloth on the quilt top and steam set the top to the batting for about 10 seconds in each spot.

Step #10

  • Stitch straight stitches across the thread on the spool.
  • Use a size 12 pearl cotton thread like Oranges and a size 5 hand embroidery needle.

Pretty Spool: Pattern Shapes

Pretty Spool has very few pattern parts. But there is one tricky maneuver you’ll have to master as we create the design. I don’t want to scare you but think of it as walking and chewing gum at the same time.

It’s called “bias fusing” and we’ll use it to make the spool and that wavey thread coming out of the needle. But first, we need the parts.

Please note: Directions are first given here on the blog, then added to the Pretty Spool Tutorial page as we go.

Step #4

  • Print out the Pretty Spool pattern by downloading the Pretty Spool pattern as a Word Document. Or click here to download and print out the Pretty Spool pattern as a PDF.
  • Place the silicone release paper (the paper you’ve just removed from the fabric) or parchment paper on the needle pattern.
  • Trace the pattern with the black Sharpie marker or a lead pencil. (Please note that any writing or numbers written on the release paper will also transfer to the fabric.)
  • Place the marker or ink side of the release paper onto the glue or fused side of the needle fabric.
  • Iron the paper in place for about 4 – 5 seconds with a hot dry iron.
  • After the fabric cools, remove the release paper from the fabric.
  • The ink from the tracing will transfer to the glue. It’s a miracle!
  • Cut out the needle shape just inside the black line with scissors.
  • Repeat the steps above to make the other Pretty Spool pattern parts.

Step #5

  • Cut the thread fabric on the bias (from corner to corner) to form 2 triangles.
  • Cut 7 strips measuring a scant 1/4″ wide from the long bias sides of each triangle for a total of 14 bias thread strips.
  • Place the spool inside the book of parchment paper. Close the book and fuse-tack into place. Fuse tacking is holding the hot iron in place on the fabric for about 3 seconds.
  • Starting at the bottom of the spool body, fuse-tack a thread strip across the spool from side to side. Follow the curve of the bottom edge of the spool as you fuse. Make sure your iron is clean as you will be ironing directly on the fabric.
  • Repeat the steps above adding more thread strips to cover the spool body. Space the thread strips about 1/16″ to 1/8″ apart
  • After the fabric cools, remove the spool from the parchment paper.  Trim the edges to remove the thread strip ends.

Step #6

  • Center the background fabric vertically inside the book. Close the book and fuse-tack into place.
  • Center the spool about 3″ up from the bottom edge of the background fabric. Close the book and fuse-tack into place.
  • Space the remaining spool parts in order about 1/16″ apart above and below the spool. Use the pattern printout or photo as a guide. Close the book and fuse-tack into place.
  • Position the needle parts on top of the spool at an angle. Close the book and fuse-tack into place.

Pretty Spool: Fabric Prep

Ready to start the Pretty Spool Project?

Good! I’m so happy you are adding another spool of thread to your vast collection.

Here you see the fabrics I used to create my Pretty Spool quilt top. These are my hand-dyed Rainbow Rich and Rainbow Medium fabrics and they contain all the colors needed to make the design. They are available pre-fused (by my little hands) as a kit. See the Pretty Spool Kit here.

You can also use your own fabrics. You’ll find a list of what you need on the Pretty Spool Tutorial page. As we make the project, I’ll be adding the directions to the Tutorial page. That way you can join at any time.

So let’s get started!

Please note: if you’re not using fabrics from my Pretty Spool Stitch Kit, be sure to wash your fabrics before starting Step #2. Commerical fabrics may have sizing or starch on the fabric that interferes with the fusible web bonding process. Washing the fabric removes the sizing.

Step #2 Fusing the Fabric

homesweetsal2
  • If you’ve purchased the Pretty Spool Kit you are so lucky! Please skip to Step #3.
  • Cut the fusible web slightly smaller than the fabric. (See suggested fusible webs in the materials list.)
  • Place the fabric on the ironing surface then put the rough side or glue side of the paper on top. (If using Misty Fuse, place the web on the fabric and cover the web with parchment paper.)
  • Transfer the fusible web to the fabric using a hot (cotton setting), dry iron.
  • Glide the iron across the paper from edge to edge for about 5 seconds in each spot. Go to the edge and beyond!

Step #3 Silicone Release Paper

homesweetsal1
  • Let the fabric and web cool 5 – 20 minutes before removing the paper. 
  • Before removing the paper from the fabrics, separate the fabric from the paper at one corner. Trim any non-fused fabric off by following the paper’s edge. Peel the paper off without ripping it. Save the paper for later use in pattern transfer.
  • The paper you’ve just removed is called silicone release paper. It has a silicone coating and will be used to transfer pattern shapes to the fused fabrics.
  • Parchment (or baking) paper is similar to release paper and can be used in place of release paper. 
  • Either side of silicone release paper or most parchment papers is usable for fusing. Please note, however, that on some versions of fusible web only the “shiny” side of the paper is usable as release paper.