Bridge House Process #3

I’m happy to say that I have a vague idea of what I’m doing.

The elements of the bridge house composition are first stitch-tacked into place. Or at least the bridge part is. The house and water (that blue fabric on the side) will be attached later.

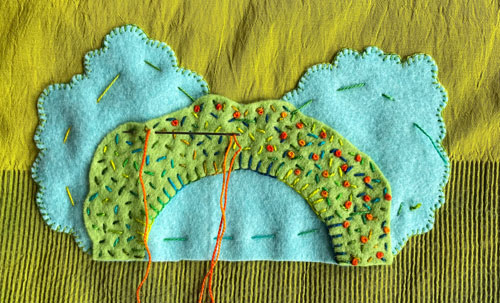
Blanket stitches made with a size 12 Sprouts thread anchor the clouds to the green silk background fabric. Then I fill out the bridge with scattered seed stitches using a size 8 Lime Frappe thread and French knots using an Oranges size 8. This “bridge” has a garden of plants growing on it. Or so I’m told.

Now the house shape is stitched to the top of the bridge with that same size 12 Sprouts thread used before. The water fabric, a blue felt, fits under the bridge shape. The water is stitched with a size 12 Aquamarine thread and rows of wavy stem stitches. What a great place to live!

Bridge House Process #2

Improvising a design can be scary. It can also be a cheap thrill!

After slicing this circular fabric in half to create an improvised embroidery, I felt a surge of fearlessness and bravery.

Or maybe it was that second cup of coffee.

Before the coffee jolt wears off, I trim the blue felt on each step-out left over from my Playful Free-Form Embroidery book. Somehow these two elements will fit together to make a design.

And, after more trimming, this is what I come up with. Do you like the background fabric?

There is a lot of fabric hiding in boxes in my house. And once I saw this green silk fabric I knew it would work for the background. The contrast of the lime green with the light blue felt sets off the embroideries. The green color also repeats in the “bridge” fabric and the house ornamentation. Yep, that’s the right color.

Next up, attaching the embroidered pieces to the silk.

Bridge House Process #1

Ever have a vague idea but no plan for how to execute that vague idea? That’s me! Here you see step-outs from my book Playful Free-Form Stitching. I want to combine them somehow to create a new embroidery (vague idea) but have no idea where I’m going (no plan).

So I put on my thinking cap, as my 3rd-grade teacher said, and try to visualize a composition. After discarding all of the houses but one, I decide to join it to the circular shape. You may recognize this as the background fabric and brush handle from the Painting the Town project.

After auditioning different arrangements of the house on the brush handle, I give up. Instead, I cut the confounded circle in half. I’ll use the top arc and the orange house and quietly slip the brush handle part into a secret drawer. There, I feel much better and may even have a plan.

Stay tuned!