

Queen Poppy #2 by Laura Wasilowski

Queen Poppy Kit
- 11″ x 14″ green batik for the background
- 2 1/2 ” x 5″ turquoise for stem
- 6″ x 6″ orange to red for bud parts
- 2″ x 4″ turquoise for bud crown
- 2″ x 1 1/2″ yellow for bud top
- 2″ x 2″ purple for leaflets
- 4″ x 8″ red to purple for left and bottom leaf centers
- 5″ x 8″ green for left and bottom leaves
- 1″ x 9″ yellow for dots
- 1 yard of fusible web (Pellon Wonder Under paper backed #805, Soft Fuse, or Misty Fuse (used with parchment paper) are recommended. Please note that some other brands of fusible web are tacky and will be difficult to hand embroider.)
- 11″ x 14″ batting (Hobbs Heirloom Premium 80/20 Batting or wool batting recommended)
- 11″ x 14″ backing fabric
- Size 12 like: Southwest Rainbow and Sunrise
- Size 8 pearl cotton threads like: Butter and Aquamarine
- Size 3 and 5 hand embroidery needles
- Black Sharpie Fine Point marker or lead pencil
- 1/2 yard parchment or baking paper (optional)
- Machine quilting thread
- Download and print out the Queen Poppy pattern as a Word document. Or download and print out the Queen Poppy pattern as a PDF.
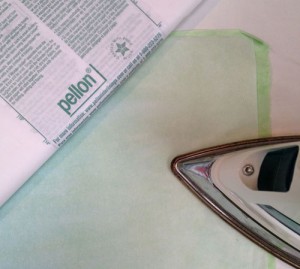
- Cut the fusible web slightly smaller than each fabric for the top of the quilt. Do not cut fusible web for the except the backing fabric. (See suggested fusible webs in the materials list.)
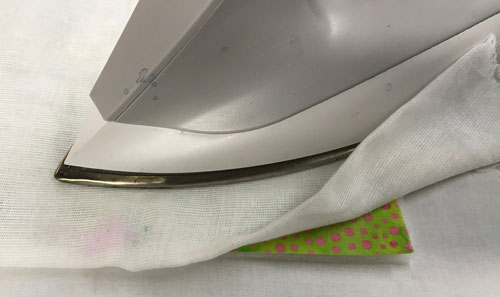
- Place the fabric on the ironing surface then put the rough side or glue side of the paper on top. (If using Misty Fuse, place the web on the fabric and cover the web with parchment paper.)
- Transfer the fusible web to the fabric using a hot (cotton setting), dry iron.
- Glide the iron across the paper from edge to edge for about 5 seconds in each spot. Go to the edge and beyond!
- Let the fabric and web cool 5 – 20 minutes before removing the paper. Do not remove the paper from the background fabric.
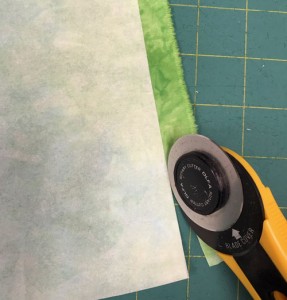
- Before removing the paper from the other fabrics, separate the fabric from the paper at one corner. Then trim any non-fused fabric off by following the paper’s edge. Peel the paper off without ripping it. Save the paper.
- The paper you’ve just removed is called silicone release paper. It has a silicone coating and will be used to transfer pattern shapes to the fused fabrics.
- Parchment (or baking) paper is similar to release paper and can be used in place of release paper.
- Either side of silicone release paper or most parchment papers are usable for fusing. Please note, however, that on some versions of fusible web only the “shiny” side of the paper is usable as release paper.

- Print out the Queen Poppy pattern by downloading the Queen Poppy pattern as a Word document or the Queen Poppy pattern as a PDF.
- Place the silicone release paper (the paper you’ve just removed from the fabric) or parchment paper on the stem pattern.
- Trace the pattern with the black Sharpie marker or a lead pencil. (Please note that any writing or numbers written on the release paper will also transfer to the fabric.)

- Place the marker or ink side of the release paper onto the glue or fused side of the stem fabric.
- Iron the paper in place for 5 seconds with a hot iron.
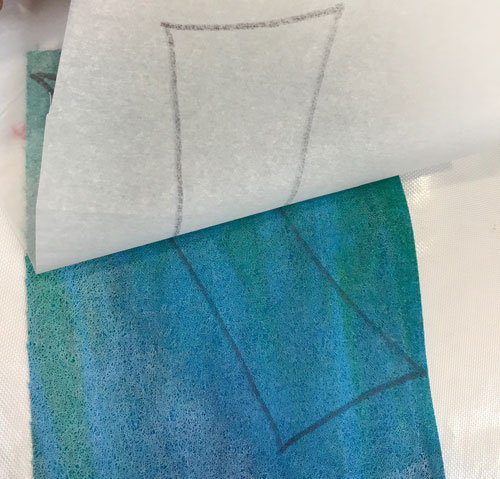
- After the fabric cools, remove the release paper from the fabric.
- The ink from the tracing will transfer to the glue. It’s a miracle!

- Cut out the stem shape just inside the black line with scissors.

- Repeat the steps above to make the 5 bud parts, bud crown, bud top, 2 leaflets, left and bottom leaves, and leaf and bottom leaf centers.
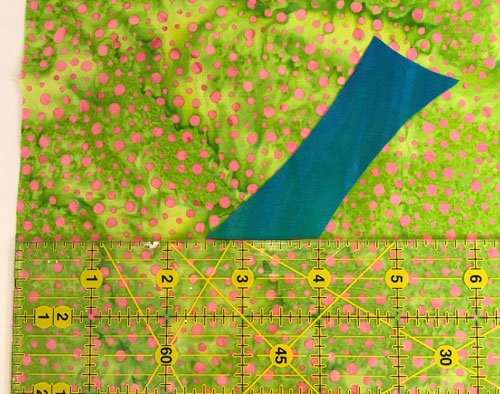
- Place the background fabric vertically on the ironing surface.
- Place the pointy end of the stem about 2 1/2″ in from the left edge of the background fabric and 5″ up from the bottom edge of the background fabric. The stem will be at about a 45 degree angle across the fabric.
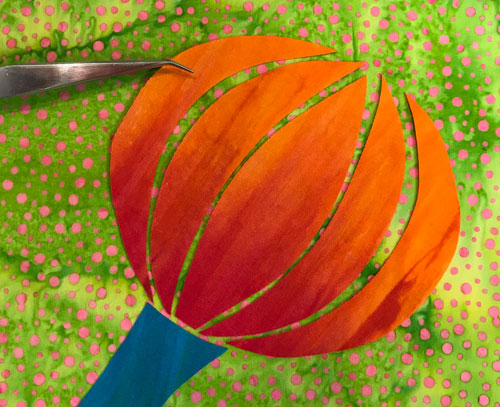
- Place the flat end of bud part #3 (the center shape) on top of the stem at about a 45 degree angle across the background fabric. Leave about a 1/8″ of the background fabric showing between the 2 elements.
- Place the 4 remaining bud parts in order on either side of the bud center. Leave 1/8″ to 1/4″ of the background fabric showing between the elements.
- Cover the bud and stem shapes with silicone release paper or parchment paper to protect the fabric from your dirty iron.
- Fuse-tack the stem and bud parts into place. (Fuse-tacking is applying the hot iron to the fabric for only 4 seconds.)
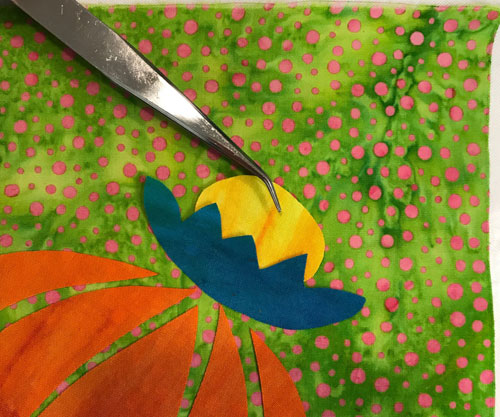
- Place the bud crown on top of the bud parts. Leave 1/8″ to 1/4″ of the background fabric showing between the elements.
- Slip the bud top just under the pointy side of the bud crown. Fuse-tack into place.
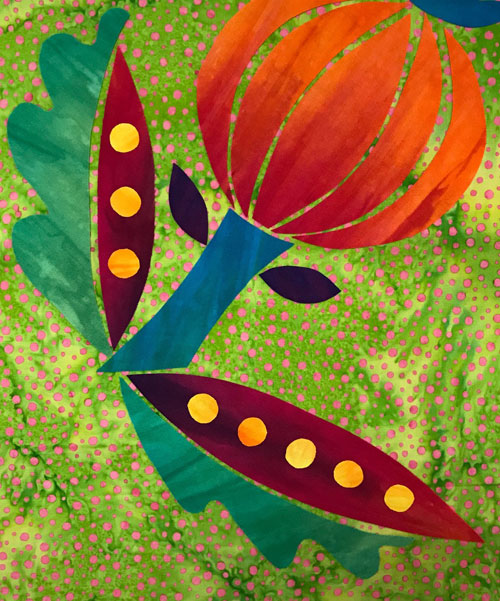
- Place the tip of the left leaf center vertically and about 1/2″ up from left side of the stem tip. Leave 1/8″ to 1/4″ of the background fabric showing between the elements.
- Place the left leaf on the outside edge of the left leaf center. Leave 1/8″ to 1/4″ of the background fabric showing between the elements.
- Place the tip of the bottom leaf center horizontally about 1/2″ to the right of the stem tip. Leave 1/8″ to 1/4″ of the background fabric showing between the elements.
- Place the bottom leaf on the outside edge the bottom leaf center. Leave 1/8″ to 1/4″ of the background fabric showing between the elements.
- Fuse-tack the leaf shapes into place.
- Place the 2 leaflets on either side of the top of the stem. Fuse-tack into place.
- Free-cut 8 dots measuring about 1/2″ across from the dot fabric.
- Place 3 dots on the left leaf center and 5 dots on the bottom leaf center. Fuse-tack into place.
-
-
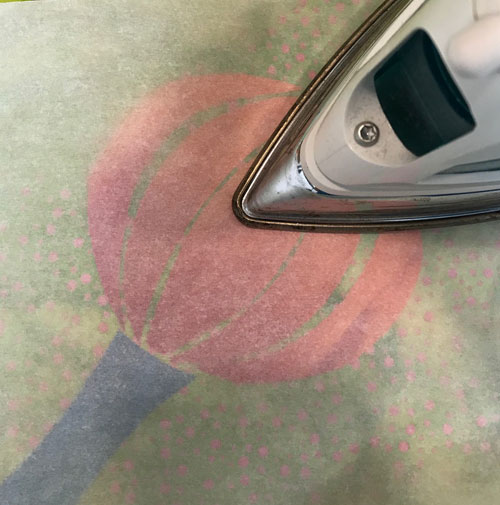
- Remove the release paper from the background fabric.
-
- Center the glue side of the quilt top onto the non-scrim side of the batting. Scrim is a non-woven fiber applied to some batts. If the background fabric is applied to the scrim side of the batting and fused into place, the quilt may appear rippled. (See How to Determine the Scrim Side of Batting.)
- Place a dry cloth on the quilt top and steam set the top to the batting for about 10 seconds in each spot.
-
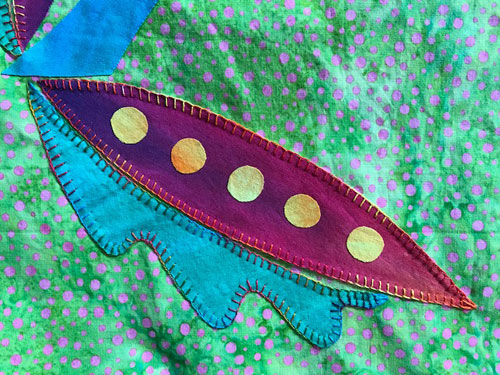
- Stitch a Blanket Stitch around the left leaf and bottom leaf. Use a size 12 pearl cotton thread (like Southwest Rainbow) and a size 5 hand embroidery needle.
- Stitch a Blanket Stitch around the edges of the left leaf center and bottom leaf center. Use a size 12 pearl cotton thread (like Sunrise).
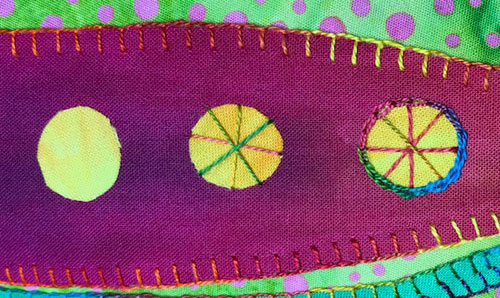
- Stitch 6 Straight Stitches across the dots on both leaves. Use a size 12 pearl cotton thread (like Southwest Rainbow).
- Use that same thread and stitch a Chain Stitch around each dot. Stitch on the leaf fabric and right next to the edge of the dot to outline the dot.
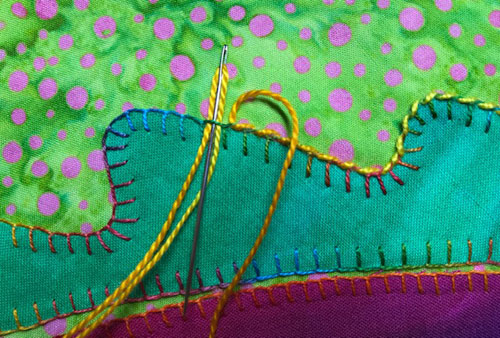
- Whip Stitch the Blanket Stitches around each edge of the left leaf and bottom leaf. Use a size 8 pearl cotton thread (like Butter).
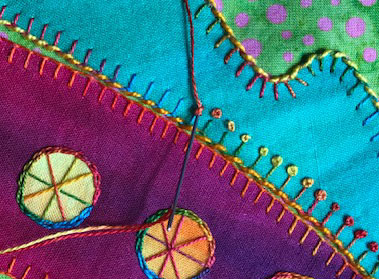
- Stitch French Knots on the tip of the Blanket Stitches on the left leaf and bottom leaf. Add the French Knots only on the inside arc of the leaves. Leave the outside wavy edges of the leaves free of knots. Use a size 12 pearl cotton thread (like Southwest Rainbow).
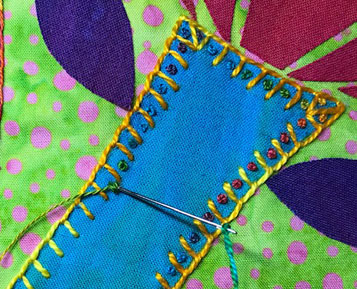
- Stitch a Blanket Stitch around the edges of the poppy stem. Use a size 8 pearl cotton thread (like Butter) and a size 3 embroidery needle.
- Stitch French Knots inside each tine or gap in the Blanket Stitch. Use a size 12 pearl cotton thread (like Southwest Rainbow) and a size 5 embroidery needle.

- Stitch the Fern Stitch from the tip to the base of the 2 leaflets off the stem. Stitch down the center and span the width of the leaflets. Use a size 12 pearl cotton thread (like Sunrise).
- Stitch a Chain Stitch around each leaftlet. Stitch on the background fabric and right next to the edge of the leaflet to outline the shape. Use a size 12 pearl cotton thread (like Southwest Rainbow).

- Stitch Blanket Stitches around each edge of the shapes that make up the poppy bulb. Use a size 8 pearl cotton thread (like Aquamarine) and a size 3 hand embroidery needle.

- Stitch Fern Stitches from each tip of the bud crown down to the base of the crown. Use a size 12 pearl cotton thread (like Southwest Rainbow) and a size 5 hand embroidery needle.

- Stitch a Chain Stitch around the edges of the bud crown. Stitch on the background fabric and right next to the edge of the crown to outline the shape. Use a size 12 pearl cotton thread (like Sunrise).

- Stitch a Blanket Stitch around each of the bud top. Use a size 8 pearl cotton thread (like Aquamarine).

- Trim the quilt top square.
- Use one of the binding methods on the Tutorial Page. Or refer to the Pillowcase Binding directions and begin with Step #4.

- Machine quilt the quilt using a titanium or chrome coated embroidery needle and free-motion stitching. (Please note that this step is optional. It is not necessary to machine quilt the piece.)
- To add free-motion stitching, drop the feed dogs on the machine and guide the needle around all the organic shapes in the design while moving the quilt.
- Add a hanging sleeve across the top part of the quilt if desired.
- You did it! Please send me a photo of your artwork. I’d love to see it. Send to: laura at artfabrik.com