Complete Your Nut House: Frieda’s Nut House #6

friedasnuthouse
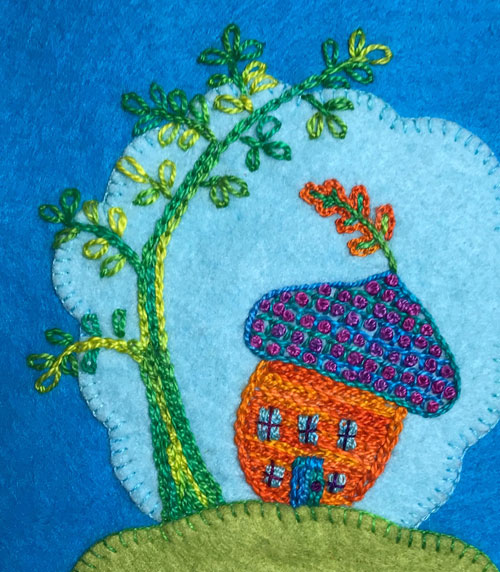
We are finishing up Frieda’s Nut House Stitch Along and are about to move in and rearrange furniture.

As you complete your little embroidery, I hope to see images of your final designs. Email a photo to me at laura@artfabrik.com

Note: If you’re just joining us, see a list of materials on Frieda’s Nut House Stitch-Along Tutorial page and complete Steps 1 – 15.
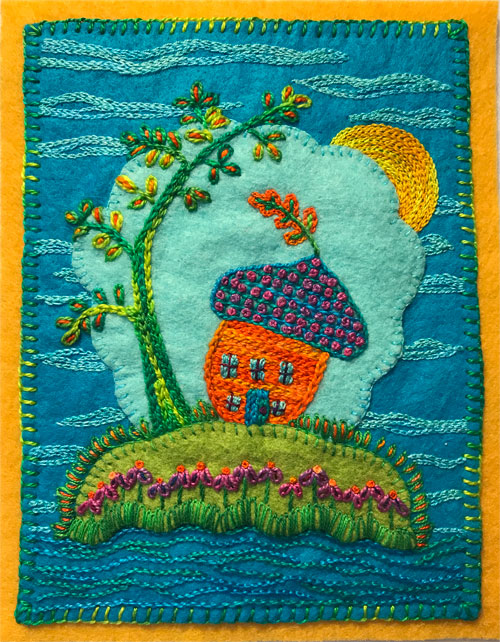
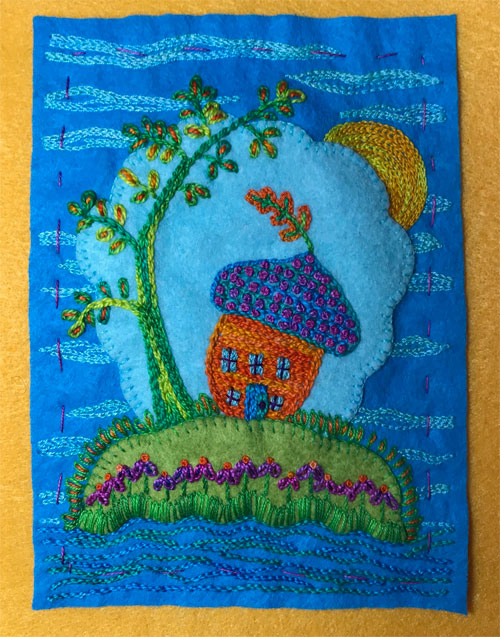


Step #16

friedasnuthouse20

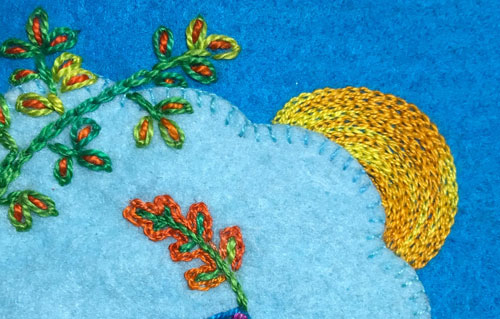
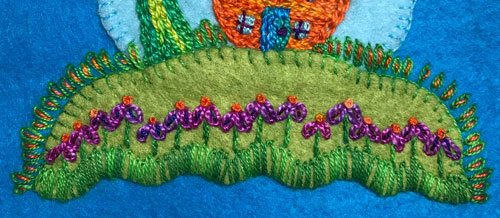
  • Stitch Chain Stitches in a large arc across on the background fabric from the upper edges of the right side of the sky to make the sun. Stitch the arc to measure about 1 1/2″ in diameter making the outline of the sun. Use a size 12 thread (like Butter) and a size 5 or 7 embroidery needle.
  • Continue to stitch Chain Stitches in rows right next to each other following the same arc to fill in the sun shape.

Step #17

friedasnuthouse21

  • Stitch wavy rows of Chain Stitches horizontally across the background fabric to make clouds. Use a size 12 thread (like Ocean).
  • Stitch the clouds to within 1/4″ of the sides and top edges of the fabric. 

Step #18

friedasnuthouse22

  • Carefully trim the background  fabric square if necessary leaving a scant 1/4″ of fabric around the edges for stitching the design to the backing fabric.
  • Center and pin the embroidery to the backing fabric.
  • Stitch-tack the embroidery onto the backing fabric.

Step #19

friedasnuthouse

  • Stitch Blanket Stitches around the edge of the background fabric attaching it to the backing fabric. Use a size 8 pearl cotton thread (like Lettuce) and a size 3 embroidery needle.
  • Trim the edges of the backing fabric to within 1/4″ of the background fabric.
  • Label your embroidery with your name and date.
  • Congratulations on making your nut house!

Stitch Your Garden: Frieda’s Nut House #5

zinnia1Having just planted over 200 zinnias in my garden, I have to say, stitching a garden is much easier.

Time to plant (stitch) our Frieda’s Nut House garden.

Note: If you’re just joining us, see a list of materials on Frieda’s Nut House Stitch-Along Tutorial page and complete Steps 1 – 11. 

Step #12

friedasnuthouse17

  • Stitch Lazy Daisy Stitches vertically across the top of the ground to form leaves. Use a size 12 thread (like Emerald Isle) and a size 5 or 7 embroidery needle.
  • Stitch Stem Stitches vertically from the top of the row of Lazy Daisy stitches on the bottom edge of the ground to form flower stems. Use the same color thread as above.

Step #13

friedasnuthouse18

  • Stitch Straight Stitches inside each Lazy Daisy leaf on the top of the ground. Use a size 12 pearl cotton thread (like Oranges).
  • Stitch 2 Lazy Daisy Stitches at an angle on the tip of each flower stem to form flower petals. Use a size 8 pearl cotton thread (like Prinky Phlox) and a size 3 embroidery needle. 
  • Stitch a French Knot on top of each flower. Use a size 12 pearl cotton thread (like Oranges). 
  • Stitch Straight Stitches inside each flower petal. Use a size 12 thread (like Violets).

Step #14

friedasnuthouse19

  • Stitch Stem Stitches horizontally and in curvy lines across the bottom edge of the fabric to make waves of water. Use a size 8 pearl cotton thread (like Aquamarine). 
  • Stitch the waves to within 1/4″ of the sides and bottom edges of the fabric. 

Stitching a Tree: Frieda’s Nut House #4

friedasnuthouse

They say the nut doesn’t fall far from the tree.

What does this have to do with our Frieda’s Nut House design?

Nothing.

But we are about to add a tree next to the nut house. There is no pattern for the tree. It is stitched free-form as are the windows, a door, and little leaf sprouting from the tip of the nut house.

Note: If you’re just joining us, see a list of materials on Frieda’s Nut House Stitch-Along Tutorial page and complete Steps 1 – 7. 

Step #8

friedasnuthouse12

  • Stitch Stem Stitches vertically and next to each other on the nut house to make a door measuring about 1/ 2” high. Use a size 8 pearl cotton thread (like Aquamarine) and a size 3 embroidery needle.
  • Stitch a French knot on the door to make the doorknob. Use a size 12 thread (like Violets) and a size 5 or 7 embroidery needle.
  • Stitch Straight Stitches vertically and next to each other on the house to make 5 windows. Use a size 12 thread (like Ocean).
  • Stitch Straight Stitches to make a plus sign shape on the windows to create window panes. Use a size 12 thread (like Violets).

Step #9

friedasnuthouse13

  • Stitch Stem Stitches vertically from the tip of the nut house roof to make the stem of a leaf  Use a size 12 thread (like Emerald Isle).
  • Using that same color of thread, stitch Stem Stitches from the stem out at an angle to create 6 veins for the leaf.
  • Stitch Chain Stitches around the stem and veins to make the leaf shape. Use a size 12 pearl cotton thread (like Oranges).

Step #10

friedasnuthouse15

  • Stitch Chain Stitches in an arc from on the left of the nut house from the ground  up to the top of the sky to make the tree trunk. Use a size 8 pearl cotton thread (like Lettuce).
  • Using that same thread, stitch a line of Stem Stitches measuring about 1/4″ long from the tip of the Chain Stitches to create a branch.
  • Stitch Lazy Daisy Stitches off the Stem Stitches to create leaves.
  • Add 4 more sets of branches and leaves down the length of the tree top. 
  • Stitch Chain Stitches from the last tree top branch down to the ground next to the first row of Chain Stitches.
  • Continue to add branches and leaves to the tree trunk. Make thicker, lower branches with Chain Stitches.
  • Add more rows of Chain Stitches to make the base of the tree trunk wider.  

Step # 11

friedasnuthouse16

  • Stitch Straight Stitches inside each Lazy Daisy leaf. Use a size 8 pearl cotton thread (like Oranges).